

Yep, you heard right. The best craft supplies are the ones that don’t cost you anything. I’m filling you in on some of my favorite (legal!) ways to get free craft supplies, so stick around for some great tips and tricks!

#1 Ask a local upholsterer for scraps
Upholsterers always have scrap fabric. While some of their clients want the scraps back, many do not. I’ve been known to make brownies in exchange for a box of fabric scraps.


Upholstery fabric is usually very high-quality, and thick enough for tote bags and other rugged projects. It makes absolutely epic hats!


I’ve made tote bags, wall hangings, pillows, shorts, beach hats, wallets, fabric flowers, small rugs, half-window curtains, and even an awesome coat out of upholstery scraps that I was given. And usually the scraps are plenty large enough for projects like that.


So ask around with your local upholsterers and see if they’ll fill a box with scraps. Take some brownies with you.
#2 Use outright garbage to begin with


Wait, call it “upcycled materials”, not garbage. Most of it came from just living my life and wearing out my guitar strings. Some came from friends and family, or thrift stores.


Yes folks, I’ve used old vinyl records, clock parts, worn-out guitar strings, broken windshield glass, stripped electrical wire, tin can lids, vinyl placemats, mesh produce bags, worn-out T-shirts, broken jewelry, expired sewing thread, and much more. Garbage is only garbage if you actually throw it away.


If it looks great when you’re finished, does it really matter that it used to be electrical wire?


I’m going to stop short of suggesting that you go dumpster-diving (it may even be illegal in your area). But if you did, I wouldn’t judge. ✌️ People who snatch broken windshield glass from construction sites shouldn’t throw stones.
I’m not even going to mention all of the treasures that people leave at landfills. Some transfer stations have an area set aside to put items that are in good condition, just not needed by their owners anymore. If you were to visit my studio, you would absolutely be able to spot things that somebody has thrown out. Just make sure you aren’t breaking rules or being unsafe when you round up treasures from unconventional places.
#3 Get free craft supplies from nature
Working with vines, fresh and dried flowers, leaves, wood, sand, stones, ashes, seashells, feathers, etc is another great way to get free craft supplies.


You do need to get permission from whomever owns the land, and watch out for things like poison ivy and the odd bee or two. (No hate; I am an odd B as well.)


You also want to make sure that you aren’t taking everything. For example, nobody will miss a few fallen leaves. But if you cut too many vines off of a plant, you’ll kill it. So be aware of the environment and considerate of nature. But “considerate” doesn’t mean hands-off, in my opinion. Some of my favorite projects have started out as natural materials, like these DIY resin jewelry pieces.


Check out my Forest Fairy costume, which is made largely out of vines and leaves.
#4 Don’t forget the grocery store
You have to buy food anyway, right?


So grab the vinaigrette that’s in an interesting bottle, and use the bottle later for an art project (like this awesome octopus bottle!). Get a fresh coconut instead of dried shredded coconut, and then carve the shell. If you buy produce in a soft mesh bag, you can use the mesh later on a hat or fascinator. (Or learn how to make a pot scrubber out of a produce bag!) Gum containers make excellent DIY travel sewing kits. Larger cardboard boxes (like the ones pizzas and family-size cereals come in) make great pattern and template material.


Even tin cans can be awesome. The Chaokoh brand of coconut milk comes in cans with this bubbly, hammered-metal texture that’s 10 different kinds of amazing. I just found this can, and I’m thinking of an arm cuff in a Joan of Arc/Fury Road mashup style. Maybe flatten it out and make a travel-sized Chinese Checkers game. Perhaps a steampunk pencil holder painted with metallic copper paint. Or…
Certain salad containers (those made out of #6 plastic) can be used as shrinky dink plastic. Check out the video below, where @vashtiharrison shows you how it’s done.
If you can use the container later instead of throwing it out, that’s a huge win in my book. So choose your food based on the bonus craft material that comes with it!
#5 Scrounge from all of your worn-out clothes and jewelry
Yep, grab all of the buttons, buckles, D-rings, and hooks & eyes from clothing that’s reached the end of its life. Sometimes the zippers will still be in good shape, too. And even if the zippers are worn out, you can still use them for decorative purposes, like ferocious T-rex teeth.


And I’ve been known to make a tote bag out of clothing tags, but don’t tell anyone.
Broken or mismatched jewelry can be a great source of ear wires, clasps, and other findings. I don’t like to reuse jump rings, because they get weaker the more you open and close them. But they are super inexpensive anyway, so I just got an assortment of different colors and sizes, and I’m good to go. I can cut the jump rings to take apart old or unwanted jewelry, and reuse all of the clasps, beads, etc. Then, I put things together the way I want them (using fresh jump rings), and boom! I have all new designs of jewelry to wear or give as gifts.
Things like pillow stuffing can sometimes be reused, but that’s more of a case-by-case basis. Polyester fiberfill doesn’t tend to go bad, but shredded foam or down feathers can break down over time. And if the pillow is fairly old, it may have been filled with stuffing that will bunch up, which isn’t really worth reusing, in my opinion. The non-bunching fiberfill that’s available today is well worth the expense.
By the way, as an Amazon affiliate, I earn a small commission from purchases made through my links at no extra cost to you. It helps me to keep this website up and running.


Even old jeans can be turned into Swiffer pads, and worn-out t-shirts can become bath mats. Usually there is some good fabric to be found on even the most tattered clothing.
#6 Landfill paint is the best paint
My landfill used to set aside paint that was free to take and use until it was periodically gathered for disposal. Recently they started pouring it all in a large drum together (oil-based and acrylics both). So you can’t use it anymore… which I think is a hate crime (because I hate it). Seriously though, it was great to be able to reuse paint instead of just disposing of it. Check your local landfill’s paint policy to see if you can snag something cool.


My laundry room needed a makeover (there was a busted water pipe, so the drywall was ripped up in order to fix it). I changed the door from red to aqua, using landfill paint! I tinted it myself to make it a little darker, and to make sure it complemented the floor (which I wasn’t changing). Some of the paint was also used on the trash basket under the sink, and a few other places.
Here’s a great tip: No matter where you got your paint, the local hardware store may be able to tint it if the color isn’t quite what you need for your next project. But they can probably only make it darker. And your colors will be limited when you’re starting with an existing color. For example, if you have red paint, they should be able to tint it to a shade of brown, but they can’t magically make it green. They also won’t be as precise with the color that you end up with, since the paint already has pigment in it. So if you’re set on a very specific shade, it’s best to start with a white base and have it tinted from there.
#7 Check with craftspeople and makers in your area
There may be scrap materials nearby that are too small for the makers to use, but perfect for a small project or accent piece.
There’s a company nearby that makes wooden decor, and I’ve gotten scraps of walnut and cherry wood from them.


A sawmill down the road has off cuts to spare after they’ve squared up the logs. I used some slabs of wood from there to make the hanging rope shelves in my studio.


A place that makes hammocks gave me a bunch of scrap rope for macrame projects. It wasn’t long enough to use for a hammock, but there were so many other projects I could make with it, like my seaside chandelier!
#8 Use free supplies to organize your craft area
Using upcycled materials to organize your craft room is a great free way to store all of your art supplies, and it definitely doesn’t have to look like trash when you’re done.
Start at the grocery store: pick food in attractive containers that fit on your shelves. Buy the pasta sauce that comes in a mason jar so you can store your buttons in it. Certain desserts and candies come in sectioned containers that are perfect for storing and sorting small craft supplies. I found dried fruit in containers that fit perfectly on an old DVD rack.


I made a really cool sewing thread rack out of welded wire, and I store my sewing bobbins in a DIY bobbin holder that I made out of an old piece of garden hose. Florists will sometimes give you bud nets that will keep your serger cones from unraveling.
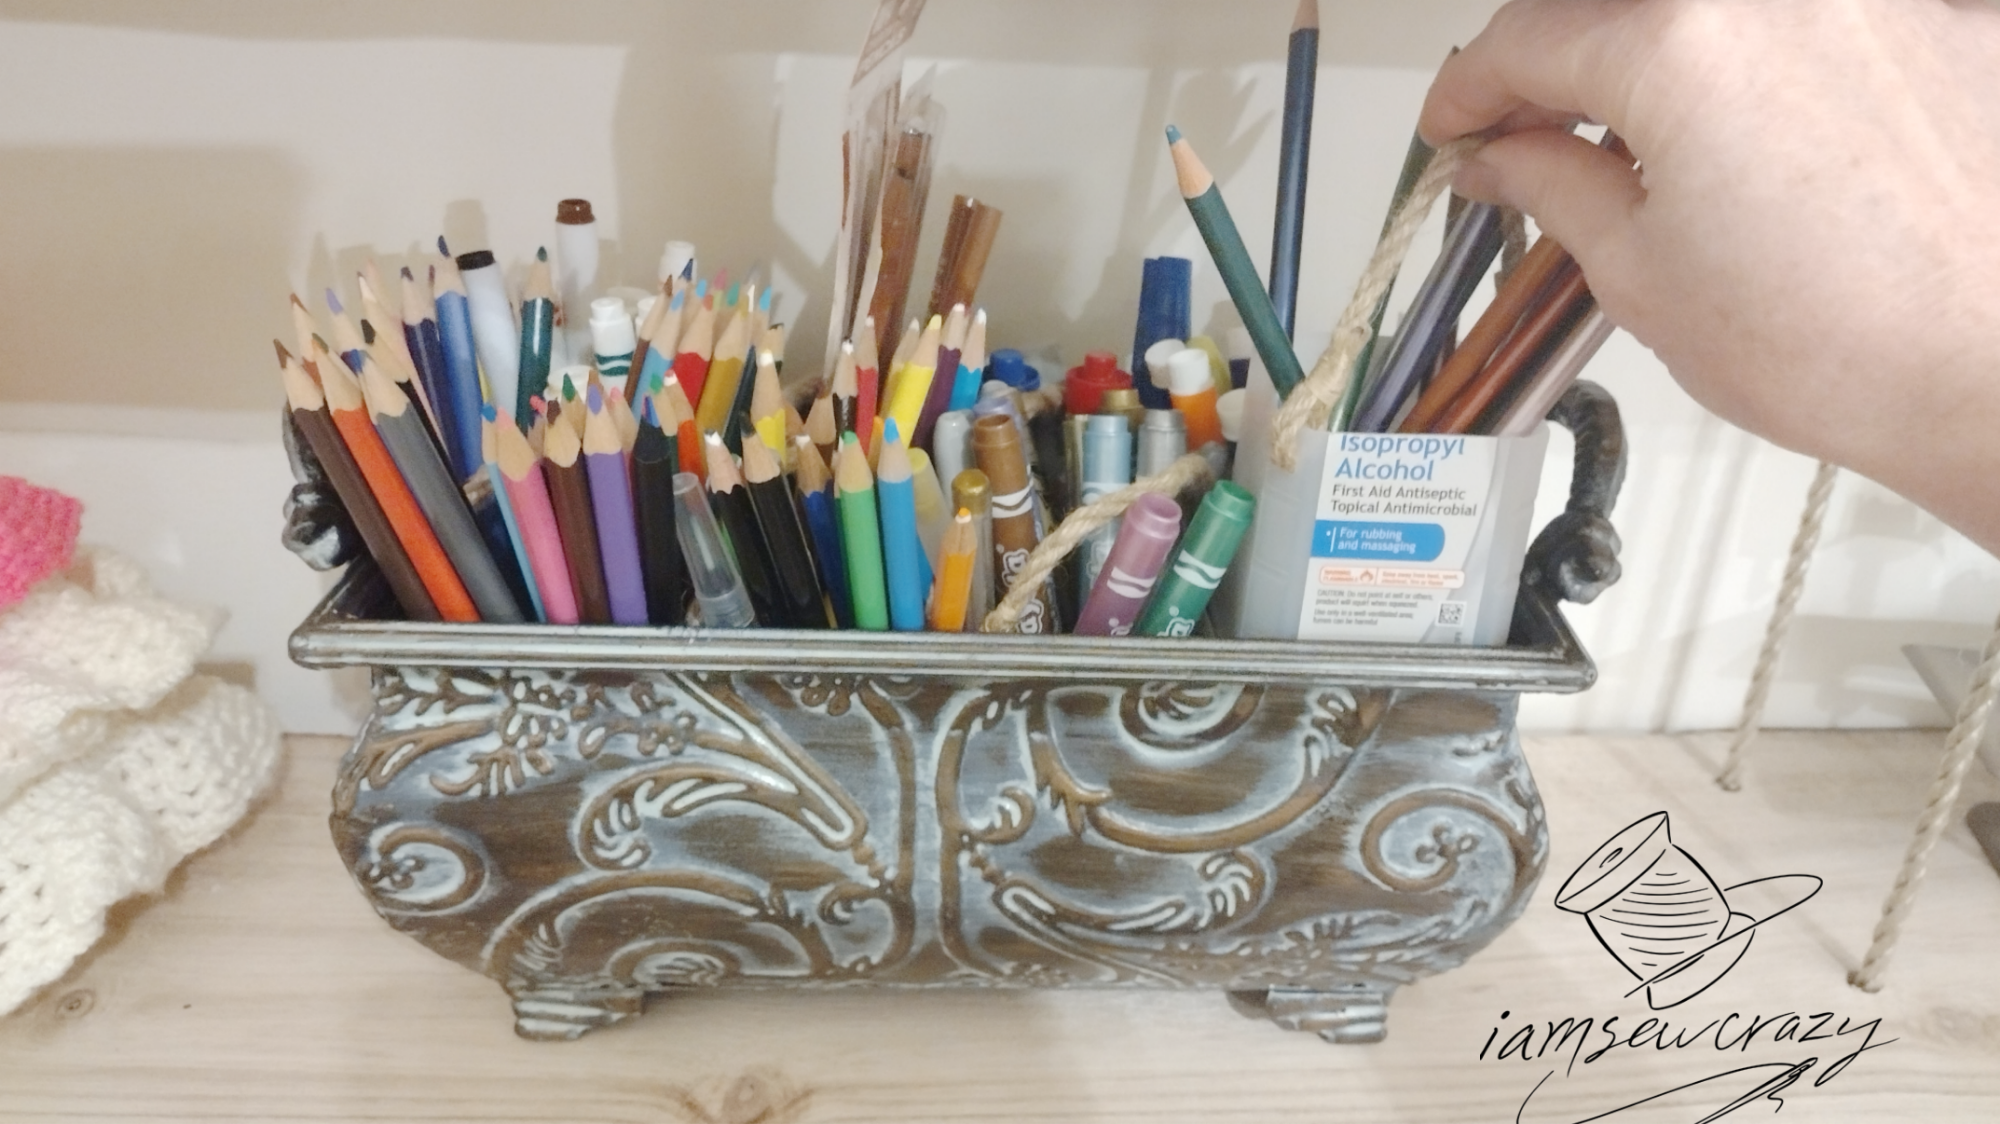
I’ve sorted all of my drawing supplies into 8 square plastic bottles with the tops cut off. (Permanent markers in one, metallic pencils in another, watercolor pencils in another…) I added rope handles to each bottle so that they were easy to lift and carry. Then I put all of the bottles into an old planter, and boom! It looks amazing but still keeps my supplies organized and easy to tote around. You can see the cute rope handles, but not the plastic bottles. I can take the whole planter with me, or just grab the rope handle of the markers I need. The bottles were from things I was going to buy anyway; I just saved up the empty bottles and made something cool with them.
So use free craft supplies to organize your free craft supplies! It’s a win for everyone, including the planet.
#9 Check with thrift stores and resellers in your area
When you frequent the local thrift store scene, let it be known that you are looking for scrap material, and not things to wear. If they know you are looking for parts and pieces, people will often set aside things that can’t be sold. Brownies definitely help.
I ended up with fabric sample books after a fabric store’s offerings changed. Occasionally I’ve gotten store display shelves as well.
My local Habitat for Humanity Restore is quite small (tiny, really!) and they constantly give away things they don’t have any room for on the sales floor.


A few local thrift stores have given me damaged clothing, broken jewelry, or things that nobody wanted to buy. Broken jewelry and matchless earrings often wind up as embellishments on dresses, fascinators, fabric flowers, tote bags, or crafts like my DIY message in a bottle.
Sometimes thrift stores have things like old paint that they aren’t confident reselling, but are happy to give away to someone who doesn’t mind thinning it down, or picking through it to find bottles that are still good. I’ve gotten loads of stuff like that as the local thrift store staff has gotten to know me and the crazy things I reuse.
I have also been contacted professionally by a few companies asking me to review their craft tools or come up with unique ways to use their products. I always appreciate it, and I love working with whatever they send me. But I would consider it tacky to go around asking for free stuff.
#10 Check local listings
I’m sure this one goes without saying, but I’m saying it anyway. Check out websites where people list things for free. Here are a bunch of them:
- Freecycle
- The free section of your local Craigslist
- Trash Nothing
- The free section of Facebook Marketplace
- Free listings on Nextdoor
- Look for local groups on Buy Nothing
- See if your town has a “really really free market”
There may be other options based on the country you live in. My church sometimes has a big old swap meet in the parking lot where you can bring things you don’t need anymore, and take anything for free. If there isn’t something like that going on in your area, then maybe you can get one going! Start by checking with community centers and churches to see if they will let you use their space.
#11 Get a Fairy Godmother
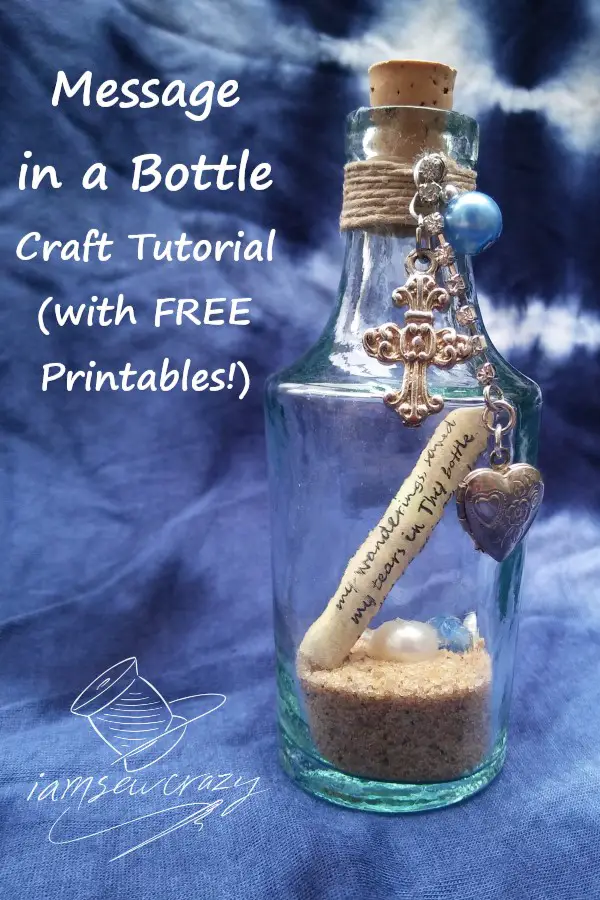
This is super random, but somebody has been steadily throwing single-serving wine bottles behind my mailbox for a very long time. I cleaned them up and removed the labels. Then I used them for a craft event I was hosting. We made DIY message in a bottle crafts, and it was a huge hit! So thank you, Drunk Fairy Godmother, whoever you are. My next wish is that you do not drive. 😬
I have also been given a lot of fabric, tools, notions, thread, and even several sewing machines. This one is tricky, because usually it was a “right place, right time” type of situation. A lot of the time, somebody was moving and wanted to pare down. Or they didn’t really get along with a certain material or piece of equipment. Or they wanted to upgrade. And in every case, I saw it as a blessing from God and payed it forward wherever it made sense.

A friend who bids on storage units and resells things inside often finds things in unsalable condition and gives them to me. Sometimes if nobody bids on an item, she just gives it away to a good home.


A lady who resells vintage clothing on eBay gave me a bunch of leather items that were damaged and unsalable. I tested different methods to find the best way to clean suede, and then I used the material to make hair slides, tote bags, and other small projects. (One of my leather-coat-turned-bag projects made the cover of We Like Sewing magazine!)
You can try a “wanted” post on Facebook, Craigslist, etc. and see where that gets you. I usually offer to make a trade, so that it works out well for both parties involved. But don’t give up! Honestly, stuff just seems to show up whenever I need it, and I thank Jesus for that.
#12 Steal things from my mother
If you’ve never stolen anything from my mother, I highly recommend it. That’s how I got most of my towels.
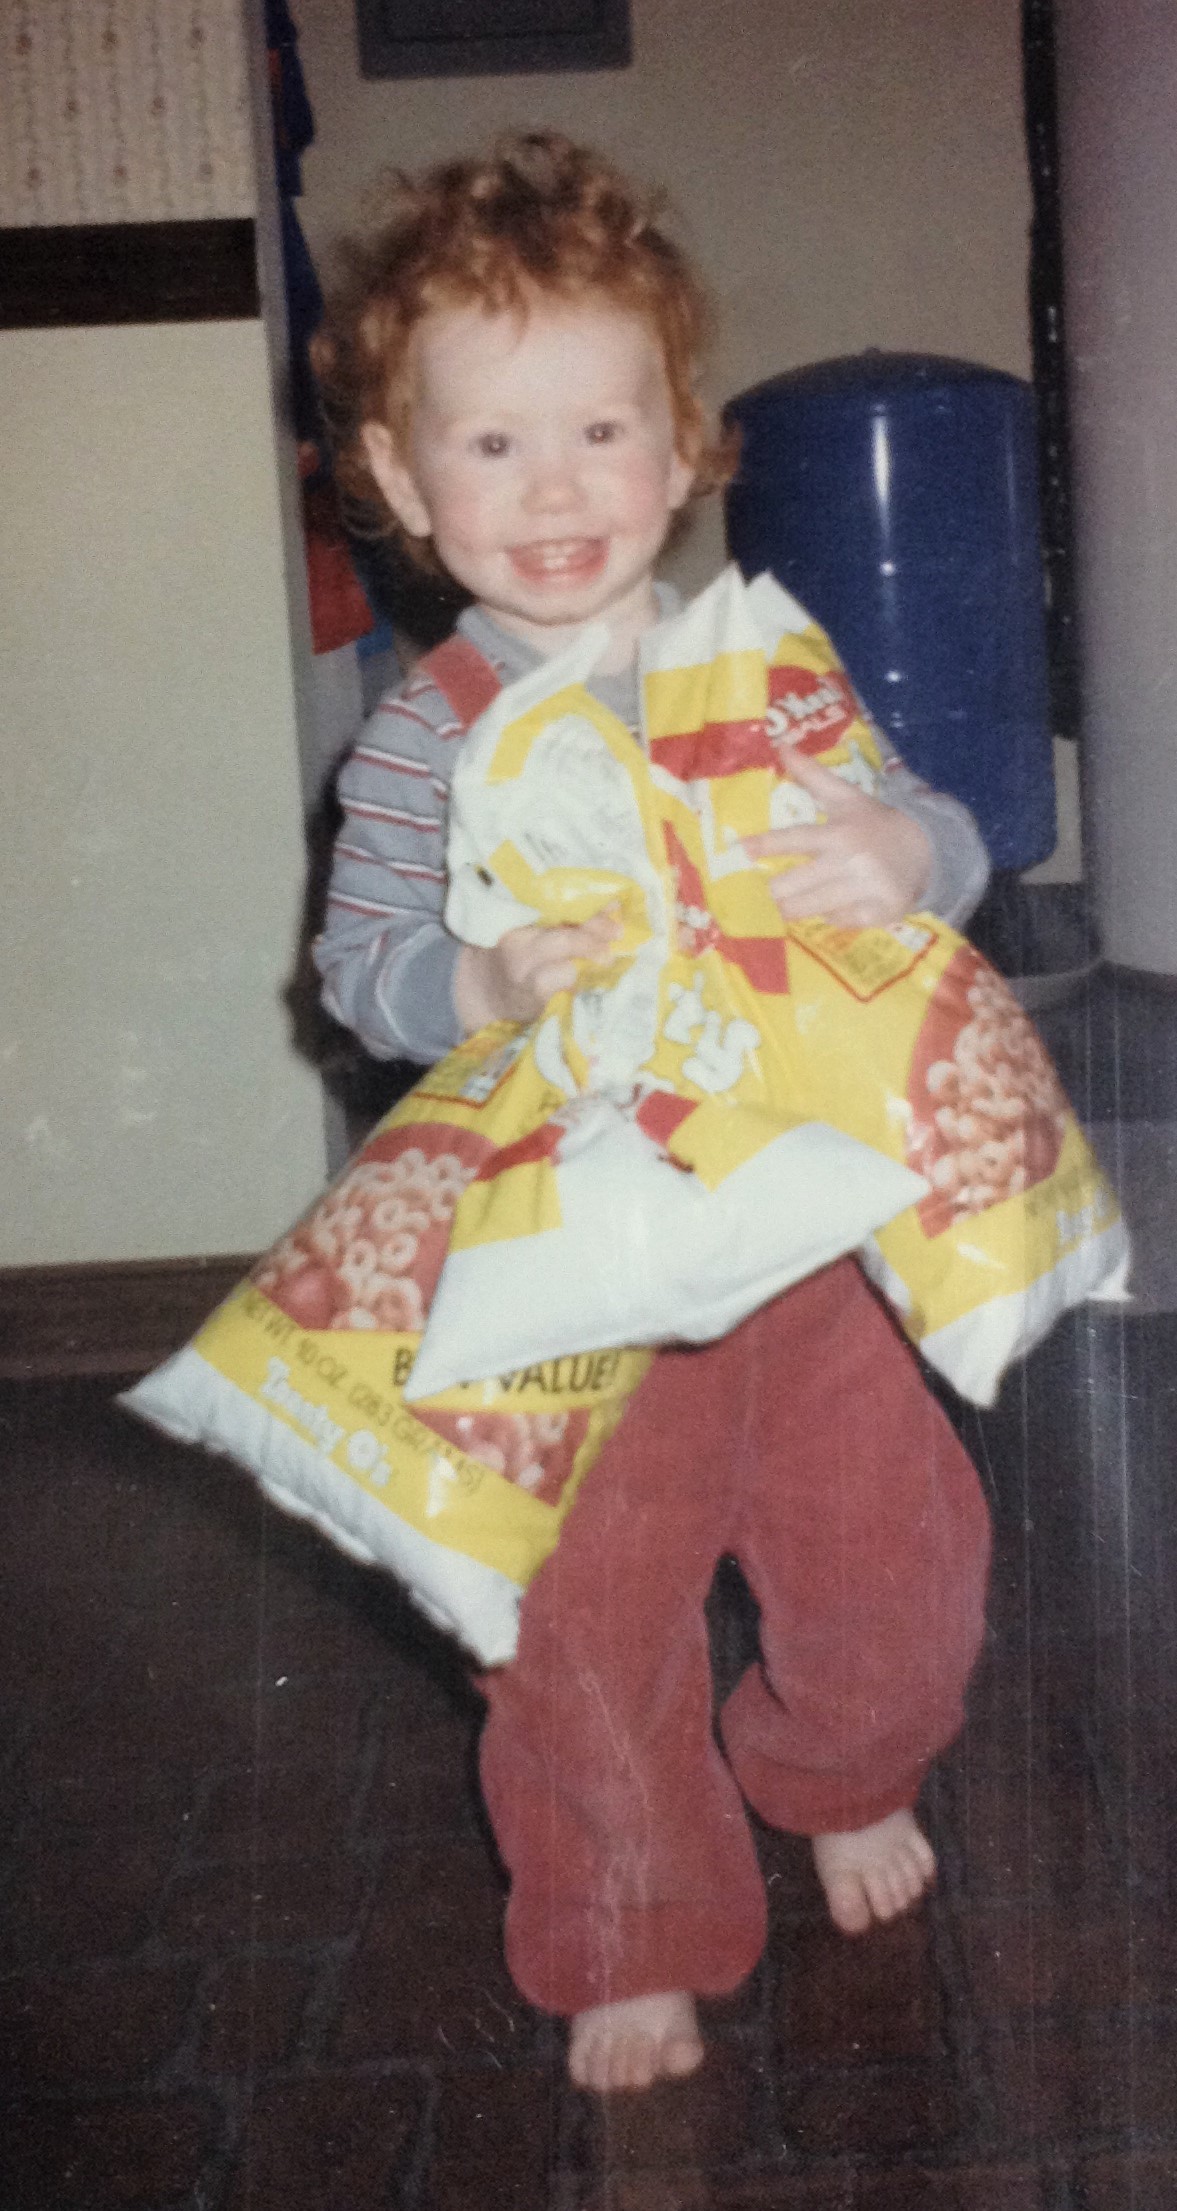
My habit of stealing things from my mother started when I was only 3, as you can see. I’ve gotten a lot better at it since then. She still won’t let me have her cast iron skillet though. 😂
Bonus tip: Know when to buy new supplies
I’ve dropped a few hints about that throughout the article, like how jump rings get weaker when you reuse them. I also do not sew with reused thread, for the same reason. Don’t let your time and hard work be wasted because you thought that a dry-rotted canvas was okay to paint over. There are plenty of good materials to be found if you’re patient. And the things you will need to buy (like jump rings, thread, pillow stuffing, etc) are pretty cheap on the scope of things. Some things are worth spending a little money on. And a headache that didn’t cost you any money is still a headache.
If it:
- Will make your project less durable
- Could potentially be hazardous, like reusing a damaged wire from an old lamp
- Is moldy, not cleanable, a biohazard, etc
- Contains lead, asbestos, or other dangerous components
Then it’s not worth the trouble. It doesn’t matter how free it is. I admire your can-do attitude, but put that mess down. Seriously.
So there you have it! Some of my favorite ways to get free craft supplies. I hope that helps you make awesome things in the future! Go forth and be crazy, you whacky, thrifty, awesome people you.
Jessie