
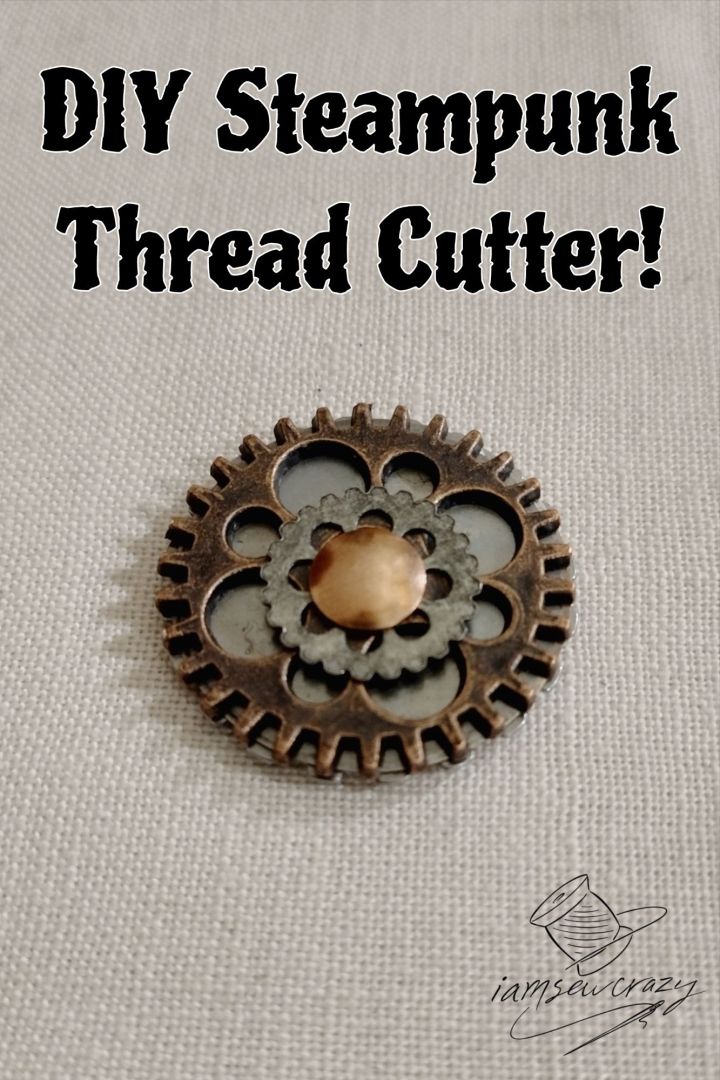
This steampunk DIY thread cutter pendant would make an amazing necklace, and is absolutely perfect for crafting on the go. I’ve attached my pendant to my vintage Kenmore sewing machine, since it was the only sewing machine I had without a thread cutter. But the beauty and portability of this steampunk thread cutter make it versatile enough for many different uses.

I’ve seen these stunning thread cutter pendants around, and I really do love them. The aged metal look and raised flower designs are so classy. But the notches around the outside remind me of gear teeth, and I got to thinking. Can I make a DIY thread cutter pendant using a rotary cutter blade and some of my steampunk gears? The answer is yes. Yes, I can. And now I’ll show you how to make a DIY thread cutter pendant of your very own!
Important Safety Disclaimer About Sharp Things: Do not attempt to make a DIY thread cutter pendant, because sharp things are sharp. I’m only showing you how I made mine so that you can be sure to not make one of your own. This way, you will remain safe from the sharp things. Next time you need to cut thread, use something dull, because safety. 😎 😉
Supplies needed to make a DIY thread cutter pendant

It you don’t already have any rivets and gears on hand, it would be a lot cheaper to just buy a thread cutter pendant! 😂 I only used what I already had from other projects. Use your discretion here, and don’t let your creativity and can-do attitude turn this into a $30 project.
- A 5/16″ split rivet (also called a bifurcated rivet). You could use a few different options here, depending on what you have on hand.
- An Olfa 28mm rotary cutter blade, because those are the ones I use in my rotary cutter. They seem to last for ages! But use whatever you have that matches the size of your gears.
- Assorted steampunk gears of various sizes and colors.
- A Phillips head screwdriver bit that goes in a drill, and a hammer to set the rivet. (I’m using my cool hammer multitool!) The tools you need will vary depending on your rivet choice.
Important Disclaimer About Amazon Affiliate Links: This website costs me money to run. I use Amazon affiliate links because when you click them and make a purchase, I get a small commission at no extra cost to you. I keep making tutorials and free printables, you buy cool stuff, and now we’re both happy.
How to make a DIY thread cutter pendant
Select your gears

I started by dumping out my stash of gears, and selecting two that were a little larger than a 28mm rotary cutter blade. I wanted the blade to be showing between the gear teeth, but not protruding past the teeth at all.
If you have smaller or larger gears, you can also get rotary cutter blades in 45mm and 18mm sizes.
Then, I selected a few smaller gears that looked nice on top of the large gears. I tried to use contrasting colors so that each gear would stand out, alternating between silver and copper colors.
Slide the gears and blade onto the rivet


I slid the gears and blade onto a rivet, with the blade sandwiched between the largest gears.
I used a 5/16″ split rivet (also called a bifurcated rivet). But exactly what length of rivet you need will depend on the thickness of the gears you have chosen. You will want the stack of gears to come up to the bottom of the split in the rivet, so that everything is held tightly after the rivet is set.
If you have a double-cap rivet of the correct size, I’d use that instead, especially if you want to be wearing your pendant as a necklace later. The finish on the reverse side will be much nicer with a double-cap rivet than with a split rivet. I didn’t have any, lol.
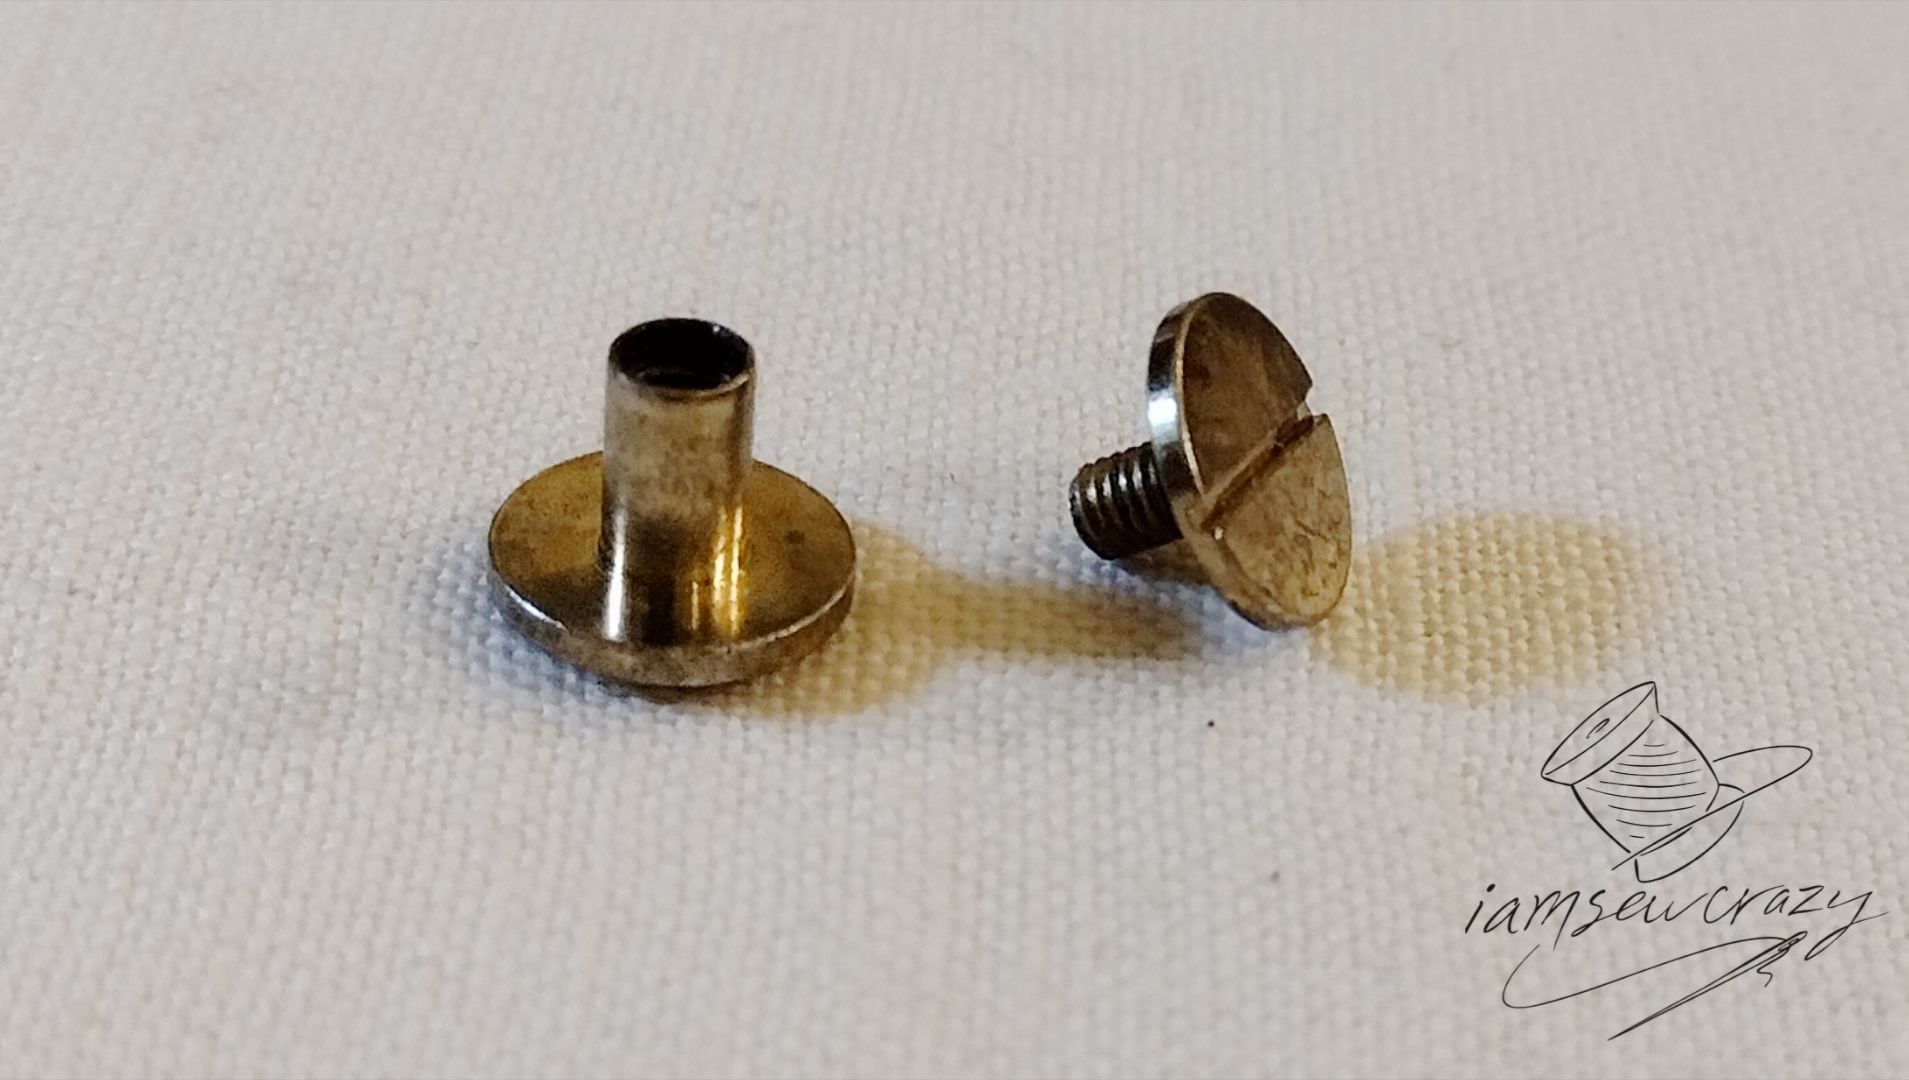
I almost used a Chicago screw, because that would make it easier to change the blade if I ever wanted to. Chicago screws are like double-cap rivets, but the two parts screw into each other so that it can be unfastened and refastened repeatedly. They are also very user-friendly, since all you need is a screwdriver. But the ones I had on hand weren’t quite the size I wanted, so I went with the split rivet.
How to set a split rivet without the proper tools
For goodness sake, if you already have a rivet setter, use that. But I just used what I had on hand (I’m sensing a theme here), since I rarely use rivets in my work.
Stack up the gears on the rivet the way you want them, and place the stack with the rivet cap-side down on a piece of scrap wood. (I’m just setting a plain rivet as a demonstration, because the gears were making it really hard to see what was going on in the pictures.)


Using the Phillips head screwdriver bit as a chisel, hit it with a hammer to drive the legs of the rivet apart.
Place the shaft of the screwdriver bit sideways over the rivet, and tap it a few more times. When the rivet legs are fairly flat, use the hammer (or a pair of channel lock pliers) to flatten them all the way down. If you use pliers, place a piece of scrap material over the rivet cap so that you don’t scratch it up.
Safety check!

Now that you’re done, get whatever kid you’re mad at to run their fingers around the outside of the thread cutter to make sure it’s safe. (Just kidding, of course! Get your husband to do it!)
No, seriously, make sure that nothing has shifted while you were setting the rivet. If the blade is protruding past the gear teeth, you’ll have to try again with another rivet.
If everything is lined up correctly, make sure the rivet is tight, so that the blade and gears cannot shift in the future.
You can see in the photo that my fingers cannot touch the blade. But a piece of thread can slide right between the gear teeth and get sliced cleanly.
All done!

I’ve stuck my DIY thread cutter pendant onto the side of my vintage Kenmore sewing machine using a piece of Alien tape. It’s the perfect steampunk upgrade to my favorite sewing machine!

And if you don’t already happen to have this many odds and ends on hand, these thread cutters are lovely, inexpensive, and make great gifts for yourself or other crafters in your life.
Happy creating!
Jessie