

Are you wondering how to restyle a wedding dress? Perhaps you have a vintage wedding gown from a family member, and you’re wondering what a remake would entail. Restyling a wedding dress is a great way to honor relatives or family traditions. And although it can be a big project, it’s quite literally a labor of love!
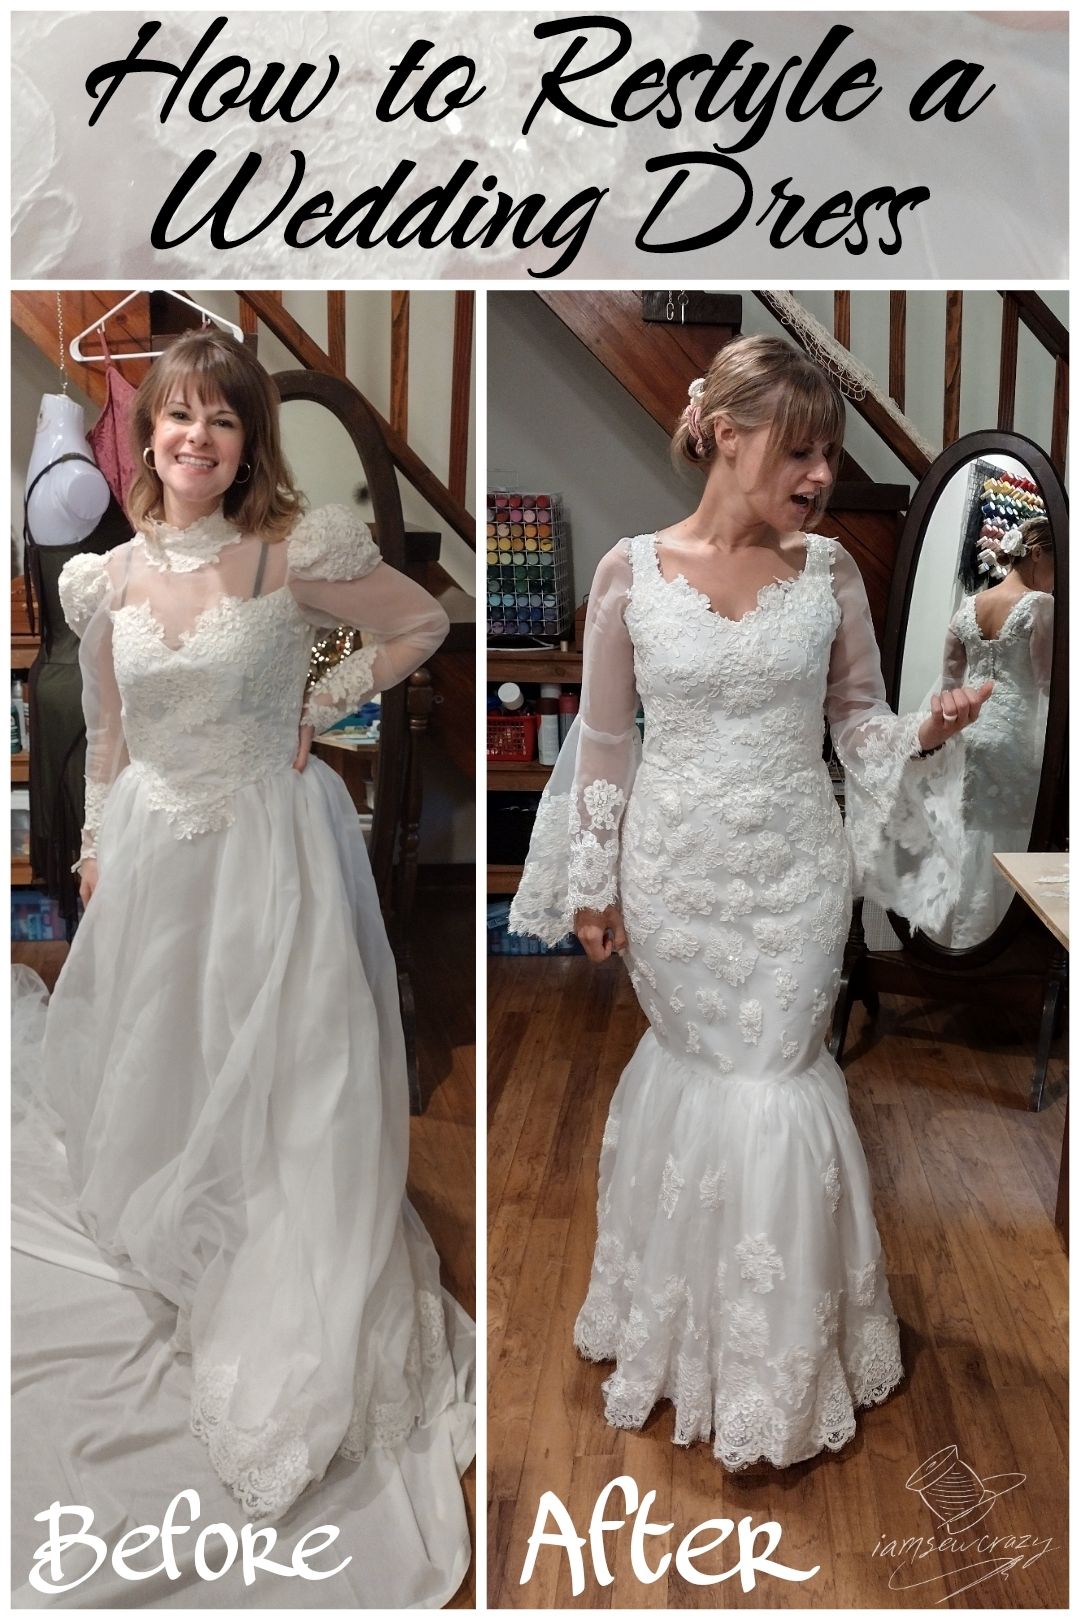
Originally, this wedding dress was custom-made for the bride’s mother. When it came time for the daughter to get married, we restyled it to fit the daughter’s vision. I also restyled her mother’s wedding veil into a stunning flower-shaped fascinator for the bride’s hair. Transforming the dress allowed the bride to wear something old and something new on her wedding day. (We even worked in something borrowed and something blue!)
Restyling this wedding dress turned out to be one of my favorite projects I’ve ever taken on. I think the bride wearing her mother’s dress is a beautiful tribute to her parents’ love. And in spite of the high stakes involved with restyling a vintage wedding dress, I think it turned out perfectly.
The “before” pictures
Here is the original wedding dress: it had a high collar, puffed sleeves, and a train that could be bustled in the back. Although the bride’s mother looked lovely in it on her wedding day, it did not match the style the bride was dreaming of.
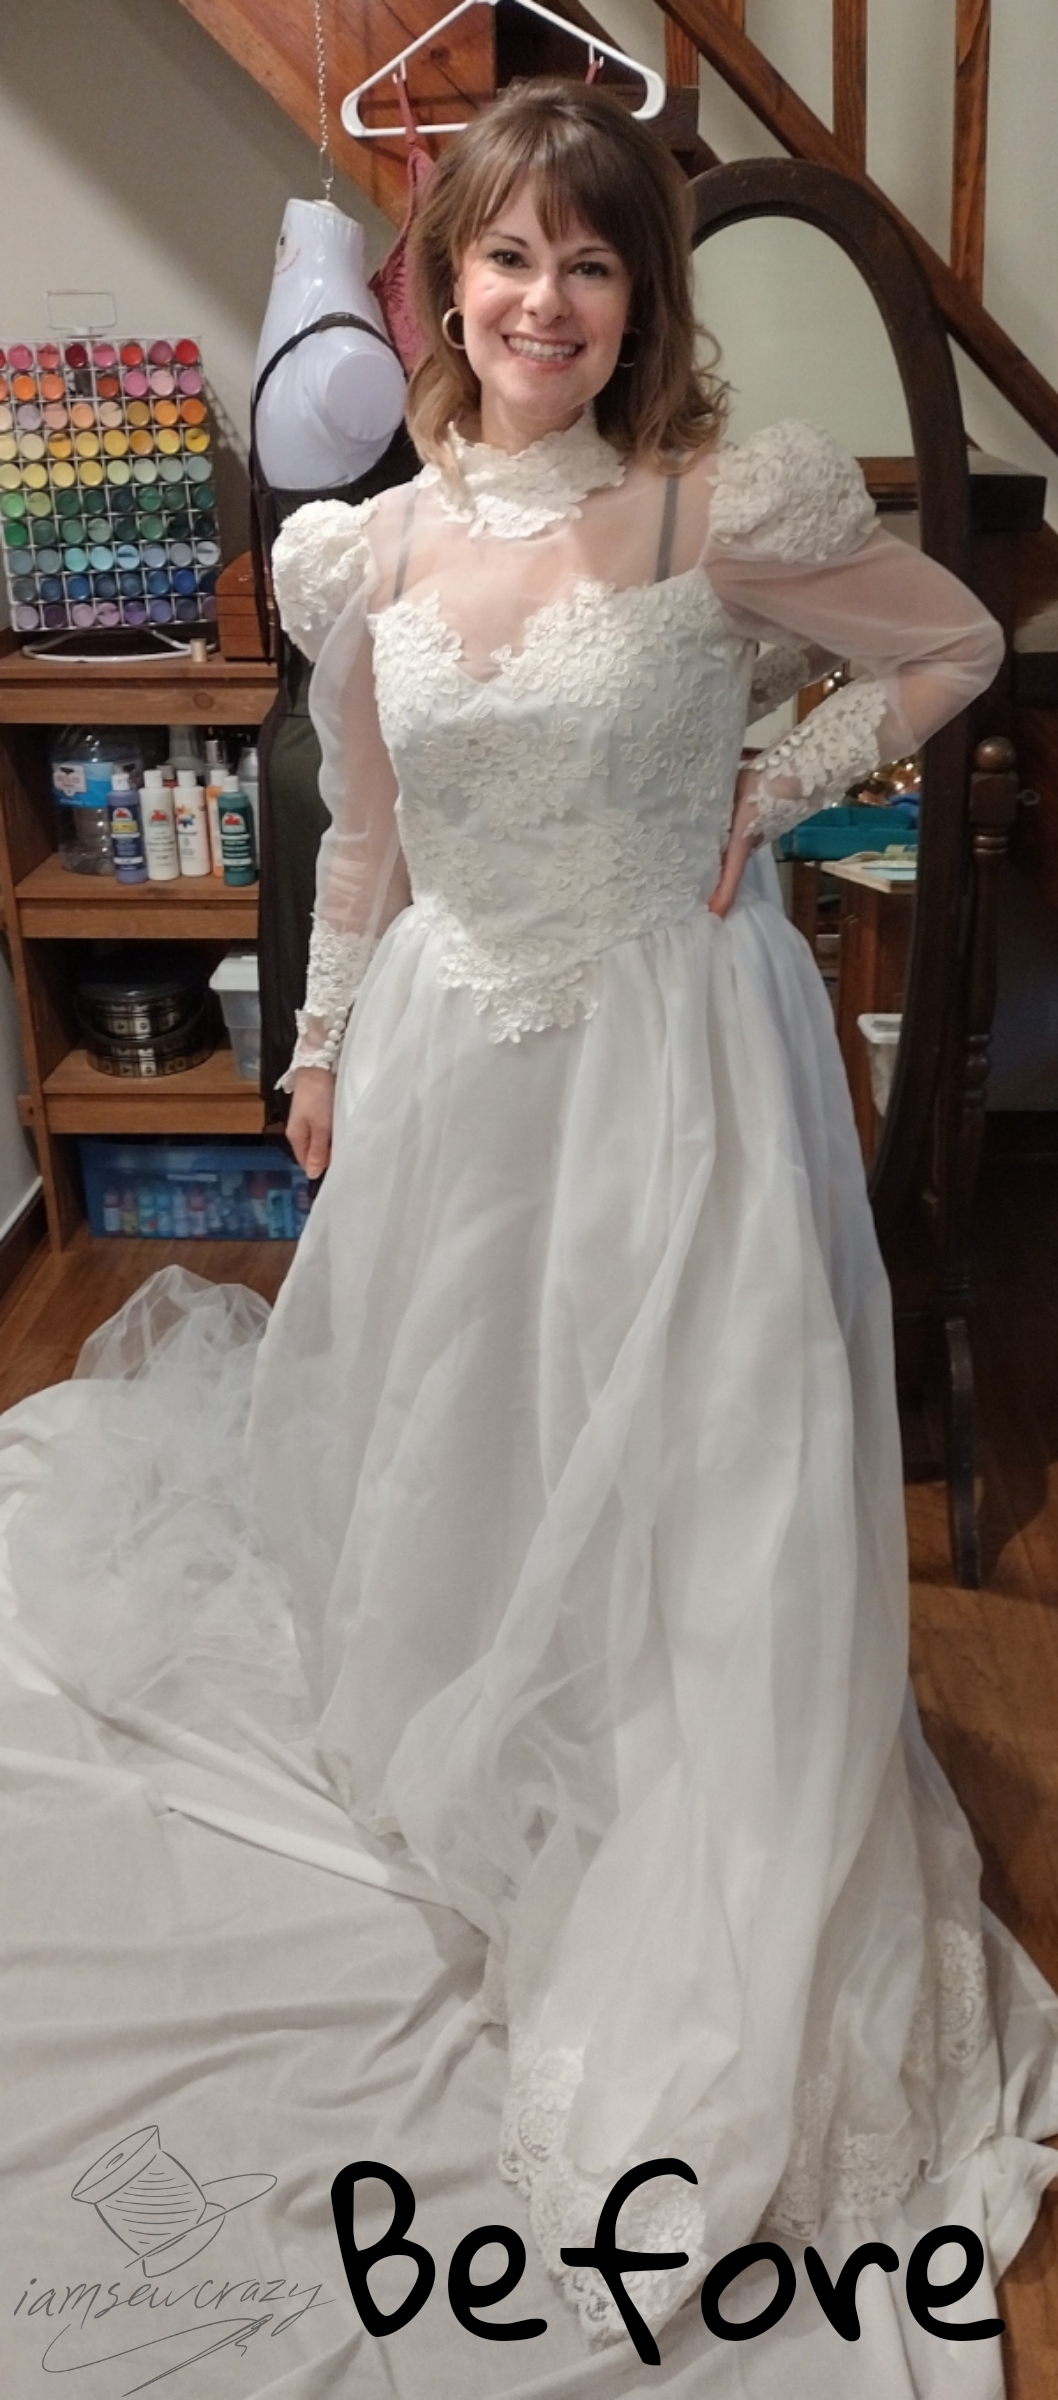
The dress also did not fit the bride, and it would need to be altered even if she had wanted to keep the original style. Her mother is a bit taller than she is, and you can tell that the dress had length issues in the bodice, skirt, sleeves… pretty much everywhere you’d expect.
Fortunately, it had a large train that I could use to make the removable sleeves. If it had been a close-fitting dress originally, I would have had a hard time cutting out all of the pieces that I needed. So it was a really nice starting point to restyle this wedding dress into the dress of the bride’s dreams.
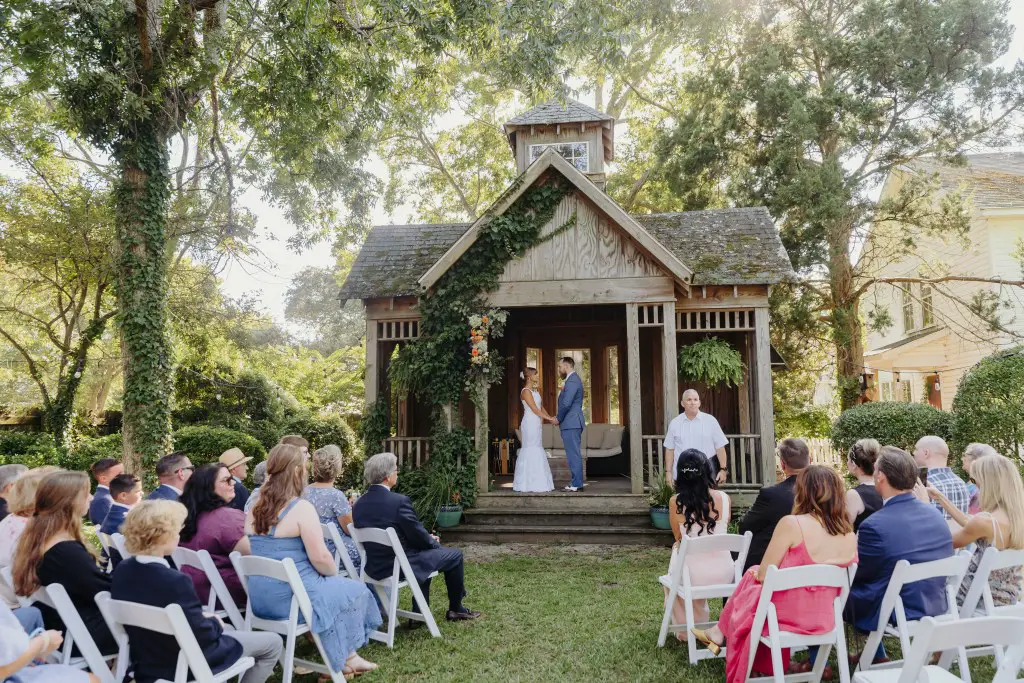
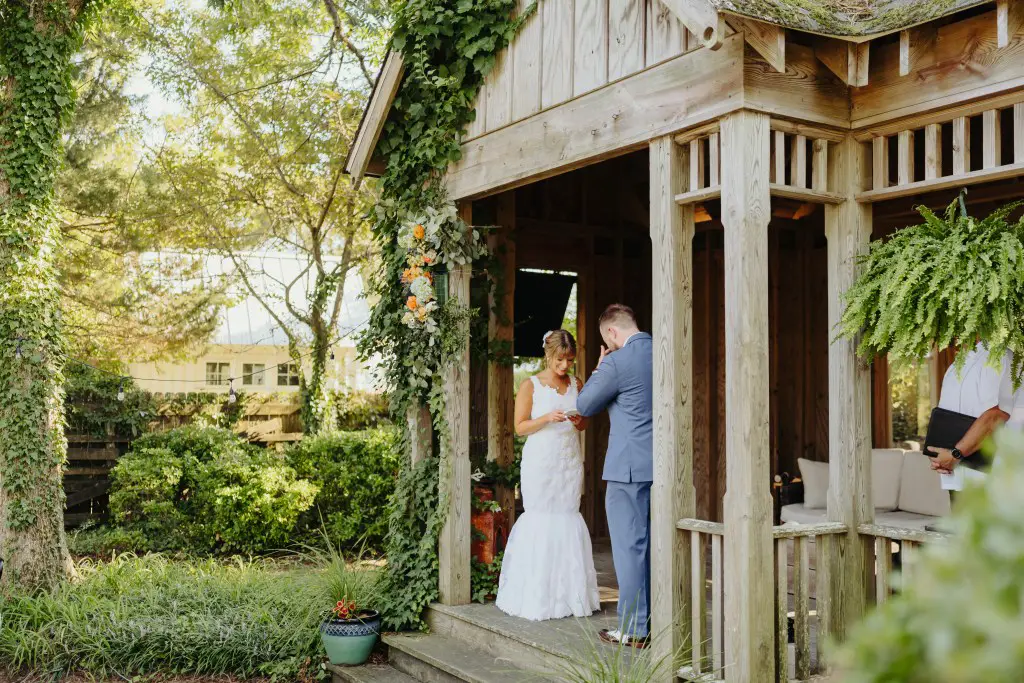
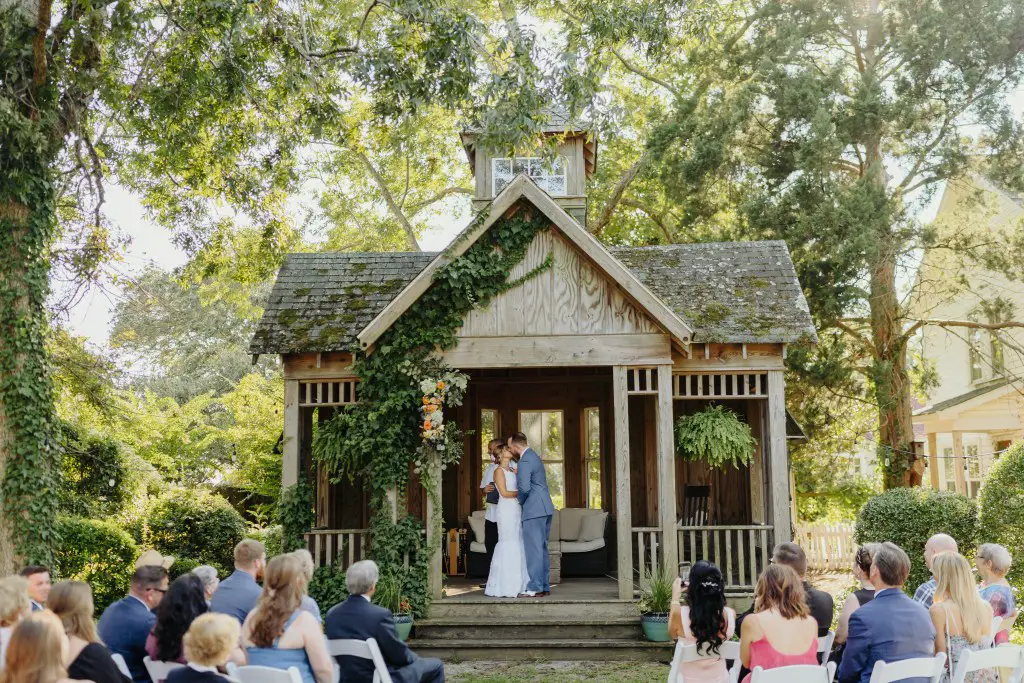
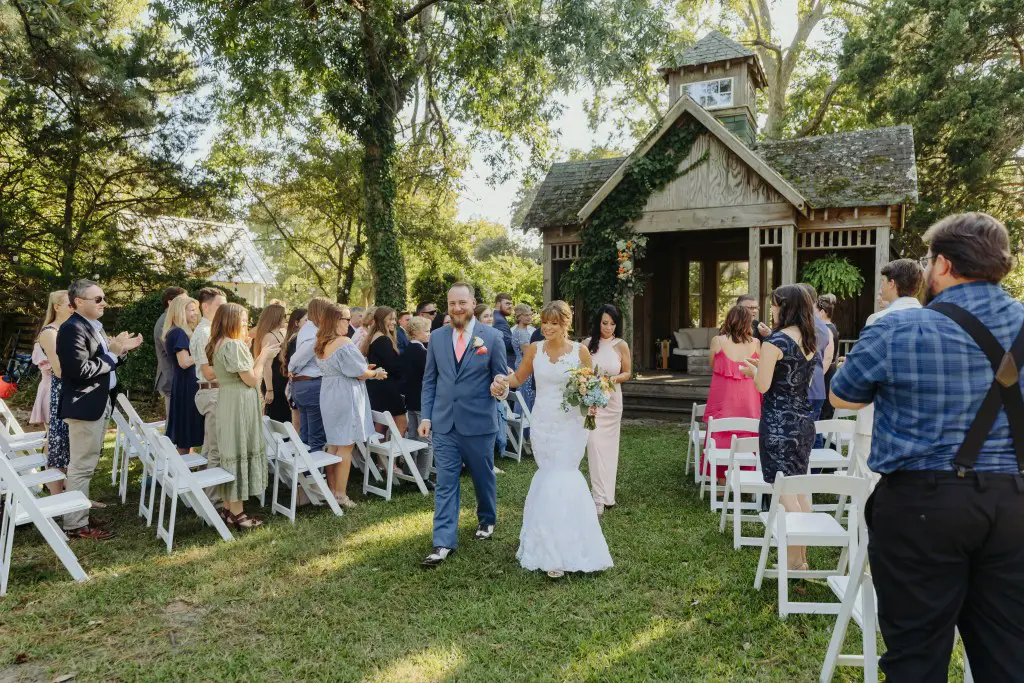
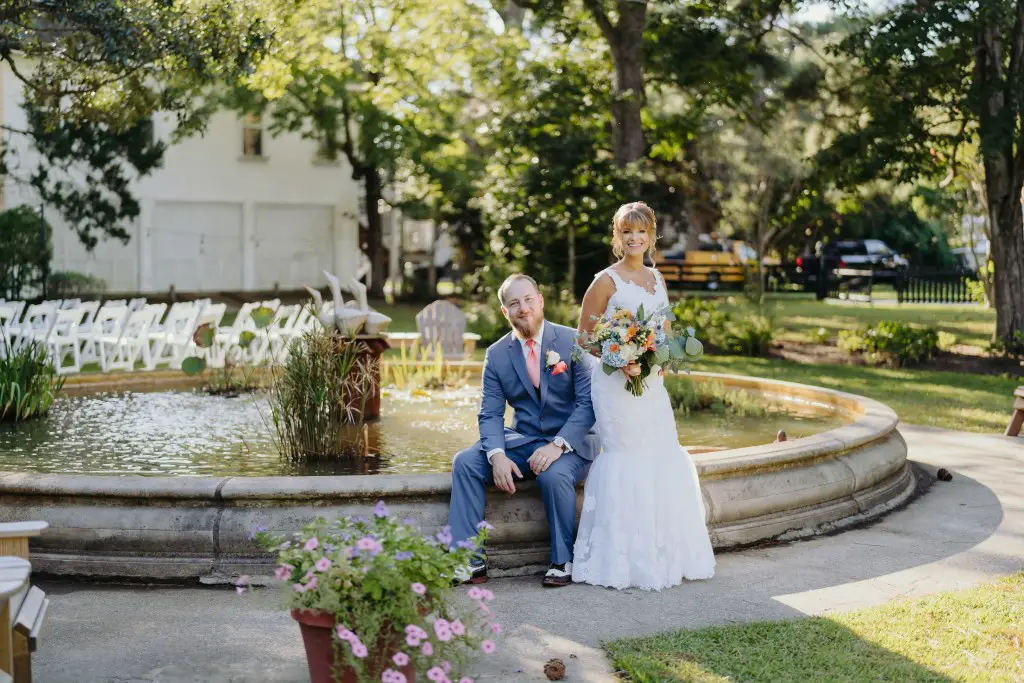
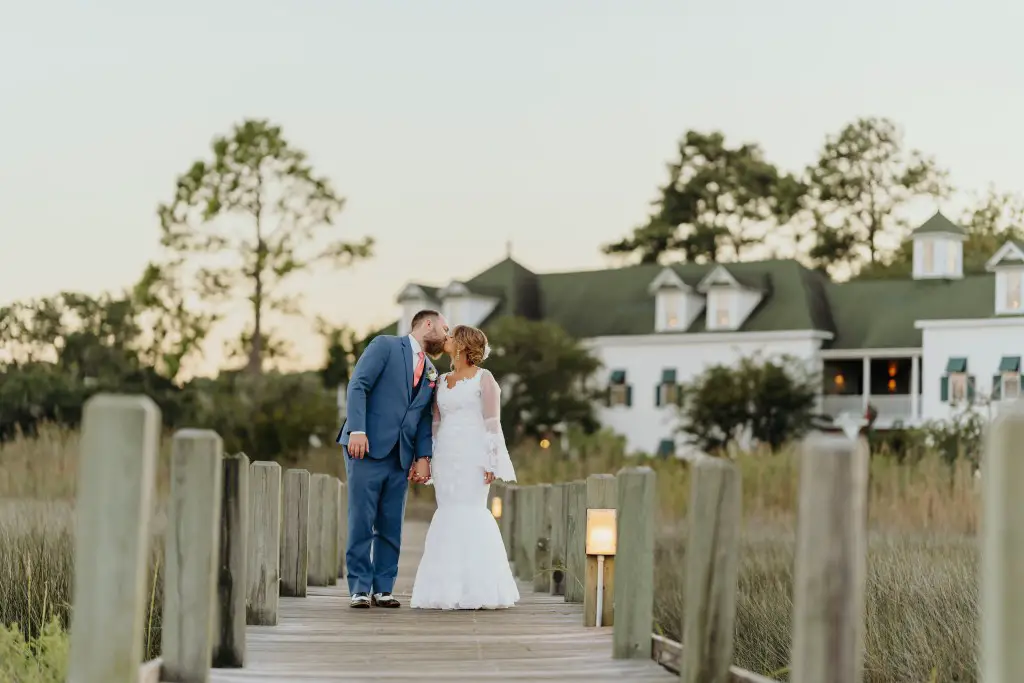
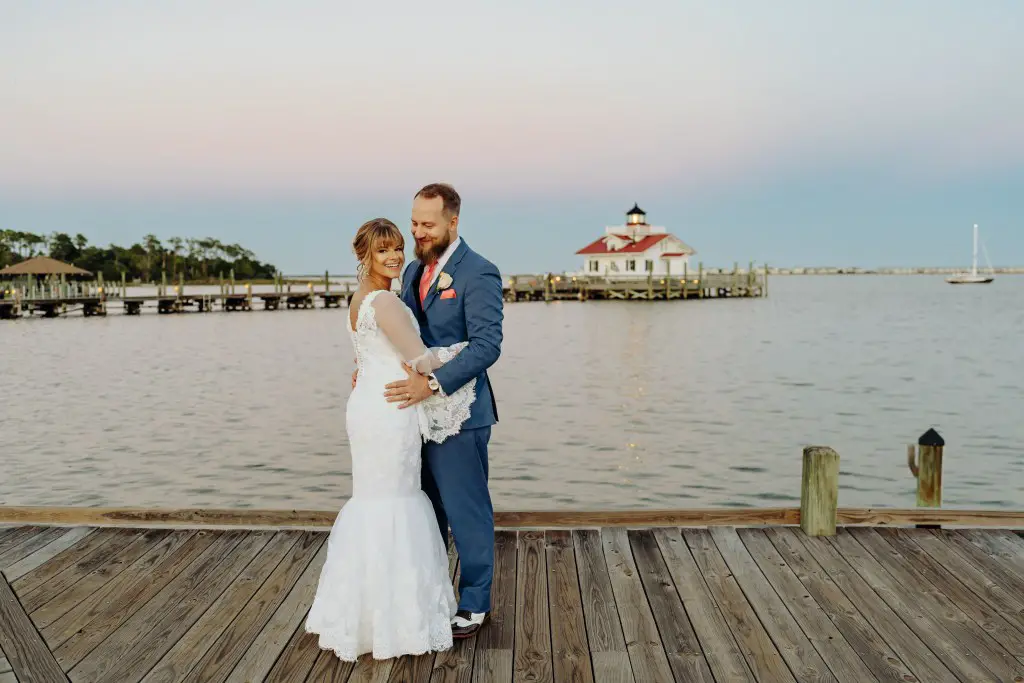
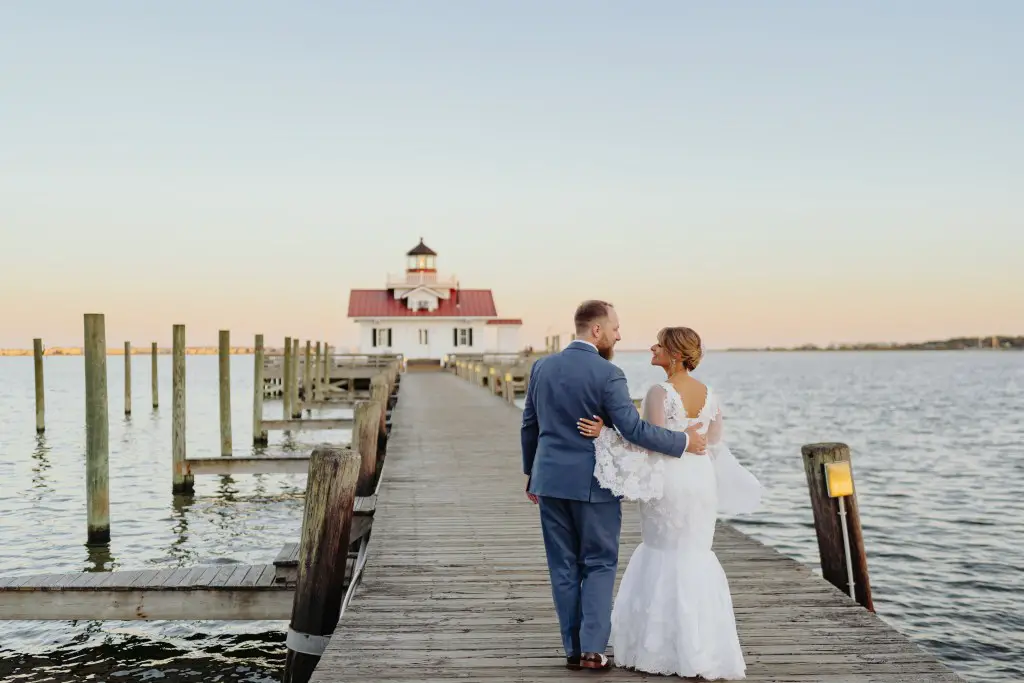
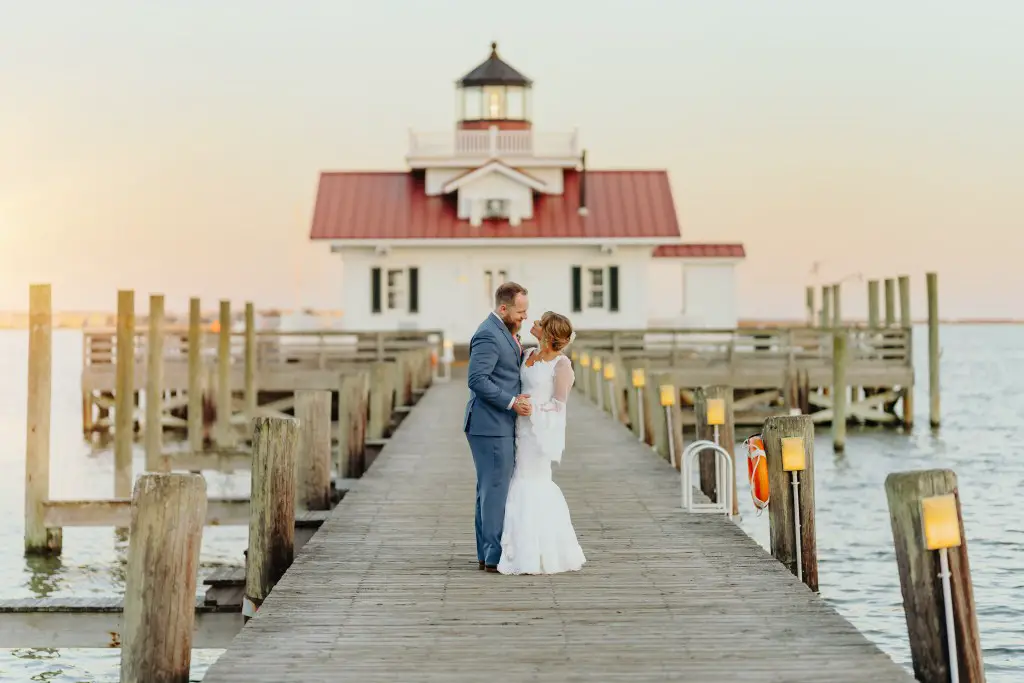
The “after” pictures
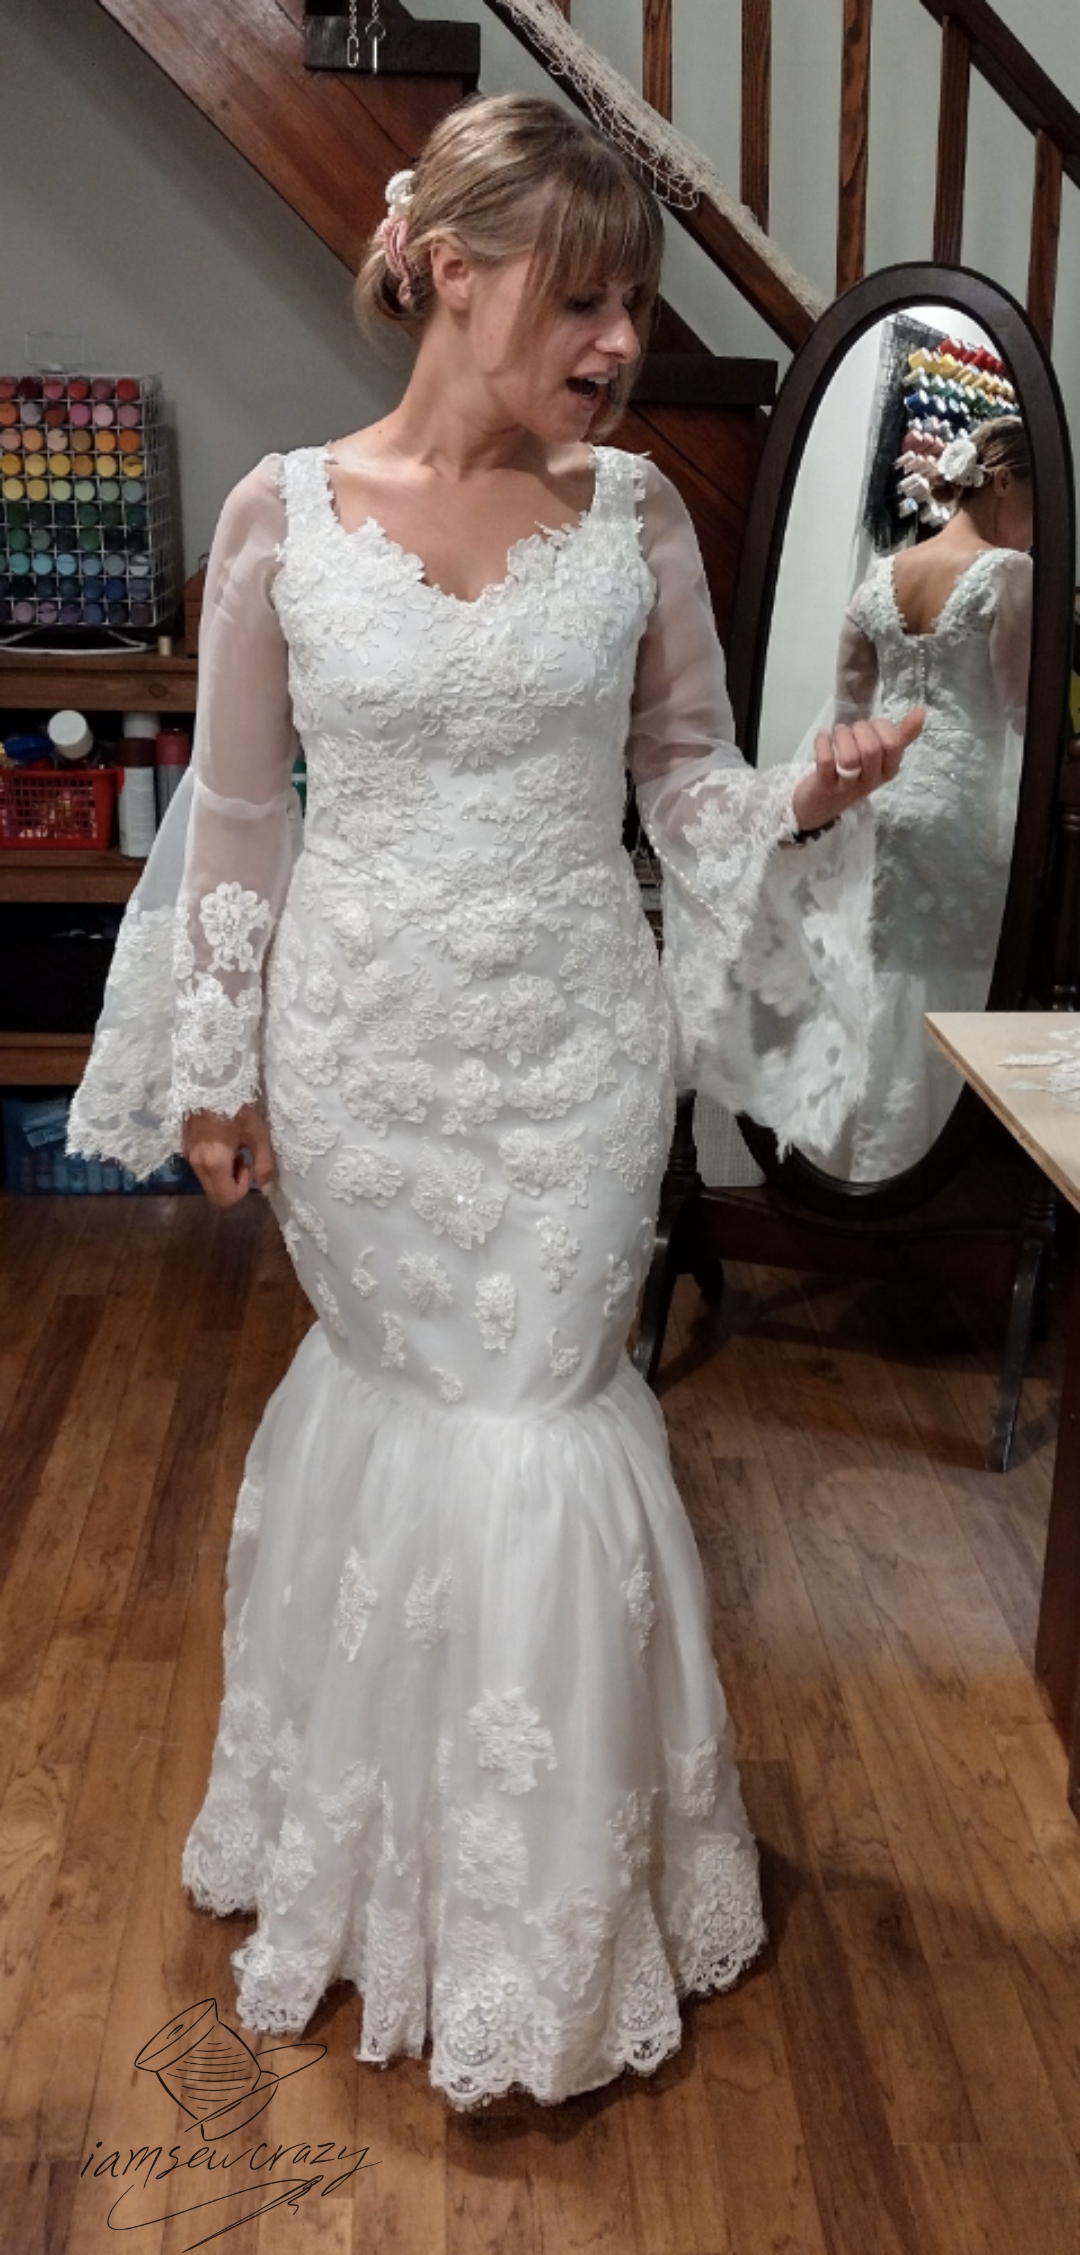
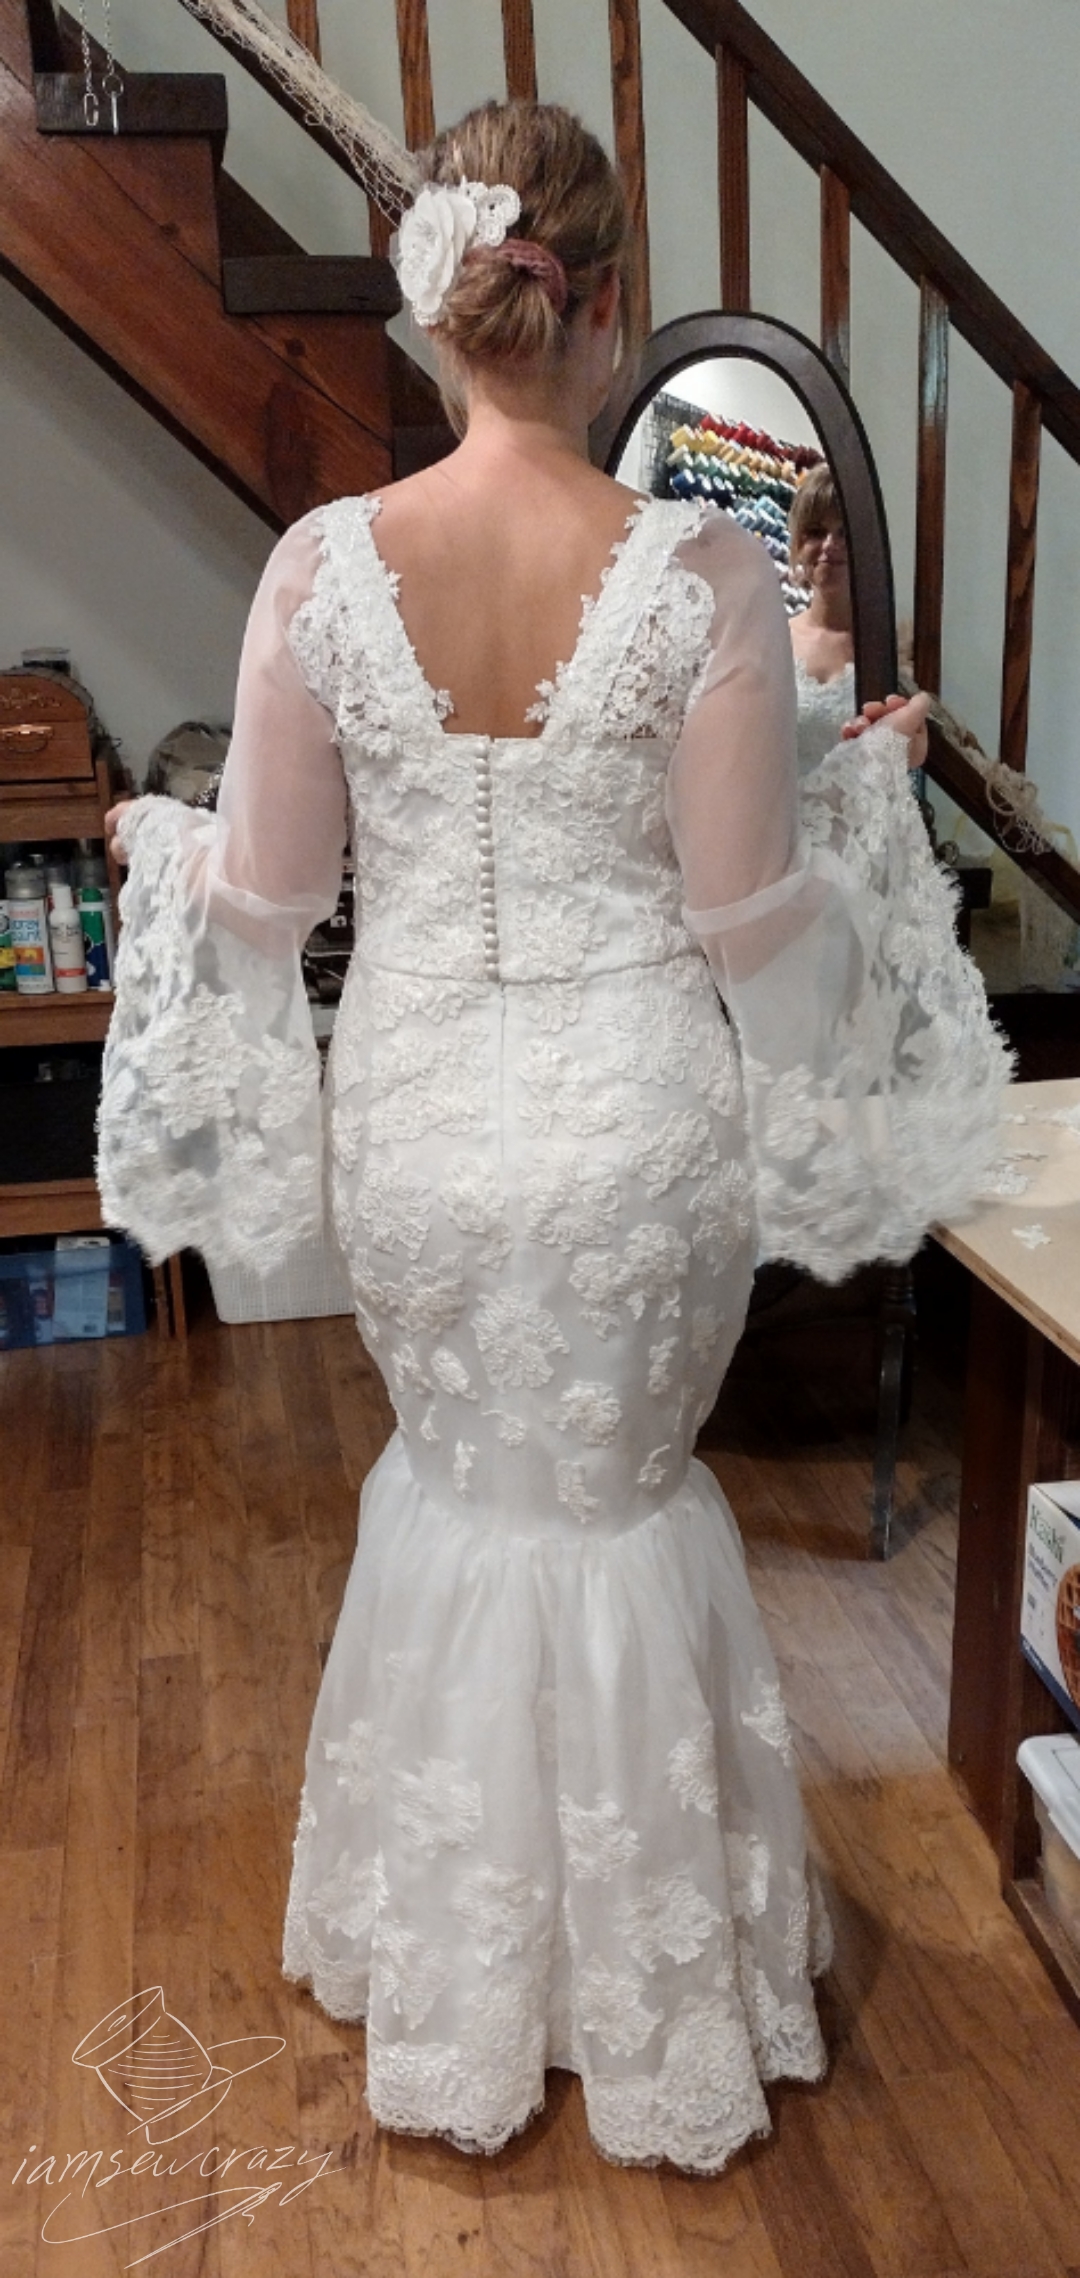

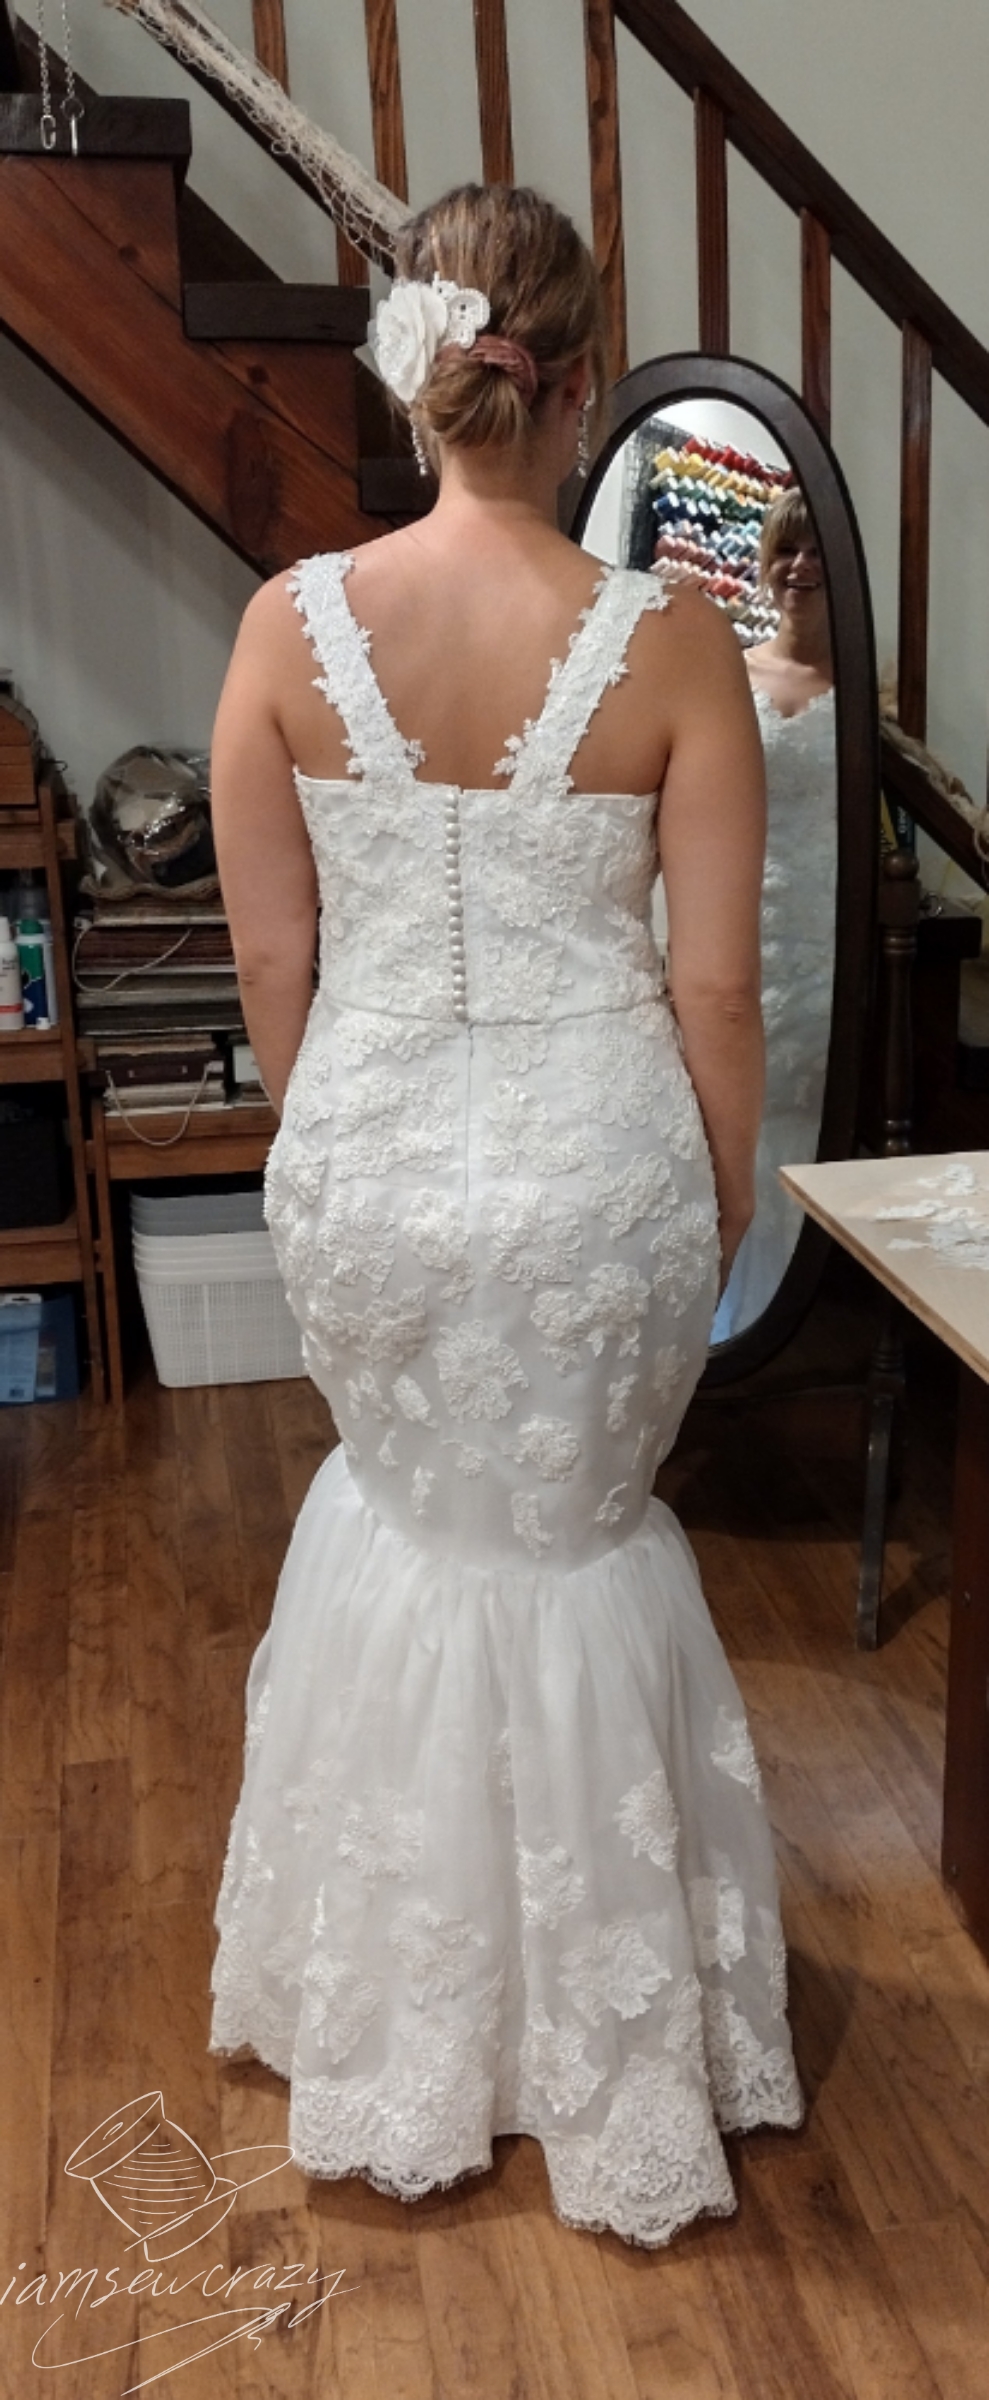
Ta-daa! It’s a whole new dress!
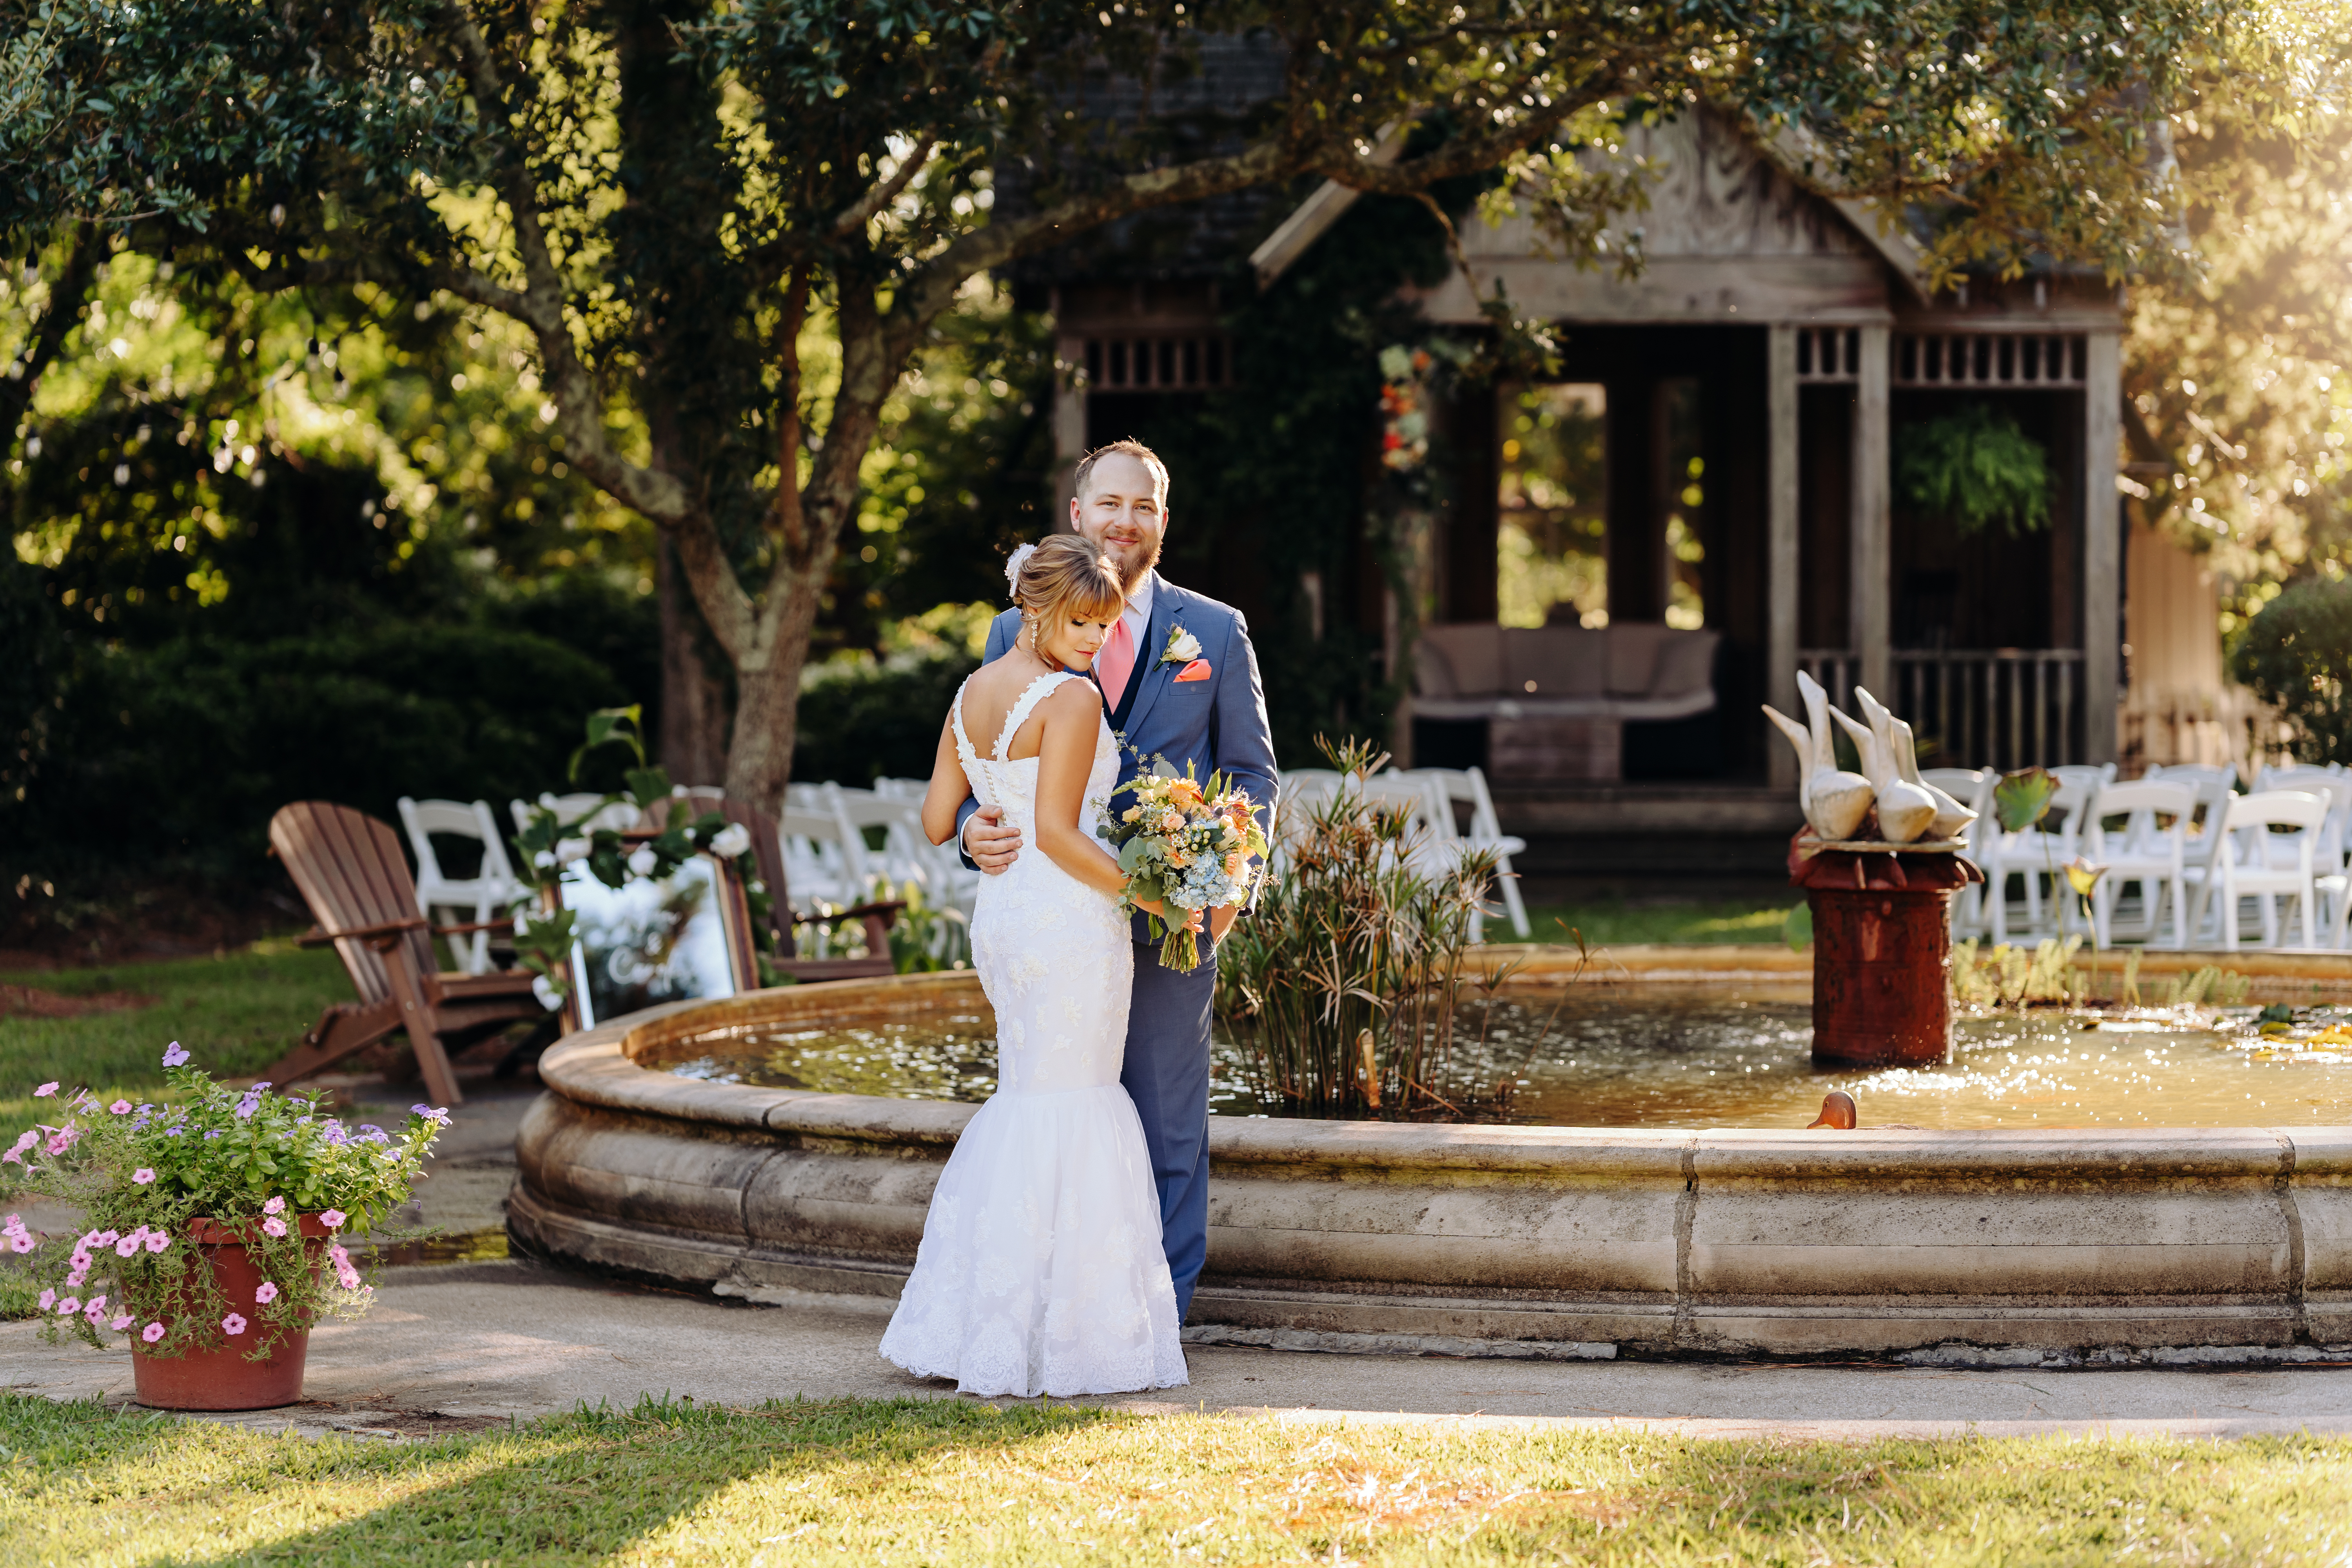
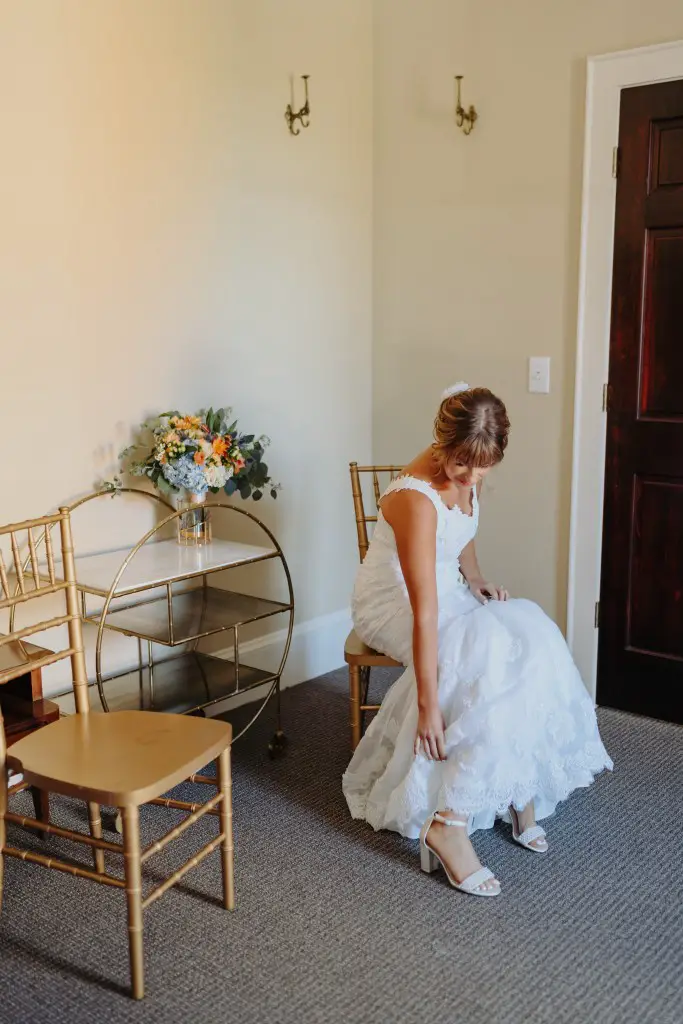
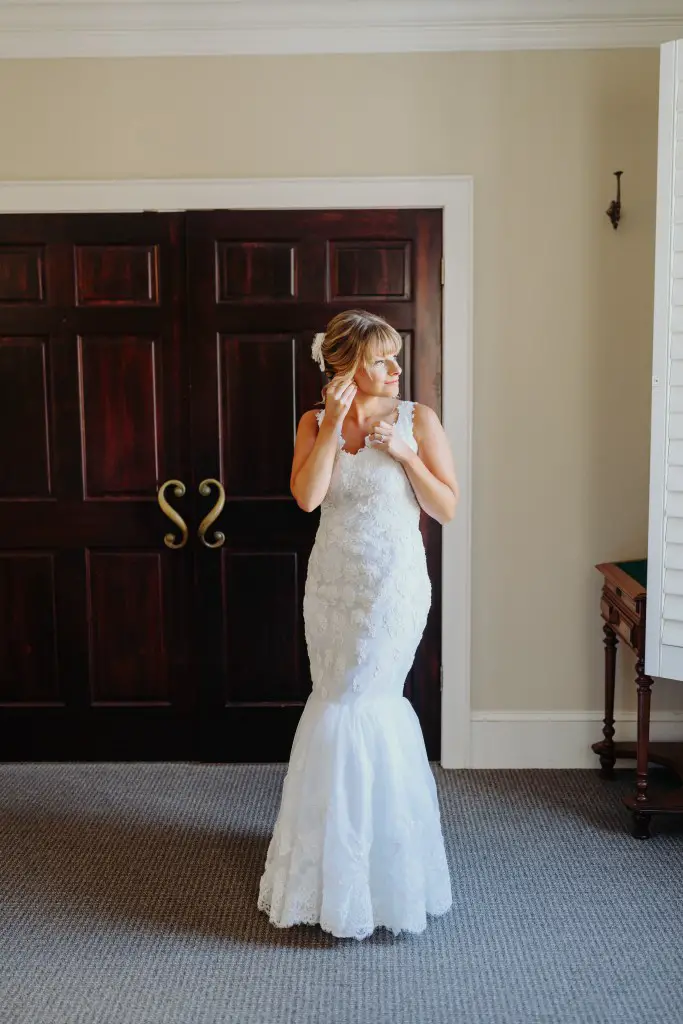
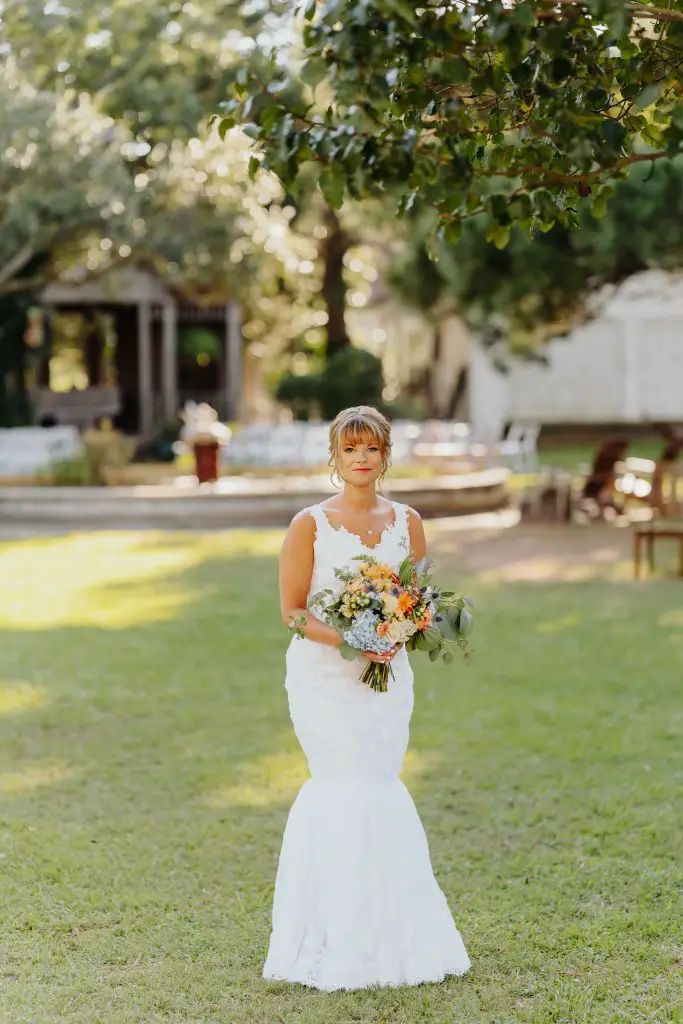
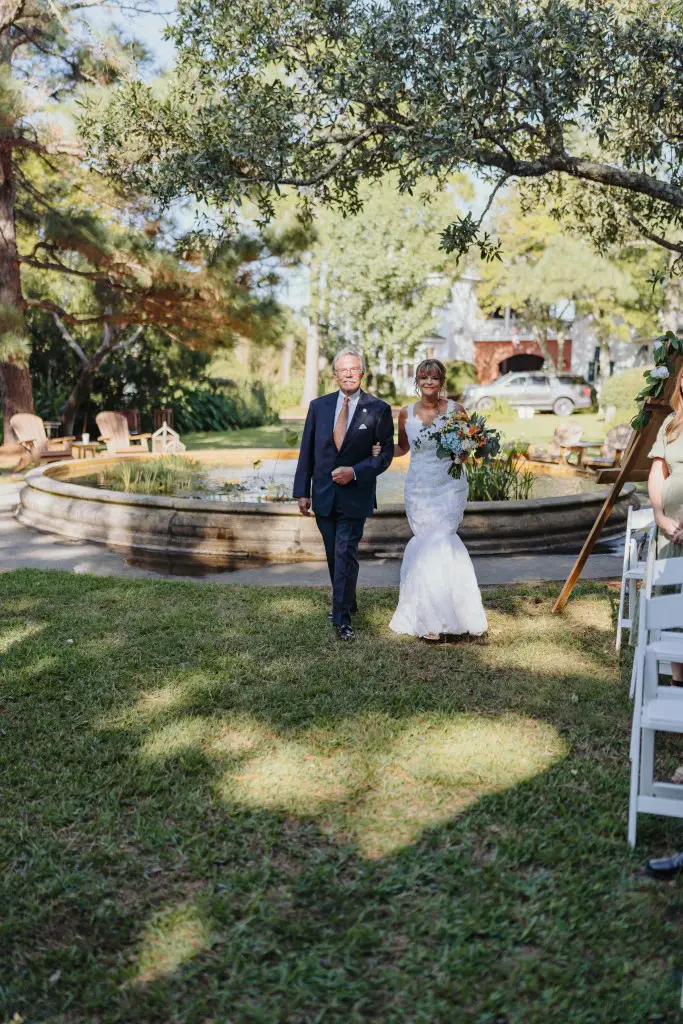
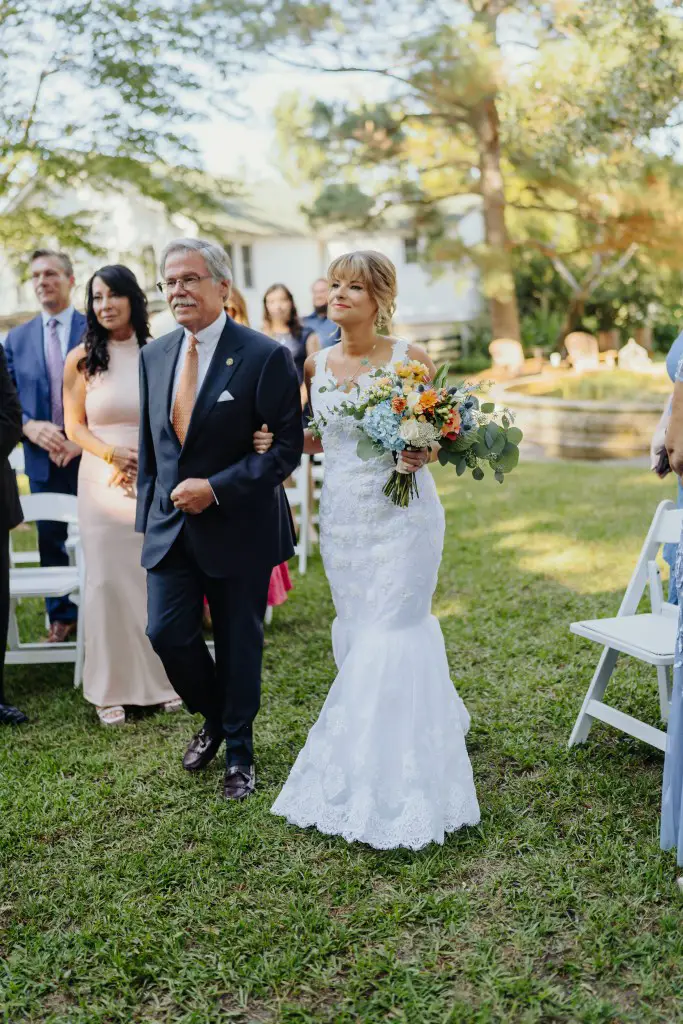
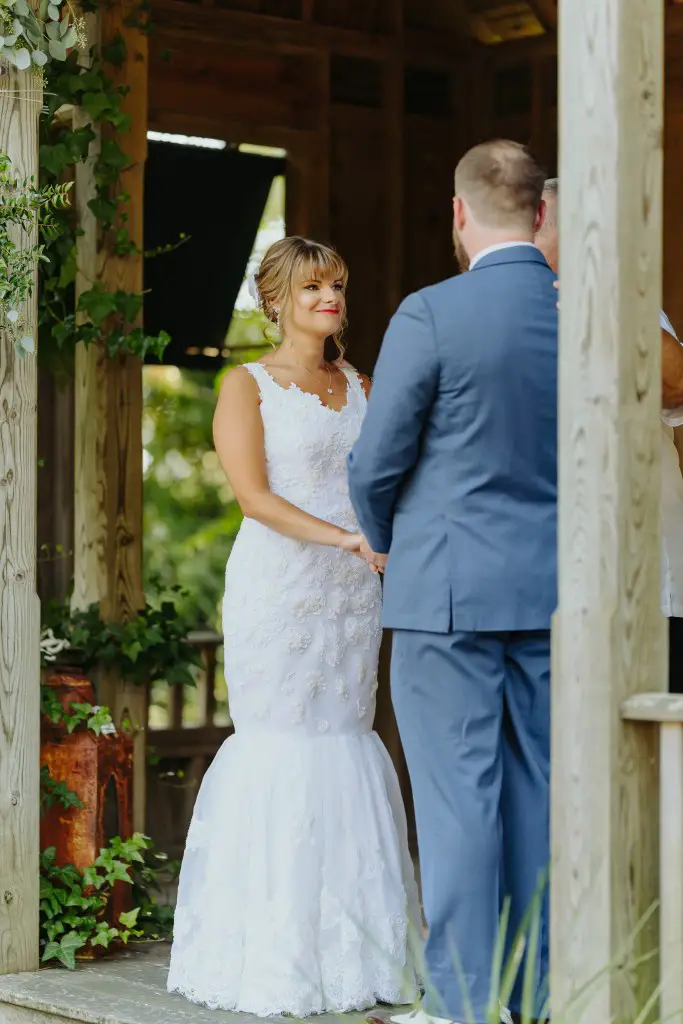


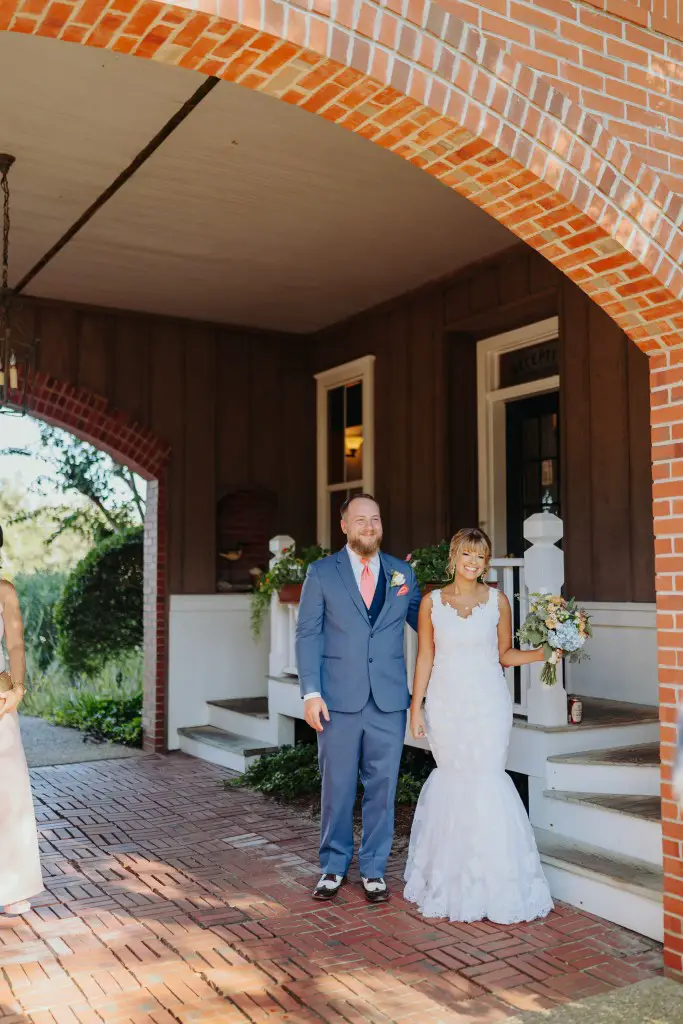
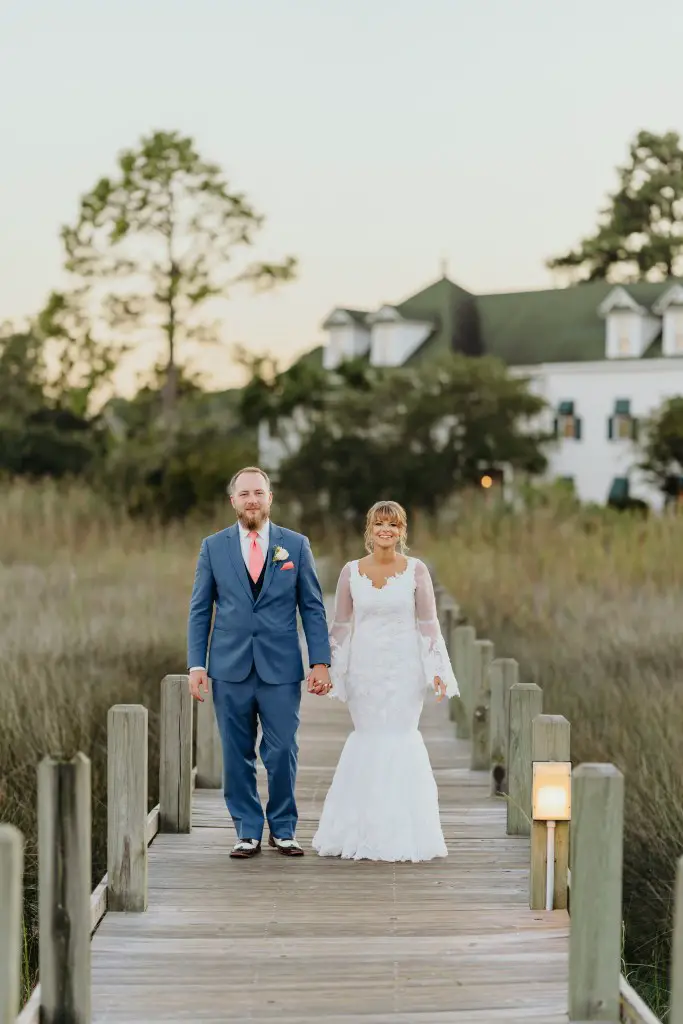
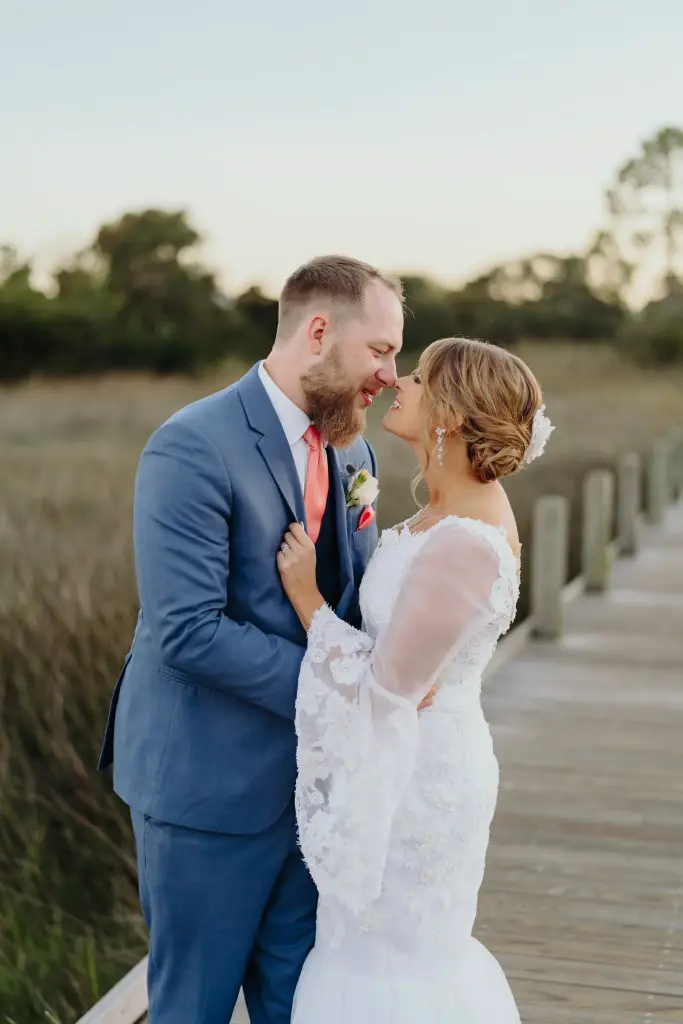
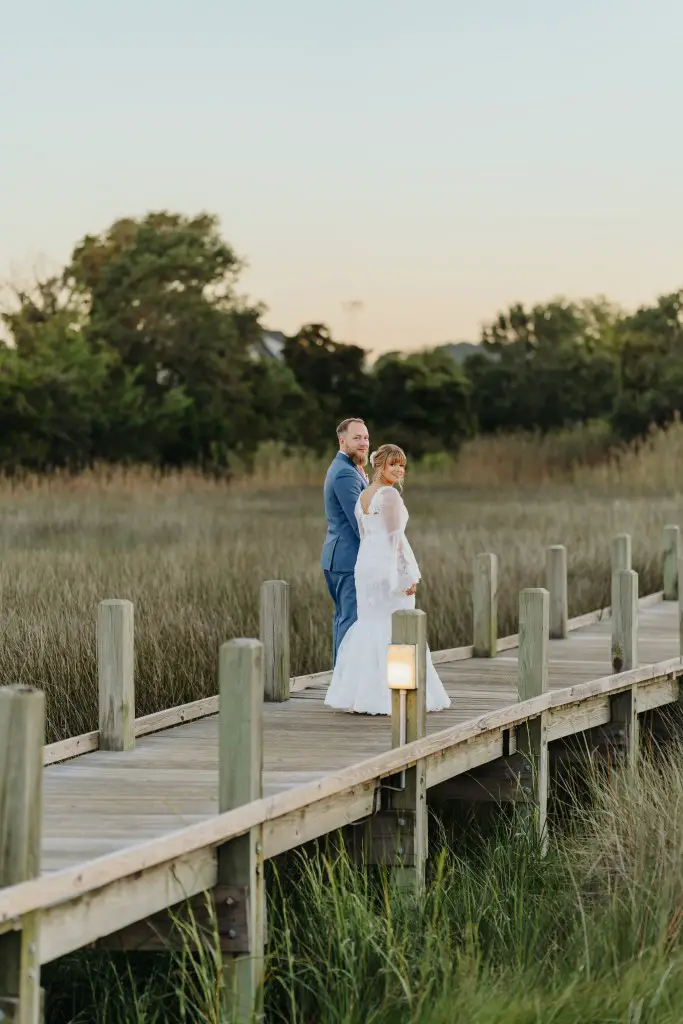

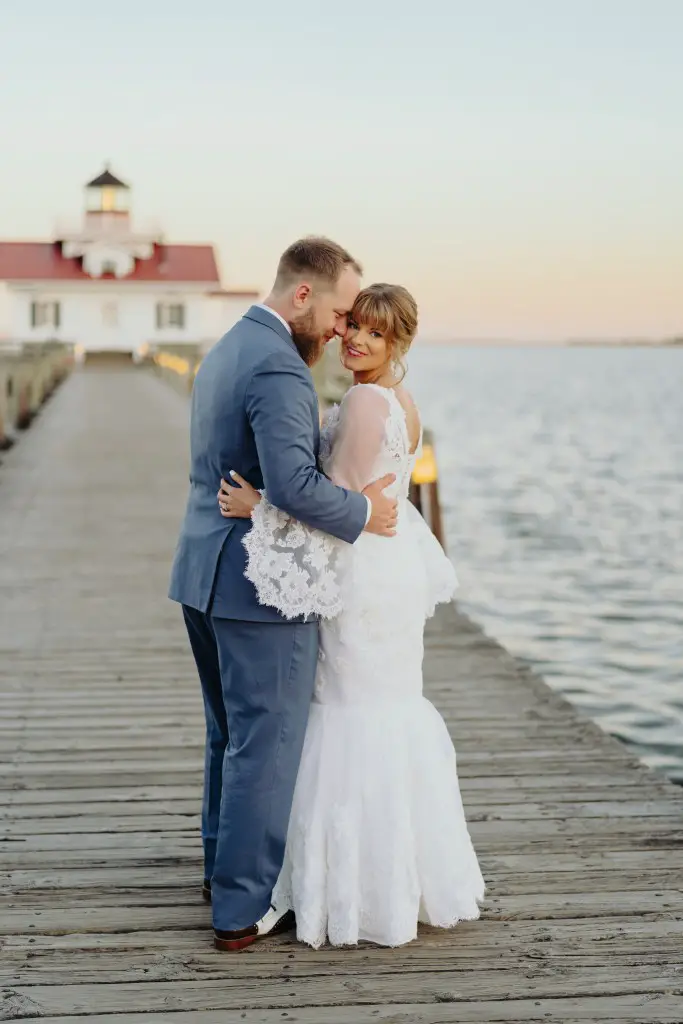
All of the wedding day photos are courtesy of Maria Kandalova Photography. The pictures turned out great, and I’d like to thank Maria for allowing me to use them. If you’re looking for a photographer in the Outer Banks area, check out Maria’s website or instagram.
How to restyle a wedding dress: tips to complete your own wedding dress transformation
Since I was working with a one-of-a-kind heirloom, restyling this wedding dress was a fairly high-stress project. One wrong cut would be a disaster! But even though it was a very special dress, it’s still just fabric. Restyling a wedding dress is a project to take seriously, but not one to be afraid of.
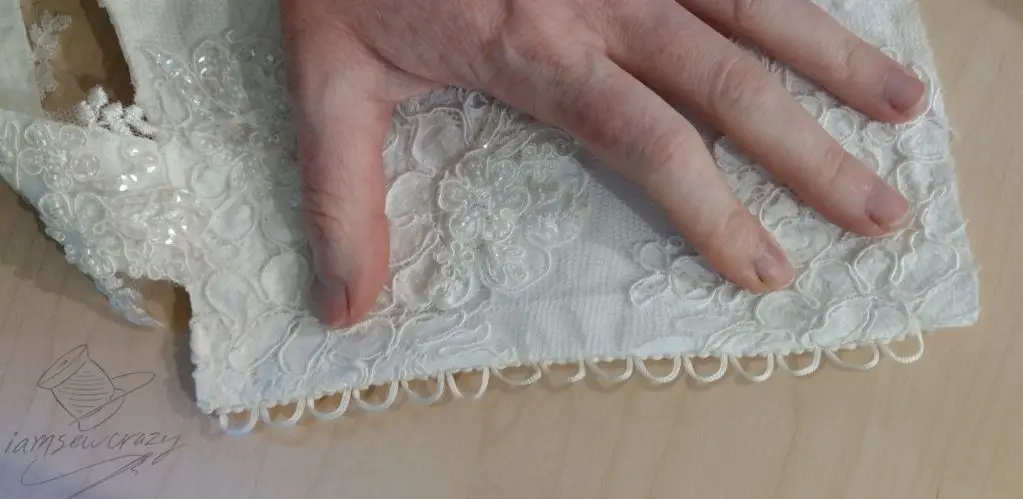
Working with an existing garment does come with certain challenges. You can’t just buy more of the same fabric if you need to, and finding materials that match the dress and fit your vision can be tricky. You need to work around the original seams. There may be damaged areas of lace or fabric that need to be repaired or covered up. And the whole process will be somewhat slow and finicky, since every detail is so important on a wedding dress.
I wish I could give you an exact tutorial about how to restyle a wedding dress into something new. But since every dress is a different starting point, and every bride’s dream is a different ending point, I can’t offer you steps to take or patterns to sew. But I do have a lot of tips and guidance that will show you how to restyle a wedding dress of your own:
Consider the size first and foremost
Work on perfecting the fit before you consider embellishments. It doesn’t matter how beautiful your embellishments are if the dress doesn’t fit!
If the original dress is a little bit too small, think about adding a lace-up panel in place of the zipper or buttons on the back of the dress. This will gloss over minor fitting woes, or expand the dress by a few inches. Side gussets are another good option to fit a bride of a different size.
If the dress is too large for the bride, you’ll probably have an easier time taking away fabric than adding it. Taking in the sides, kind of like a reverse gusset, works very well in most cases. But a lace-up panel can also work wonders on a dress that started out a little too large! Cut down the back, removing the zipper or buttons in the process, and add a lace-up panel as a fastener. This can help make the transition between dress sizes look smooth and purposeful.
If the size of the original dress is too far away from the size that you need, consider reusing just the lace from the old dress, for example, instead of reworking the whole thing. There are many ways to honor an heirloom dress besides actually wearing it! And that brings me to my next tip:
Work with the original dress, not against it
Style choices are very personal, and often brides have strong opinions about them. But certain changes to a vintage wedding dress would be like trying to fit a square peg into a round hole. For example, if the dress was strapless to start out with, it might look odd to try to turn it into a looser-fitting bodice. You may need to keep just the skirt and make a new bodice that fits the look you are going for.
If the current dress is miles away from where you want to end up, then consider merging the old dress with a new one instead of restyling the original wedding dress. For example, think about using some of the original lace as appliqued motifs on a different dress. Or turn the vintage dress into a new veil or fascinator. There are quite a few different ways to honor an heirloom dress and turn it into something completely new.
Whether to restyle the dress or just use components of it is a complicated decision. You should take into account the current size and style of the dress, and how different that is from your vision for the new dress. Consider the emotional significance of the dress, the skill level required to make the transformation, the practicality of cutting your new pieces from the old dress, and the structure that’s already in place vs. what will be needed to accomplish the fit you are going for.
Rely heavily on pictures to make sure you and the bride are on the same page
If the bride is somebody besides you, make sure that you have the same design in mind by looking up a lot of reference pictures. There have been times when my clients were asking for “a buttercream color” or something else that’s very open to interpretation. Make sure that you both use pictures, sketches, and color swatches in order to visually communicate the design that’s in your head.
Restyling a wedding dress will take three times longer than you think it will
The whole process will be somewhat slow and finicky, since every detail is so important on a wedding dress. It’s supposed to be impeccably finished, which often means that four-letter word (sewing by hand)! And when you have a deadline that’s set in stone, like a wedding day, even tiny hiccups in the process can add up. Estimate how many weeks you think the project will take you, and then triple it.
Restyle a secondhand wedding dress without emotional significance if you aren’t confident enough to cut up your grandma’s dress
I’m not sure about your area of the world, but where I live you can find secondhand wedding dresses at thrift stores pretty regularly. It would be really nice practice to cut up one of them and restyle it, to get a feel for how to restyle a wedding dress. When you aren’t attached to a dress and you didn’t pay much for it, you can relax and cut it up without worrying. And that can help you to gain the confidence you need in order to work with a family heirloom. The practice run might tell you that restyling a wedding dress is a bigger project than you want to take on without some help. Either way, it’s good to experiment first without the high stakes.
Be prepared for some surprises
When you start deconstructing a wedding dress, you may find a few surprises. There may be damaged or stained areas of the garment. And on this particular dress, the buttons didn’t match! Some of them were satin and some were matte, which I hadn’t planned on. The veil was also more of a cool white, while the dress was a shade more ivory. And there were several places where the previous seamstresses hadn’t done things the way I would have done them. I’m not saying the previous seamstresses did anything wrong, it just wasn’t the way I would have constructed the garment. So, I wasn’t exactly set up to alter it the way I wanted to.

Sometimes I would work with the way it was made, and sometimes I would redo it entirely. But in each case it meant that the process took me a little bit longer than I’d hoped it would. Which brings me to my next point:
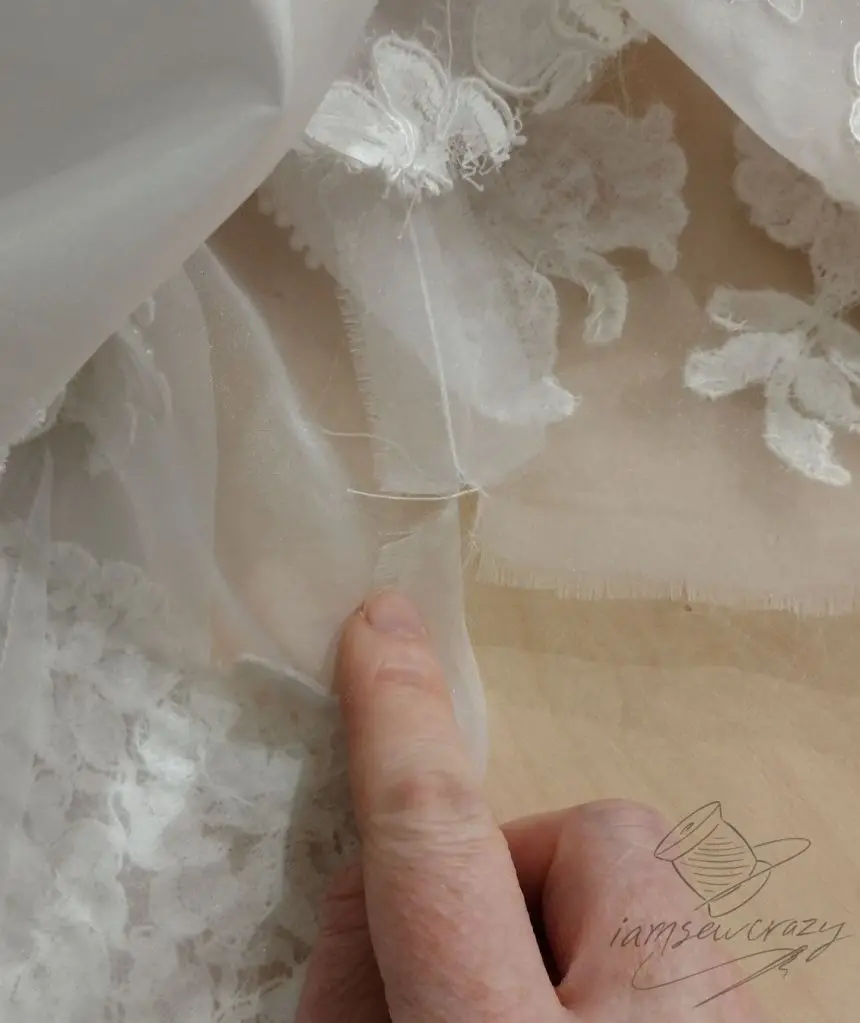
Pay special attention to the grainline of the fabric
Always find the grainline on each piece of fabric before you cut out the new shapes you need. Grainline is very important, but it can be hard to find on a very sheer or delicate fabric. So I made a video showing you one easy way to find the grainline on a sheer fabric:
Know when to add new materials instead of reusing the old ones
I hope this goes without saying, but please don’t reuse thread. That level of thriftiness is not okay. Seriously, don’t be so loyal to the original materials that you lose your mind or your patience.
Never trust an old fastener. With vintage garments like this wedding dress, age can take its toll. Some of the materials might not be as sturdy as they were when the dress was cleaned and packed away years ago.
There were 2 different kinds of fabric-covered buttons on this dress: some were matte, and some were satin. The glue holding the satin buttons together had given up completely. I could pull the fabric shanks right out of the satin buttons without any trouble! Obviously I did not reuse the satin buttons. I did reuse most of the matte buttons, BUT I added a metal hook and eye at the top of the bodice where the greatest strain would be placed on the highest button. I made sure the bride knew that it was there, and threatened to text her the morning of the wedding to remind her to have it fastened 😂
The zipper was still in good shape, and if it had been an invisible zipper, I could have reused it. But the dress originally had a flowing skirt with a lapped zipper. When I restyled the skirt to be far more fitted, a lapped zipper didn’t make sense anymore. So I bought an invisible zipper and used that instead.
Measure twice. Then measure twice again.
You don’t get a do-over with a unique project like this! I definitely couldn’t run down to the fabric store and pick up a new dress to use. Double-check before you make any cuts, and don’t work when you’re too tired or distracted. Use pins or clips to hold other layers of fabric out of the way when you are cutting or sewing. And double-check that the measurements make sense and everything looks right as you go.
Save all of the scraps from every material in the original wedding dress
You will need to obsessively save every single scrap of fabric, like some sort of pack rat with OCD, until the project is done. There are many reasons for this:
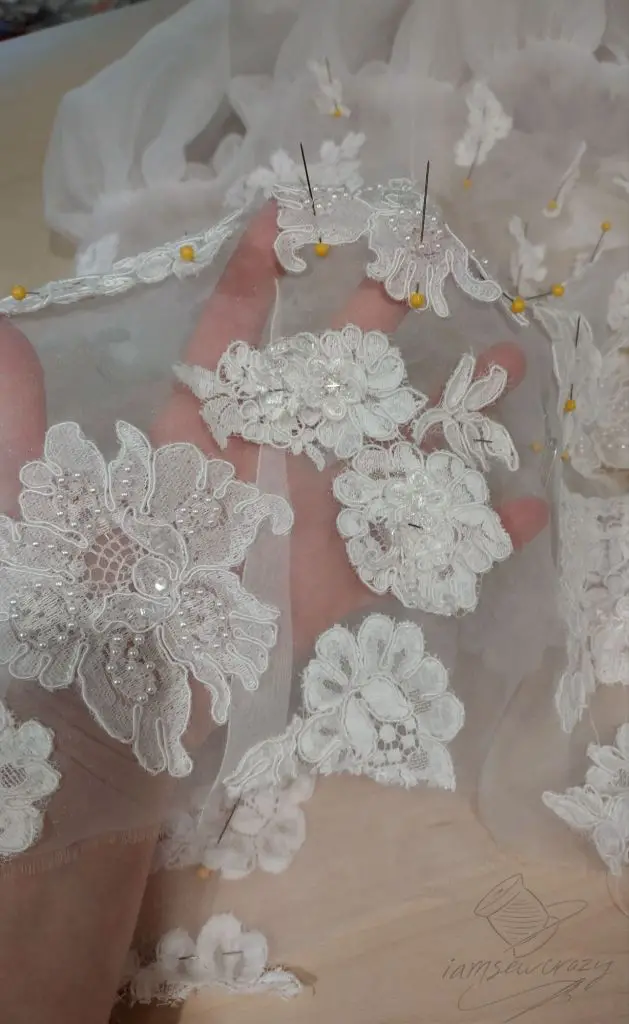
Always take scraps with you when you go to the fabric store. Look at your materials in natural light to see if you are matching colors. And make sure you layer the materials on top of each other, if they will overlap in the finished dress. You might be able to tell that in the picture above, the shimmery lace I was looking at was not a good match, so it went back on the shelf.
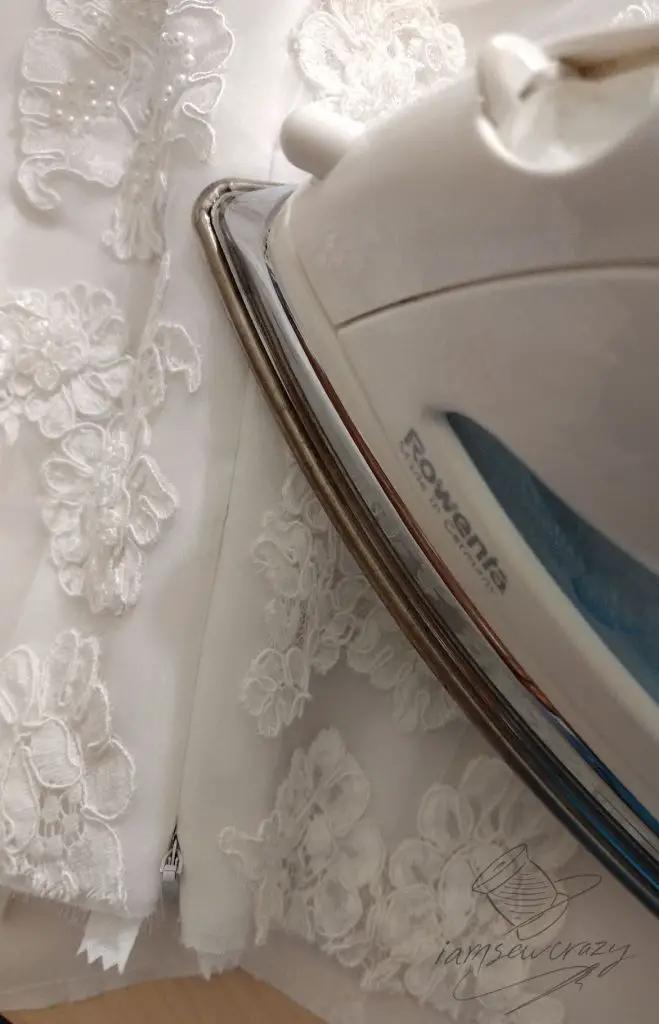
Use scraps to test your iron settings before pressing. Pressing the fabrics and seams as you sew is essential for a professional finish. Test your iron temperature on a scrap of fabric that doesn’t matter, to make sure you won’t singe or glaze the actual dress.
I also used fabric scraps to test my stitch settings. And when I gathered the fishtail pieces with my vintage gathering foot, I use some test scraps to make sure the fullness of the gather was exactly what I was going for.
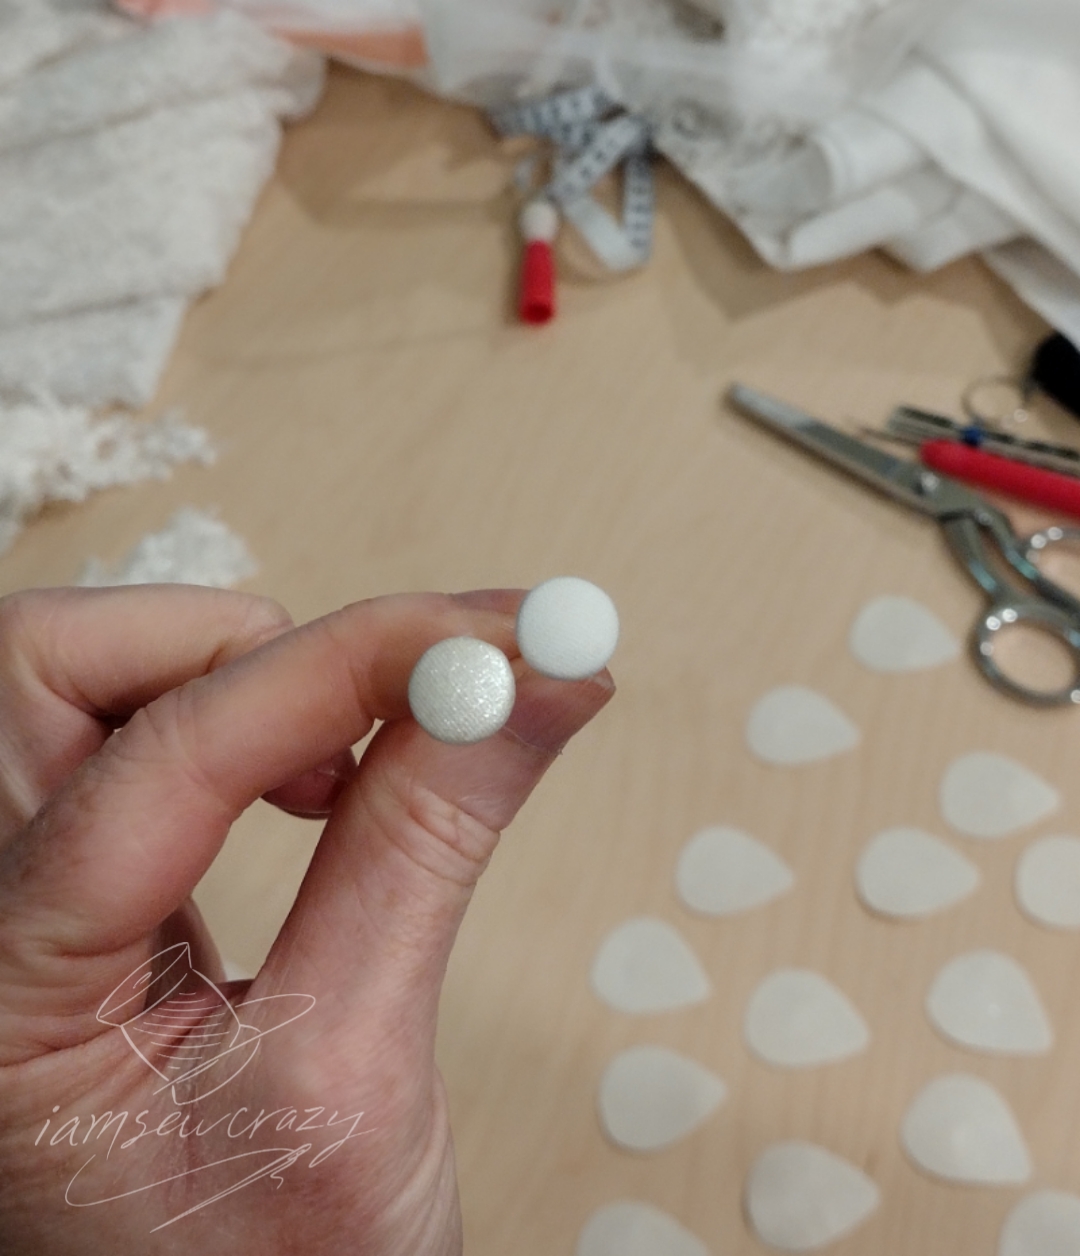
If you are making any smaller accessories or accents, such as the flower-shaped fascinator I made, then scraps can be very useful. The tiniest little snips of fabric and lace became the petals of the flower, and the accents in the center!
I even sent along a scrap of each material with the bride. I didn’t think she’d need them. But I sent them just in case she needed to steam any areas of the dress on the wedding day. It’s always better (for the dress and for the stress!) to have some scraps to test your methods out.
Utilize heirloom sewing techniques
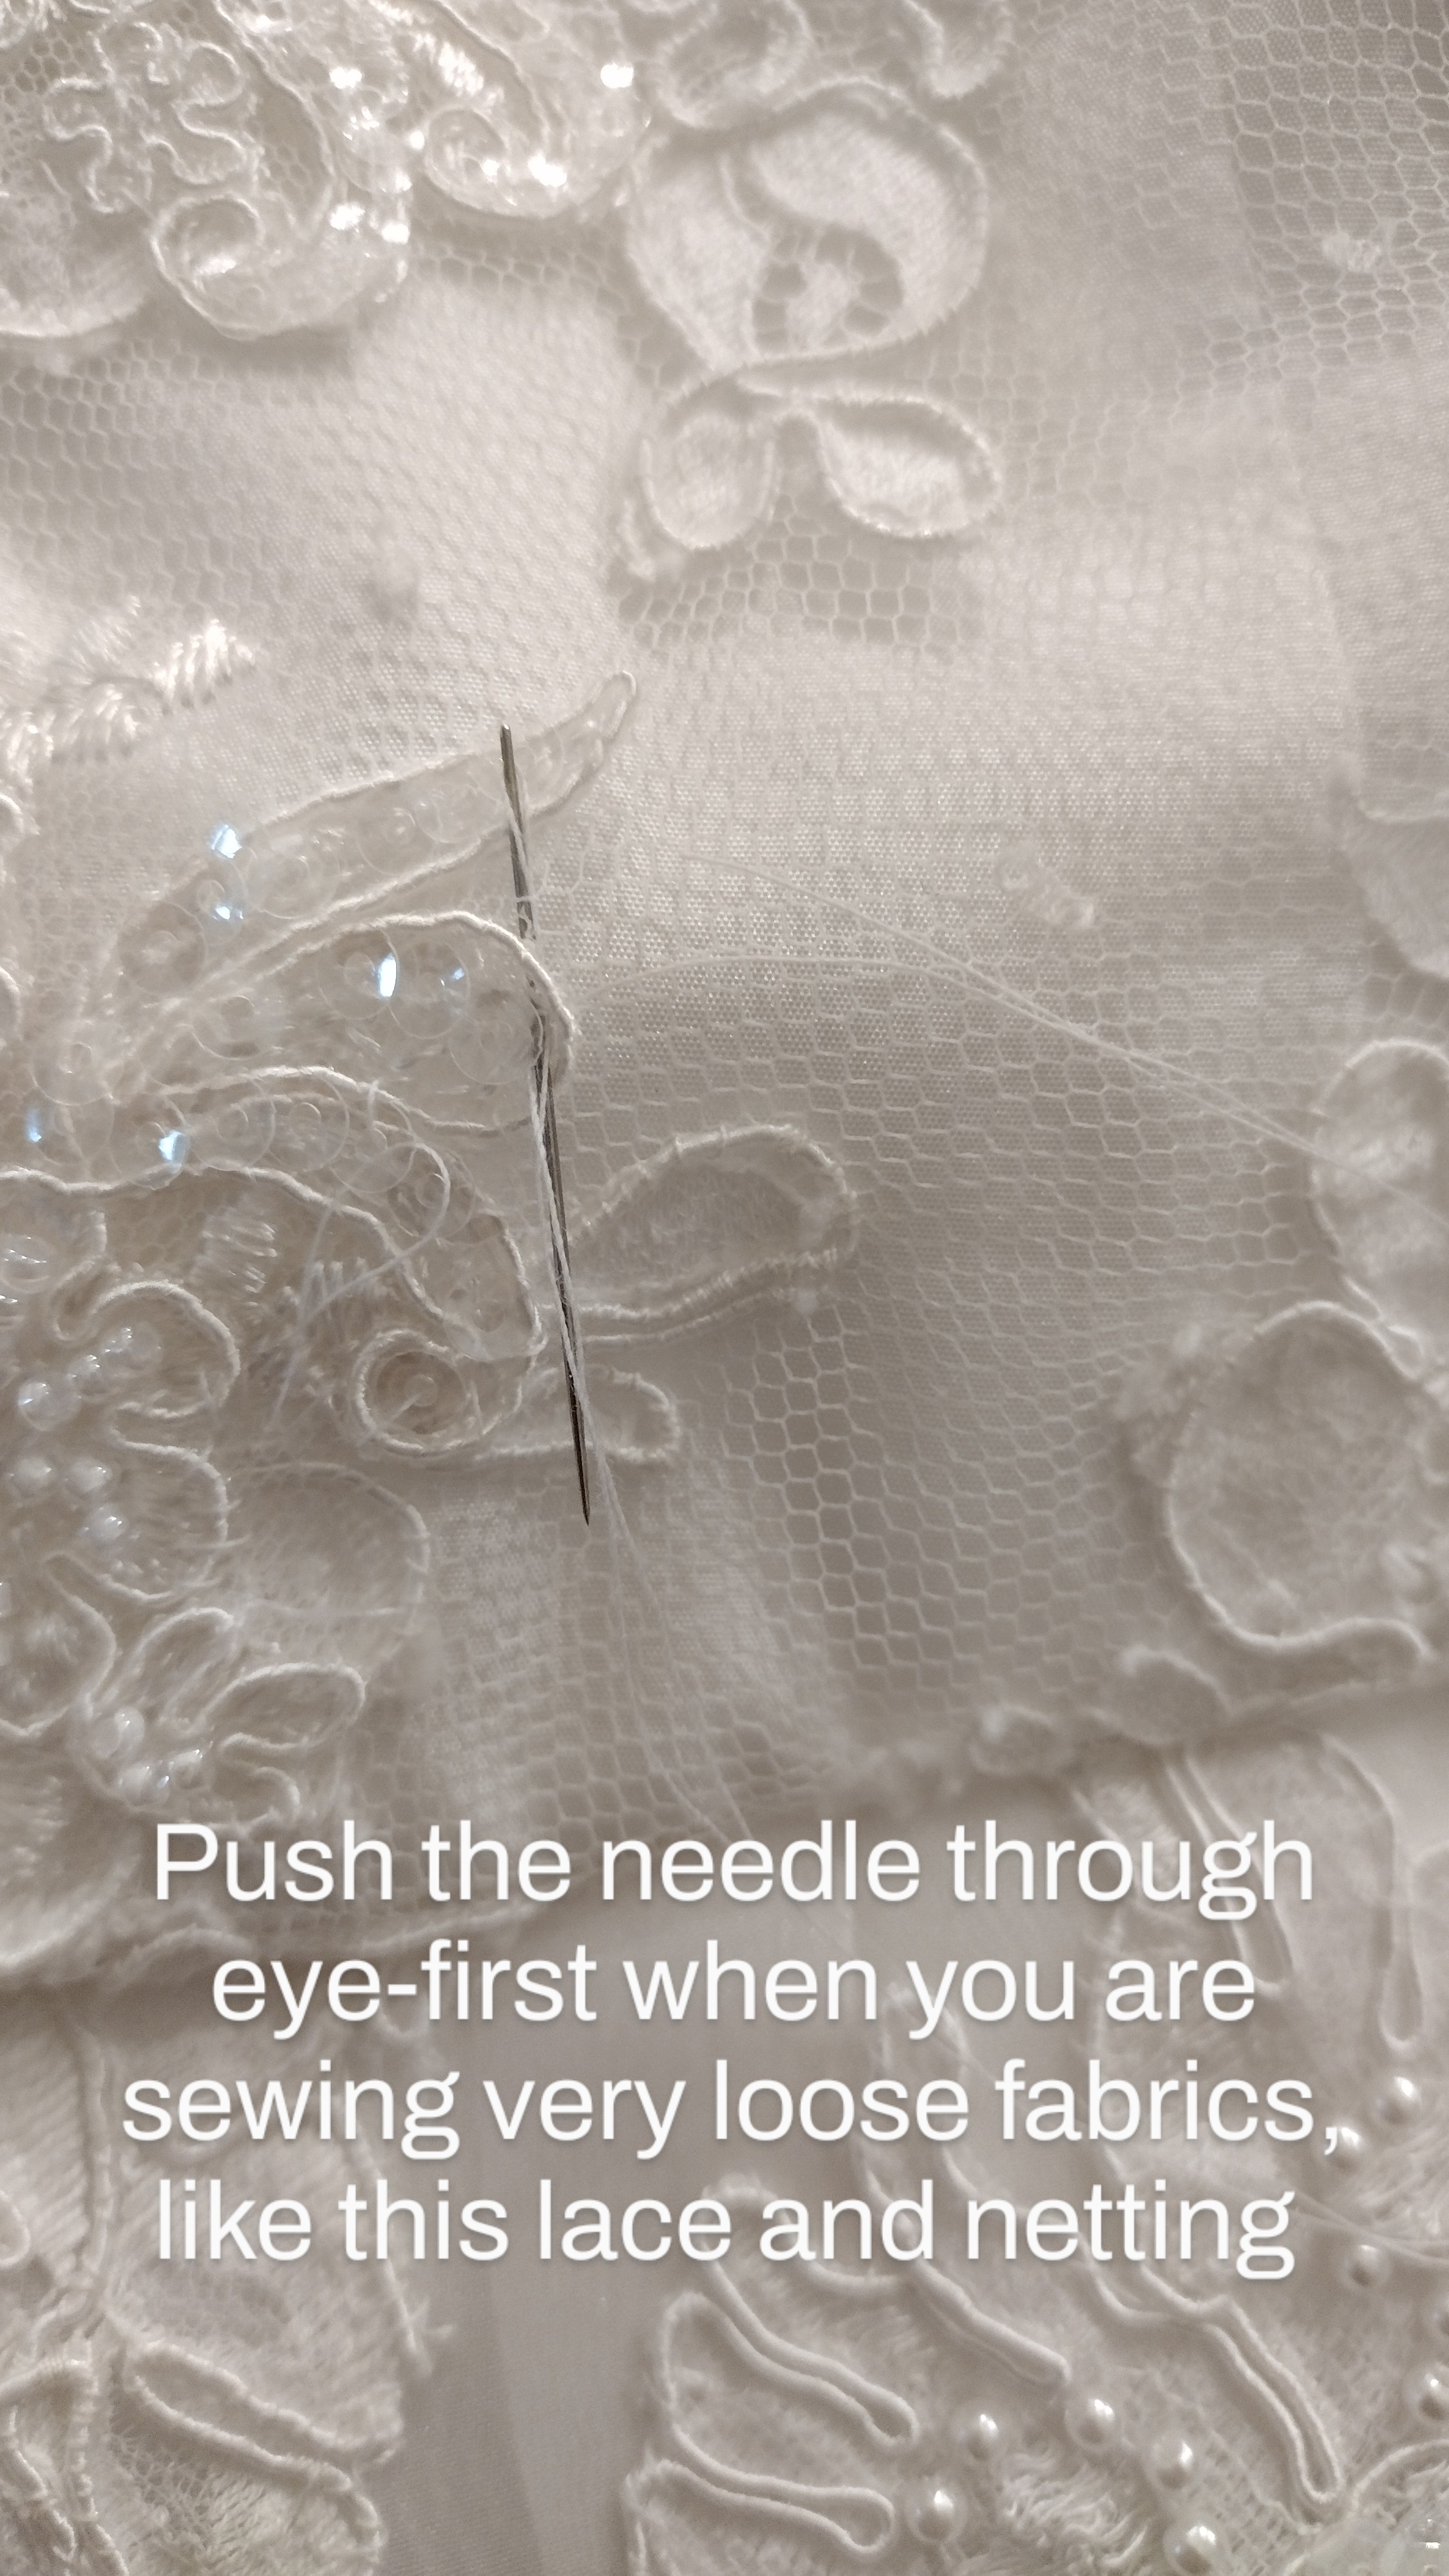
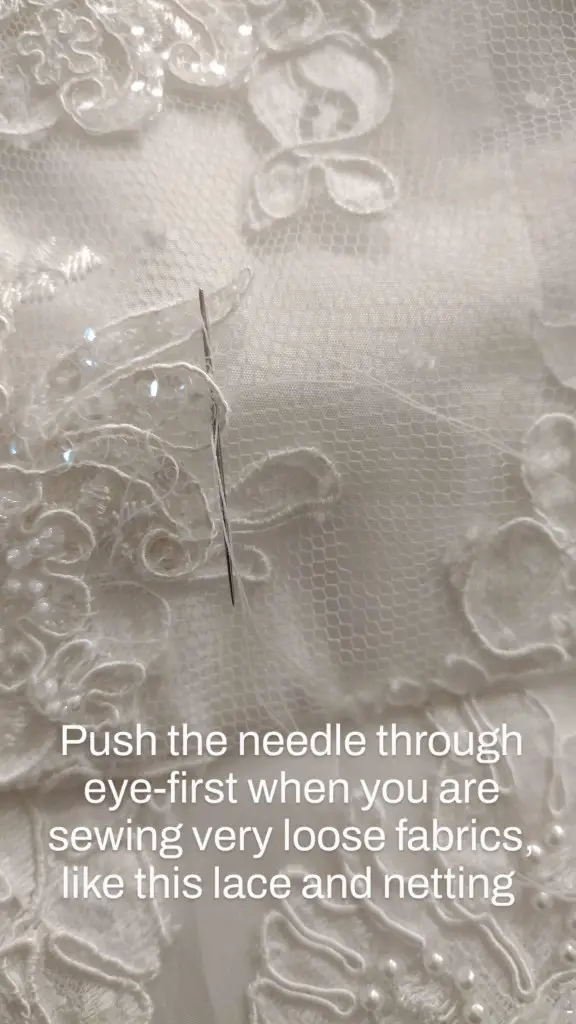
There are lots of techniques used in heirloom sewing that will add a very professional finish to a wedding dress. If you’re not accustomed to hand-sewing or working with lacy fabrics, it’s a good idea to familiarize yourself with these methods before you begin restyling a wedding dress. In particular, the heirloom techniques for sewing lace-to-lace, working with sheer fabrics, or hand-sewing appliques will be very useful to know.
And get familiar with tailor’s tacks, since this will be your best bet for making reference marks on a very important (and white!) garment. I didn’t trust any fabric marker on this dress!
Always fit the dress on the actual bride whenever possible
I know life is hectic and planning a wedding is complicated, but having in-person fittings is extremely important. Working from a list of measurements will never tell you the whole story. The exact slope of a bride’s shoulders, for example, can really affect the fit of a dress like this. And you need as much visual info as possible when you’re making changes to such a special garment.
Know how to do a proper fitting
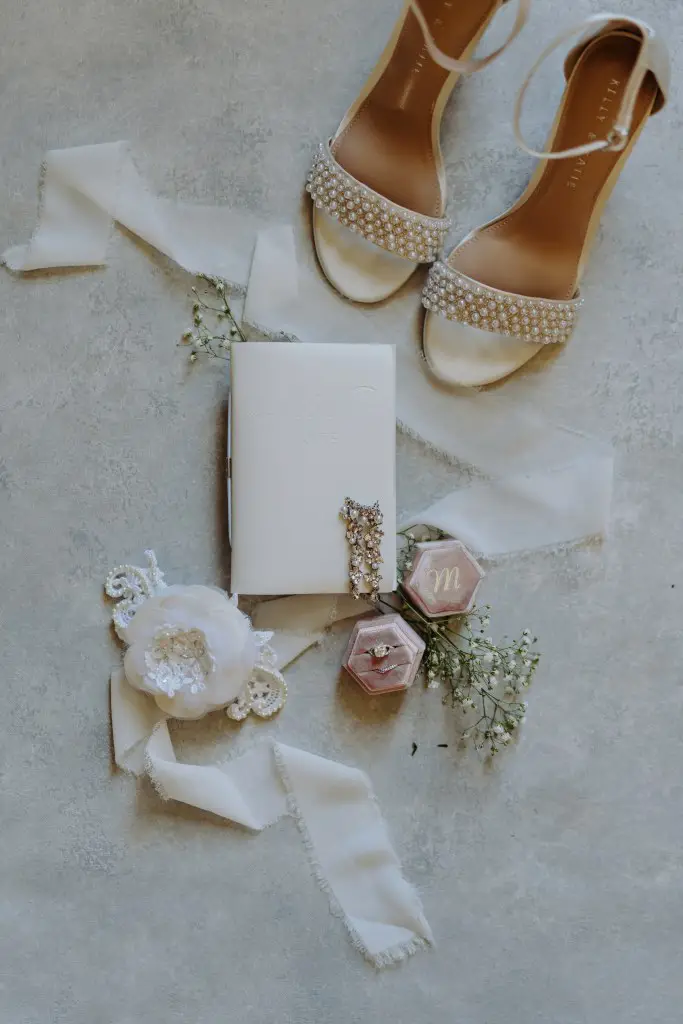
When you do a fitting, make sure that the bride brings the shoes she will be wearing to the wedding. That way, you have an accurate idea of how low the hem will fall.

If she will be wearing a bra with the dress, tell her to bring that exact bra to the fitting.
While she’s wearing the dress, have her walk around, stand up straight, and sit down. Make sure that nothing drapes awkwardly while she’s moving, and that she has enough room to sit down.
Unfortunately you’ll also have to mop the floor before the fitting, which is definitely the glamorous side of fashion design. Dragging a white dress around on a dirty floor is a very bad idea. Sometimes I throw clean fabric on the floor instead of vacuuming and mopping. I know the last thing we creative folks want to do is stop and mop the floor, but it’s a pretty important thing to consider.
Make sure your tools are good quality
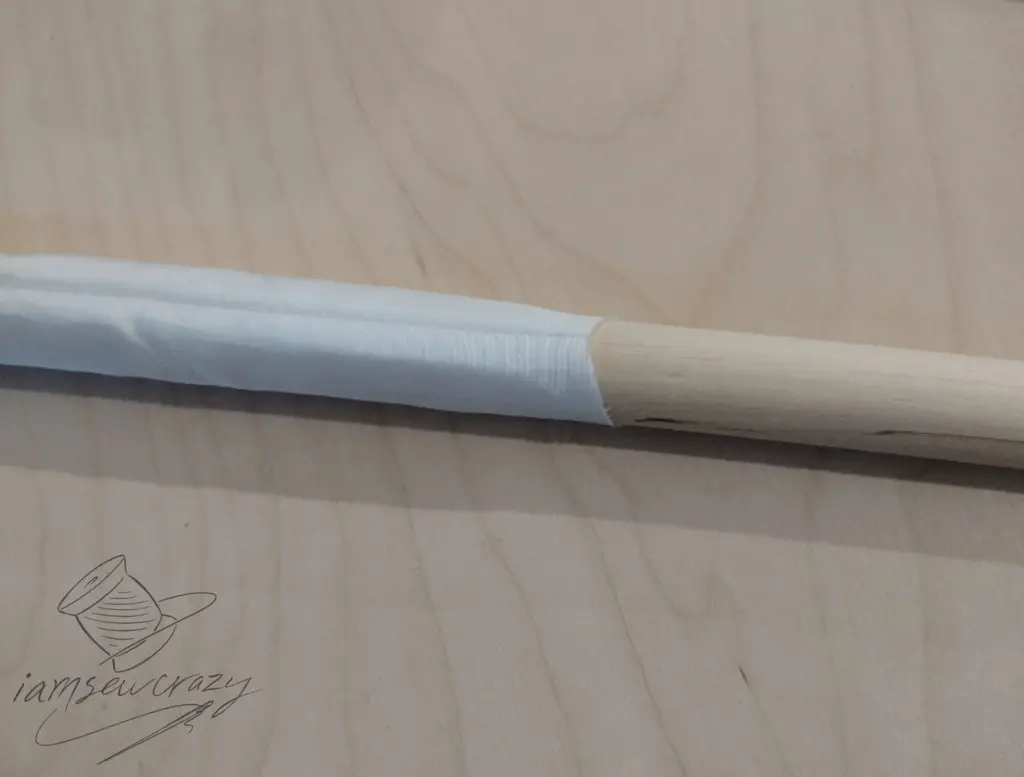
I have a travel-sized iron that I wouldn’t let within 100 yards of this dress. When you’re restyling a wedding dress or other important garment, you need to make sure that the tools you are using are good quality and trustworthy. For instance, your iron needs to be able to hold a consistent temperature. The needles that you choose should be the perfect needles for the fabric (and you should change them often). You should have a good assortment of pressing aids on hand (such as wooden dowels, pressing hams, and tailor’s clappers) that won’t transfer any dye or finishes to the white fabric. And make any reference marks with tailor’s tacks, instead of trusting that a fabric marking pen will disappear completely.
These are the tools and supplies that I relied on. (By the way, these are affiliate links and I earn from qualifying purchases at no extra cost to you):
- My trusty Rowenta Pro iron (that’s a newer model than mine is)
- Schmetz microtex needles in sizes 8, 10, and 12 (the dress was made of 5 different fabrics, plus lace)
- Beech wood dowels for pressing seam allowances open (I keep an assortment of sizes on hand)
- Mettler Metrosene thread
- Coats invisible zipper in white
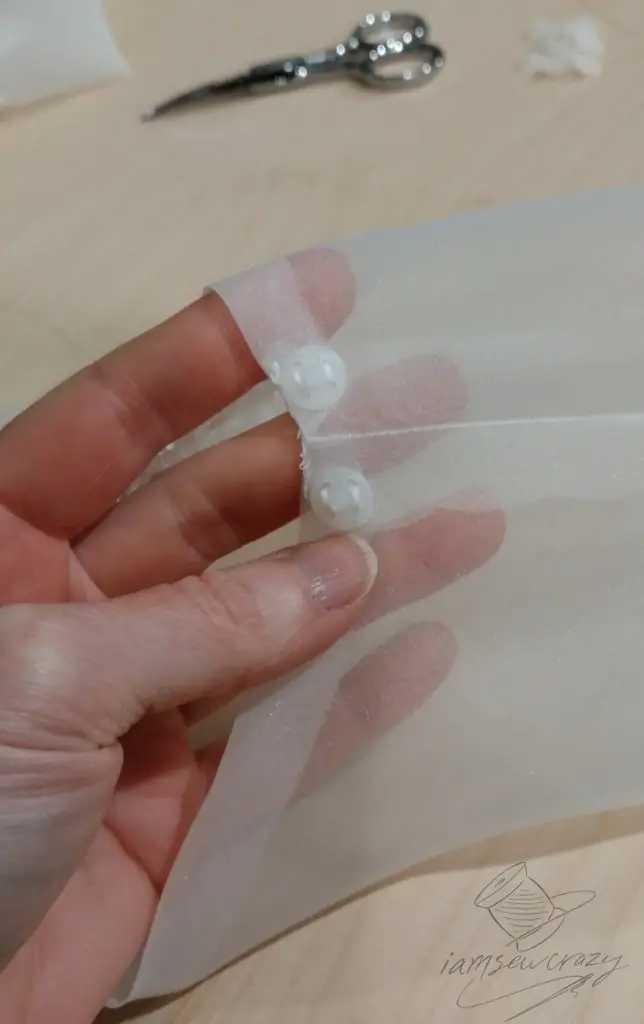
- Translucent plastic snaps to attach the sleeves (you can also use them for bustling up a train)
- Silicone finger protectors to help with the heavy-duty hand sewing and finicky ironing
Use materials that are designed to last through long-term storage
In general, you should avoid glue and adhesives. For a garment that will likely end up in long-term storage, sewing everything is a much safer bet. (Remember the fabric-covered buttons that fell apart from the original dress?) Glue is pretty great for quick Halloween costumes, but please don’t use it on an item that is supposed to be treasured for many years to come.
If you use any metal components, such as hooks and eyes, make sure that they are rustproof. A rust spot on a white wedding dress is pretty much the end of life as you know it.
Wash your hands, clean your sewing machine, and dust your table often
Skin oils will get on the fabric, you can count on it. During sewing, cutting, fittings, etc it will build up and cause the dress to look yellowish. Try to minimize it as much as possible by washing your hands frequently. I didn’t wear gloves (it would have made all that hand sewing terribly cumbersome) but there are probably a few instances where gloves would make sense.
Don’t use lotions or perfumes that might build up on the dress as you work. Tell the bride to avoid lotion and perfume for the fittings if possible. The bride should avoid makeup at the fittings as well, if the dress will be pulled over her head to try it on.
Clean your sewing machine really well before you work on a wedding dress. If you need to oil your machine, sew on rags afterwards to make sure there is no stray oil making its way towards the fabric. And wipe up any oil drips really well using rubbing alcohol.
Dust off your cutting and sewing table, as well as the bed of your machine, before working on the dress each time. Lint will really show up on a white garment!
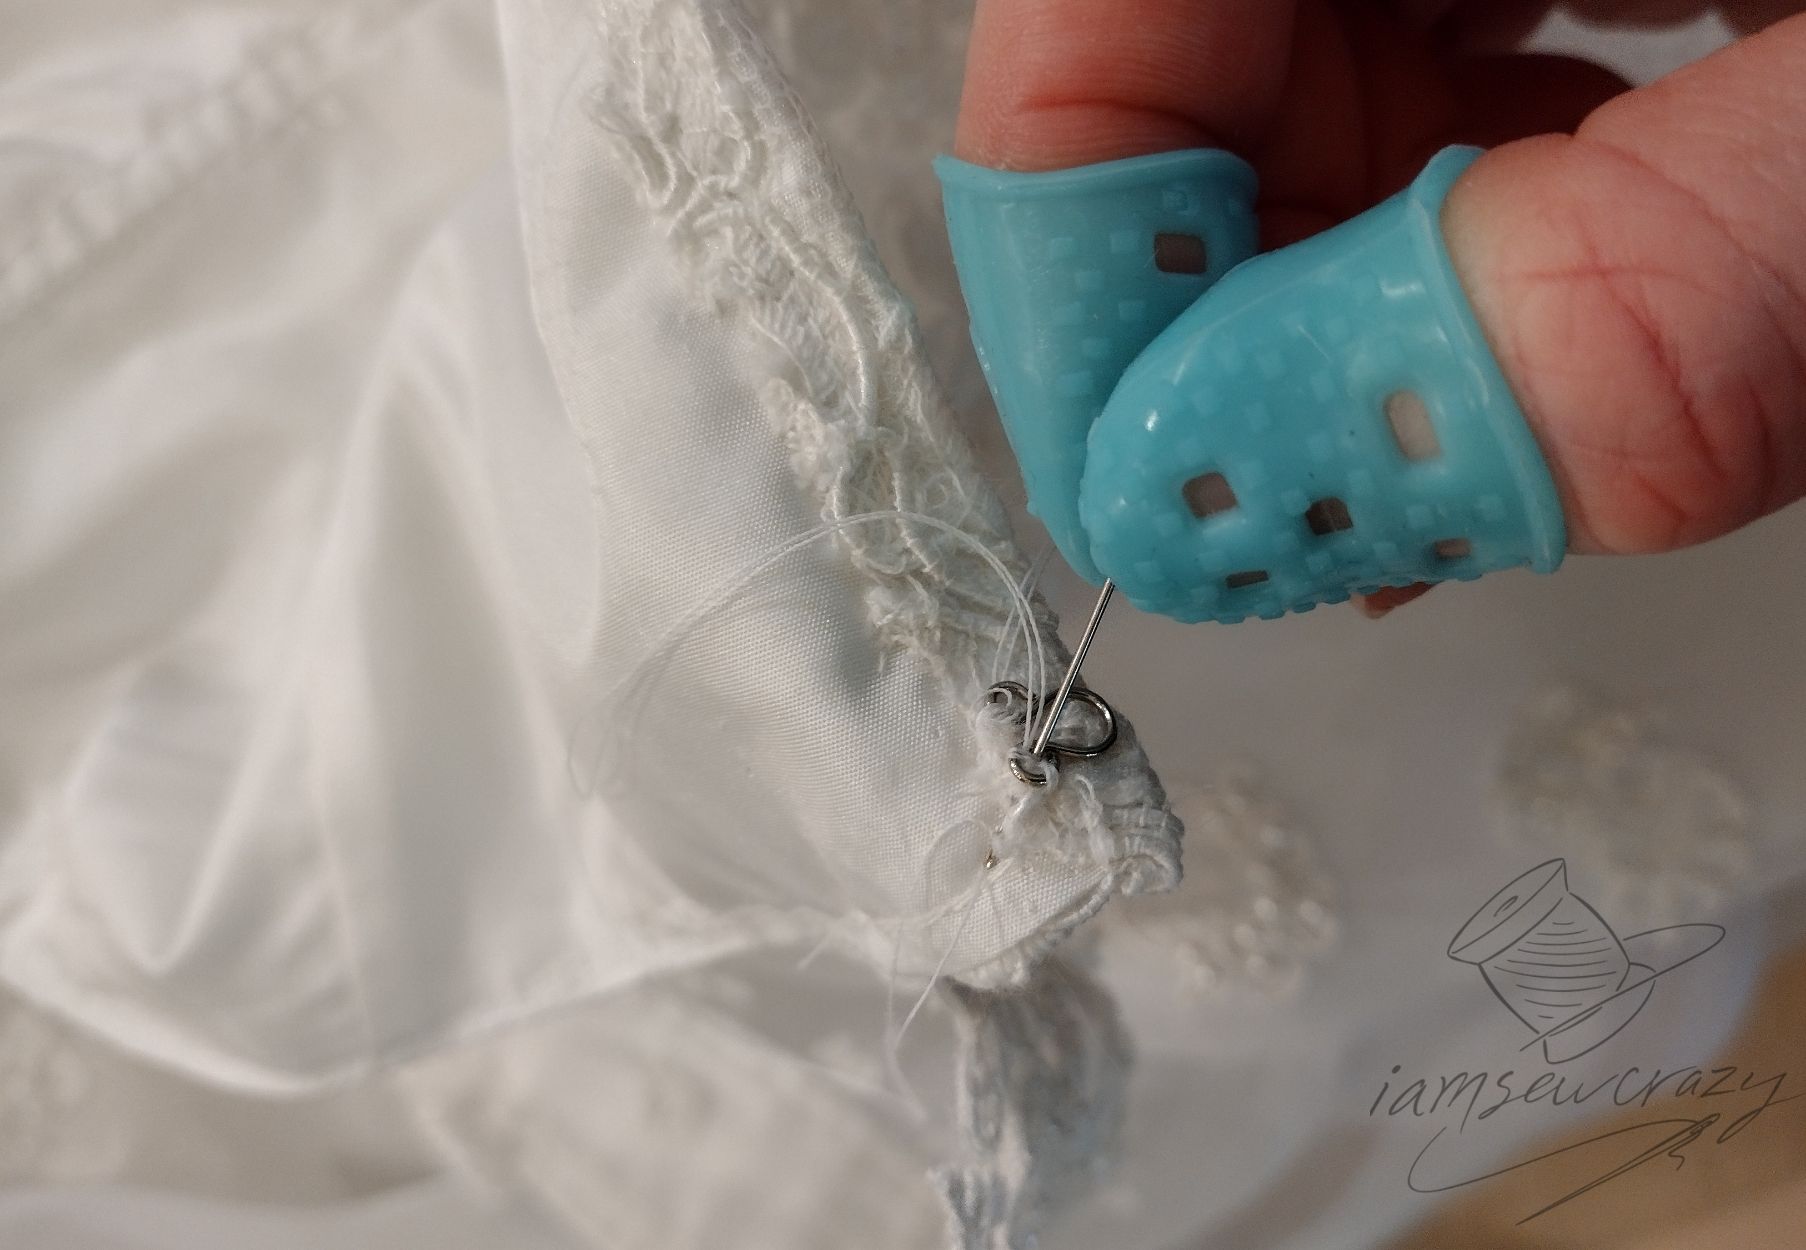
Don’t prick your thumb and get blood on the dress like I did
Yep, I can be a little clumsy at times, and I caught myself with a pin during one of the fittings. I got blood on the dress! Fortunately it was at the end of the original sleeve, near the cuff, which was one of the few pieces I didn’t need to reuse. But wow, holy crud, be careful when you’ve been trusted with a garment that has a high emotional and monetary cost. Take your time and don’t be chaos on wheels when you’re working with it.
I also refused to bring any drinks into my studio while I was working on the wedding dress. I do often have coffee or something with me, but I couldn’t risk a drip disaster. Be mindful of any pets, kids, messes, and spills that might harm the dress.
Don’t be afraid to ask for help
No judgment here! Bridal fashion design is difficult. A wedding dress is supposed to be an impeccably fitted and constructed garment. The wedding pictures should bring joy in the future, and your memories of the day should be overwhelmingly happy. It’s great that you’re preparing yourself and reading all about how to restyle a wedding dress. But if it seems like it’s too far outside of your comfort zone, it’s okay to pass off the project to somebody with more experience. If you’re stressed out and the dress is not turning out the way you’d envisioned, there’s no shame in asking for help from someone who already has experience fitting and restyling wedding gowns.
Now, let’s get back to the dress transformation!
How to restyle a wedding dress: Designing the new wedding dress
The bride, Caroline, had seen some of my work at a fashion show when she saw the Flights of Fancy collection. So she had faith that I would be able to restyle her mother’s wedding dress. And fortunately, her mother Cherie also agreed to trust me with it. They had a family friend who wanted to be involved in the process, too. She would make the fishtail pieces and attach them to a new skirt lining, and then rough out the skirt shape and send the dress to me to complete.
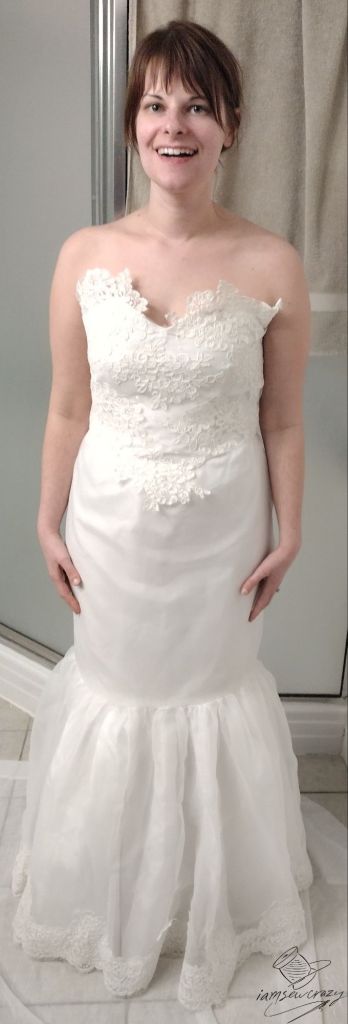
The bride’s vision
Caroline was imagining a dress with a mermaid skirt that flared at the knees, and loosely draped off-the-shoulder straps. She also wanted removable bell sleeves for her second look. (Straps for the ceremony, sleeves for the reception.) And more sparkle! She wanted beads, sequins, and glittery details to catch the light and glam up the dress.
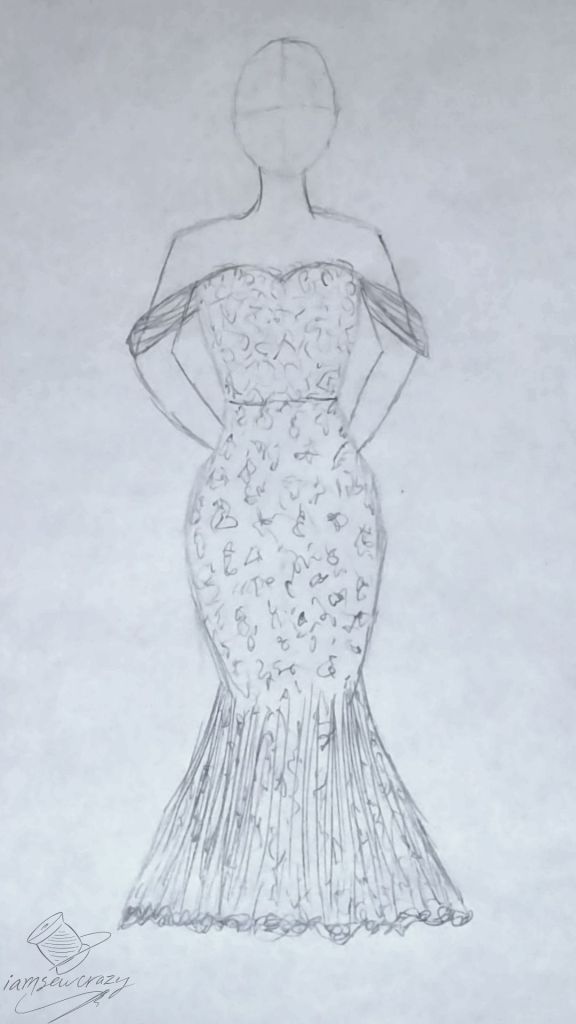
Since there are many different ways to sparkle, I asked about accent colors. She didn’t want anything with too much contrast, like silver beads. But her mom’s veil had pearl accents on it already, as well as some pearlized sequins. So she decided to lean in to the pearl theme as her accent color.
My thoughts
I loved the idea of a mermaid skirt and removable sleeves. And of course every bride needs some sparkle. The pearl accents would look smashing! But off-the-shoulder straps were going to be a bit of a style and design challenge for several reasons:
- The bride wanted to visually narrow her shoulders. I thought the best way to do that was with straps that went over her shoulders. Straps hanging to the side of her shoulders would create a horizontal line, where I thought we needed more vertical lines.
- Adding removable bell sleeves to off-the-shoulder straps would spoil the drape of the straps. If the sleeves were attached to loose straps that draped down her arms like she wanted, they would spin around as she moved her arms, and twist awkwardly.
- The dress was not originally built with a structured bodice. The fabric was thin, and it only had two pieces of poly featherboning at the side seams. It was going to be incredibly heavy once we added the fishtail, lace, pearls, beads, and sequins she wanted to add. So in order to have the dress stay up and keep its shape without resting on her shoulders, I would have to build in some very serious support. And since Caroline was losing weight over the next few months, making a fitted strapless dress would be a major time crunch. I’d have to leave the most important fitting until a date that was almost impossibly close to the wedding.
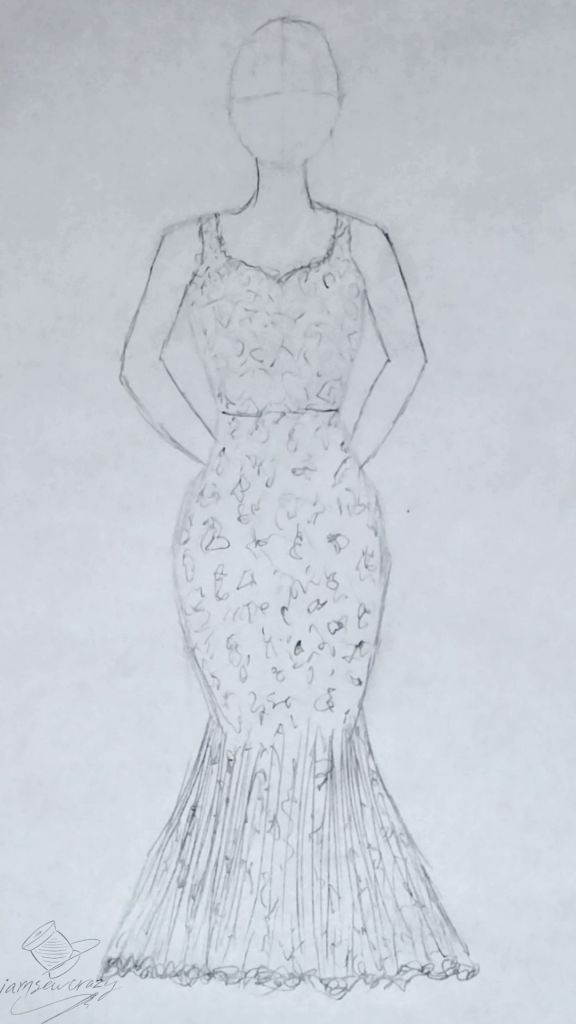
I told Caroline that I could structure the bodice if off-the-shoulder straps were what she really wanted. But we looked at some inspiration photos together, and she decided that adding traditional straps was the right call.


Handing the dress off to Michelle
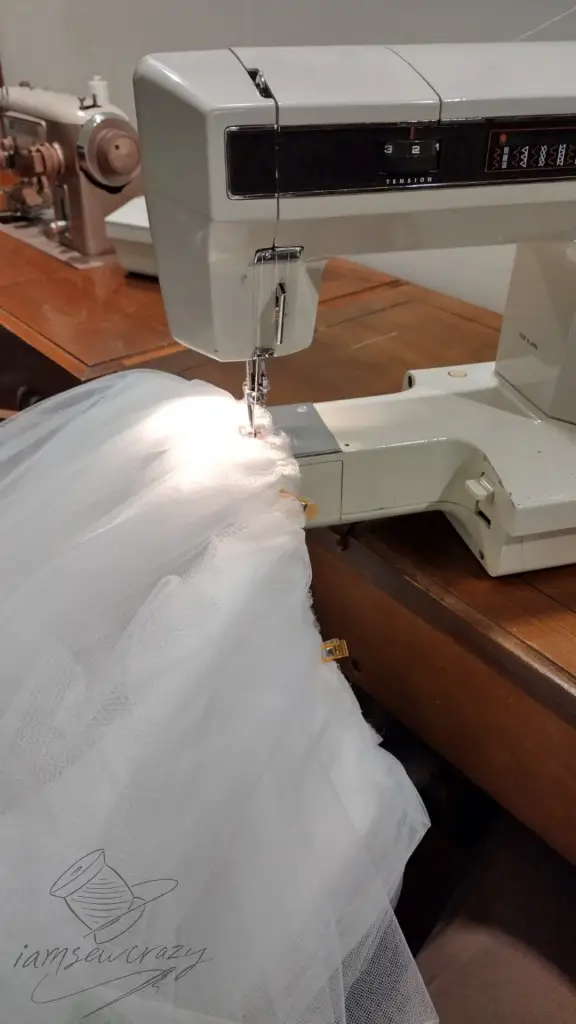
The bride’s family had a friend named Michelle, who wanted to be involved in restyling the wedding dress. I said that was fine with me, so she made the fishtail. She cut down the gathered skirt and train into a roughed-out skirt shape, and added a skirt lining. She also added layers of new tulle to the bottom of the skirt lining, gathered into a poof to create the fishtail shape. The satin and sheer layers of the original skirt were also cut into gathered shapes to cover the tulle of the fishtail.
Caroline had left the veil with me, so I went to work restyling the veil into a fascinator while Michelle worked on the skirt.
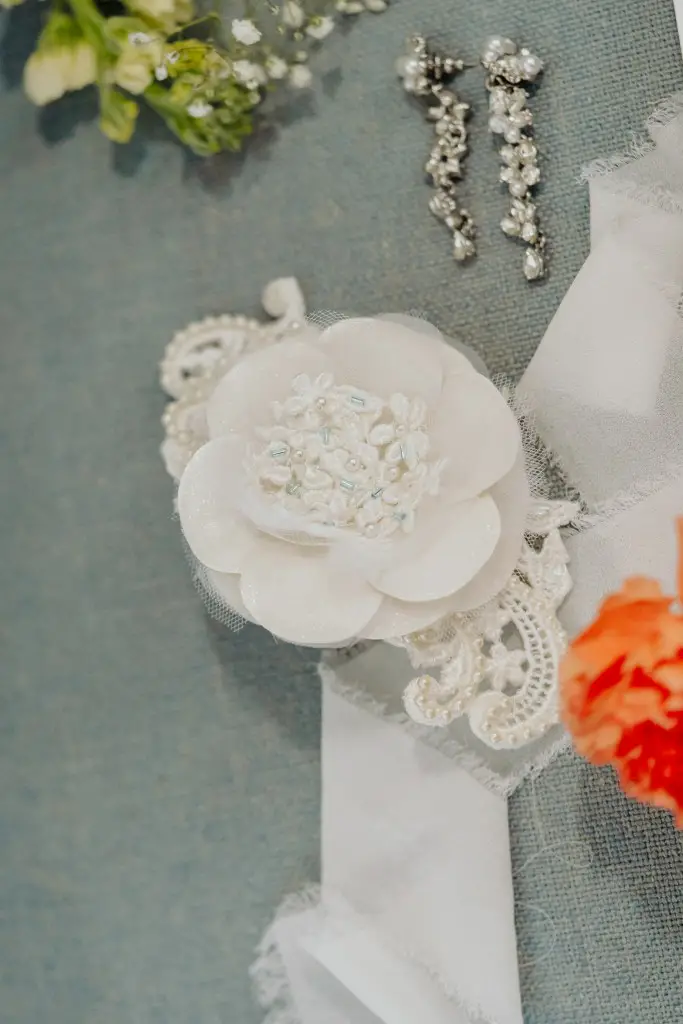
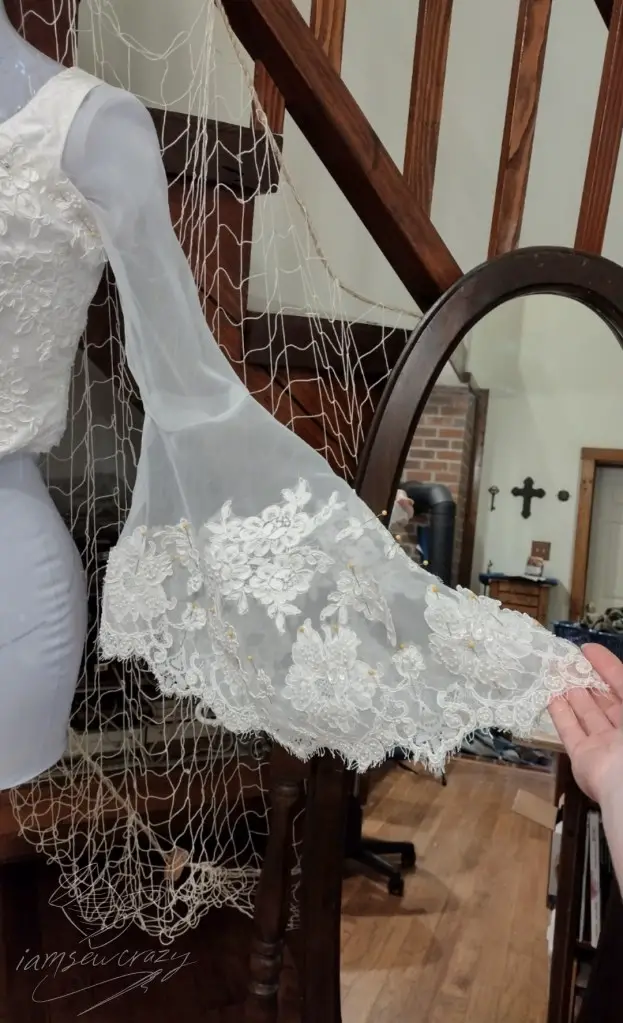
Restyling the bride’s mother’s wedding veil
Caroline and I both agreed that a traditional wedding veil just wasn’t the right look for her. I wanted to restyle her mother’s veil into a flower-shaped fascinator for her hair, to go with Caroline’s more modern aesthetic. This was one of my favorite parts of the whole project. The veil had really good bones to start with, and I was DYING to cut it to pieces!
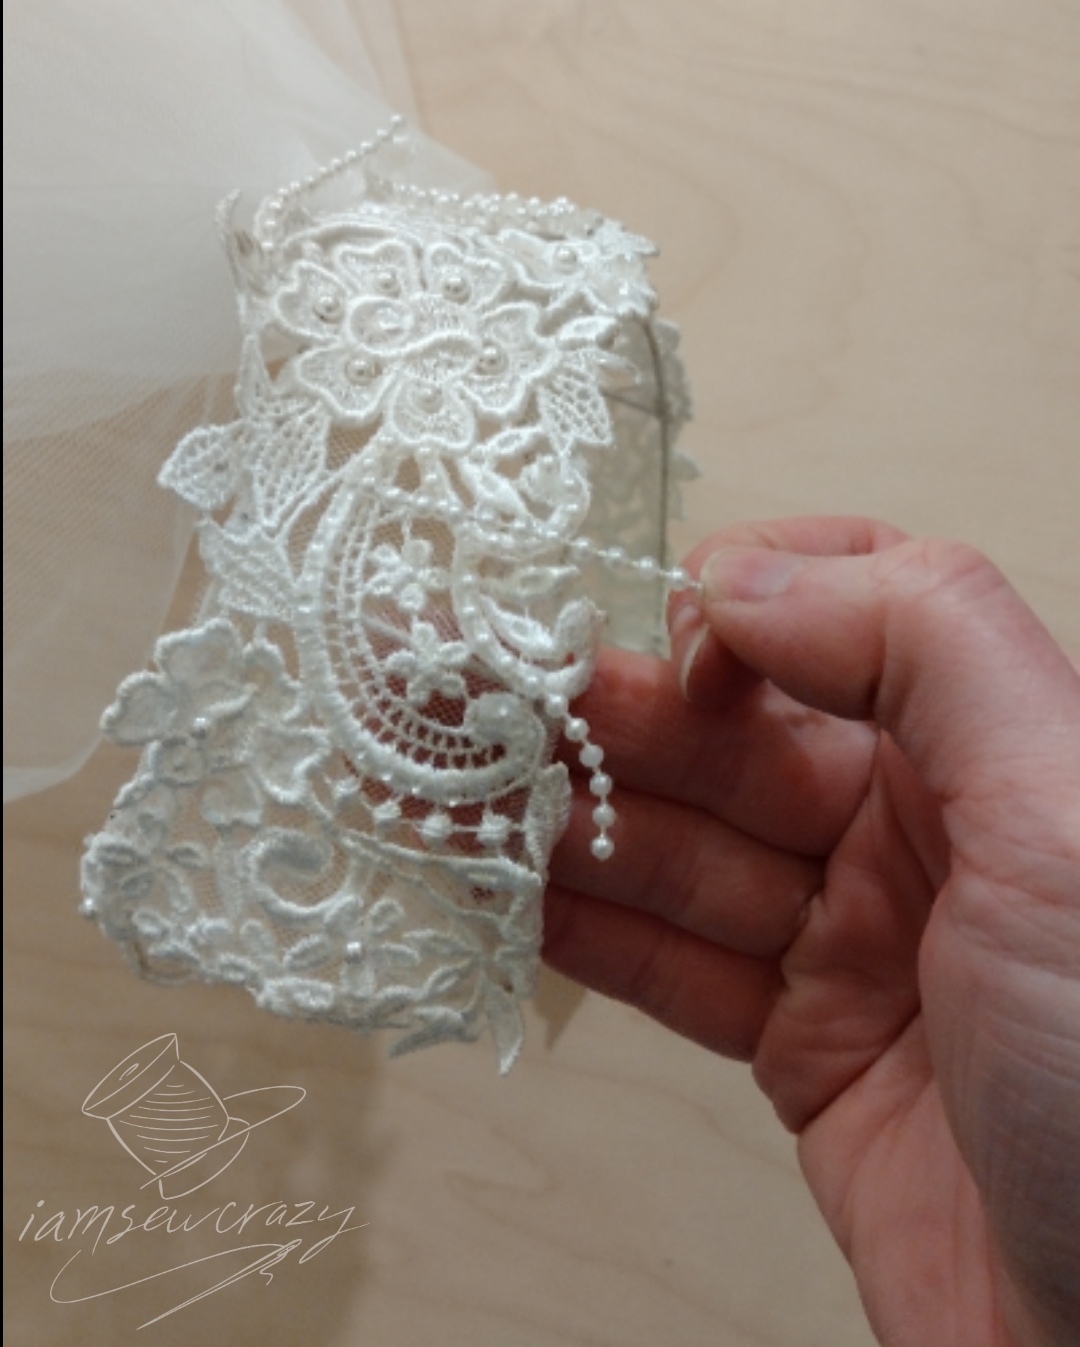
Caroline sent me a few inspiration pictures for the fascinator, but mostly let me design it however I saw fit. I did try to match the silhouette with her wedding flowers, but I was primarily concerned with making the fascinator complement her chosen hairstyle and the dress.
After I had used the pearls and sequins from her mom’s veil, the flower center needed a few more beads. Caroline chose some pale blue glass beads I had on hand in the studio. There was her “something blue”!

Here’s the finished fascinator! It clips on to the bride’s hair and sparkles in the sunlight. The wire frame is shaped to a gentle curve that fits her head. The flower petals are pearlized, and heat-shapeable using a curling iron. And it has so much of her mom’s veil in it! I love how it turned out.
Since it was a separate project from restyling the wedding dress, I’m going to make a separate tutorial about how to restyle a wedding veil into a fascinator. You will be able to see more details about how I made the fascinator there, and even print out a template to make the flower petals if you’d like. Make sure to subscribe to my blog via email so you don’t miss any new tutorials!
Now, back to the dress!
Getting the dress back after Michelle worked on it
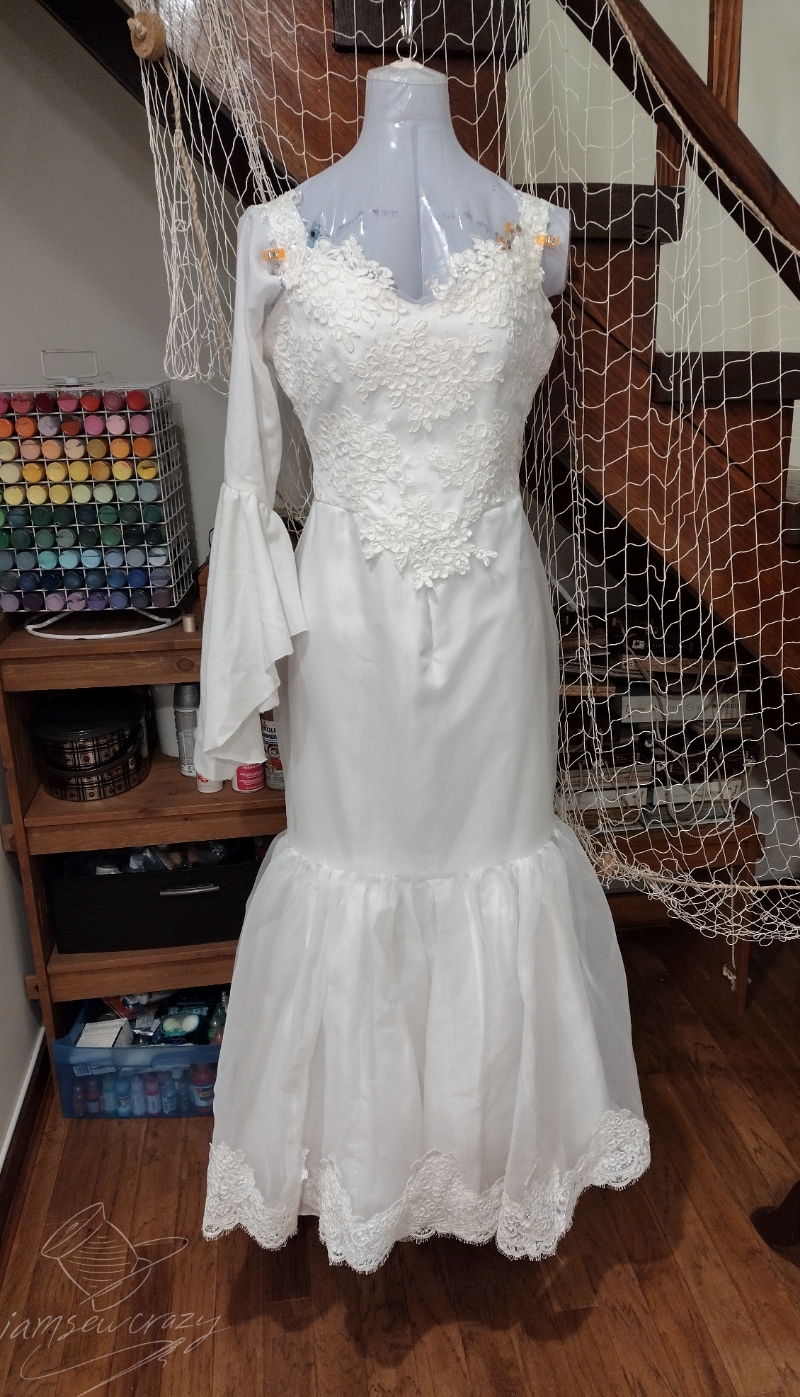
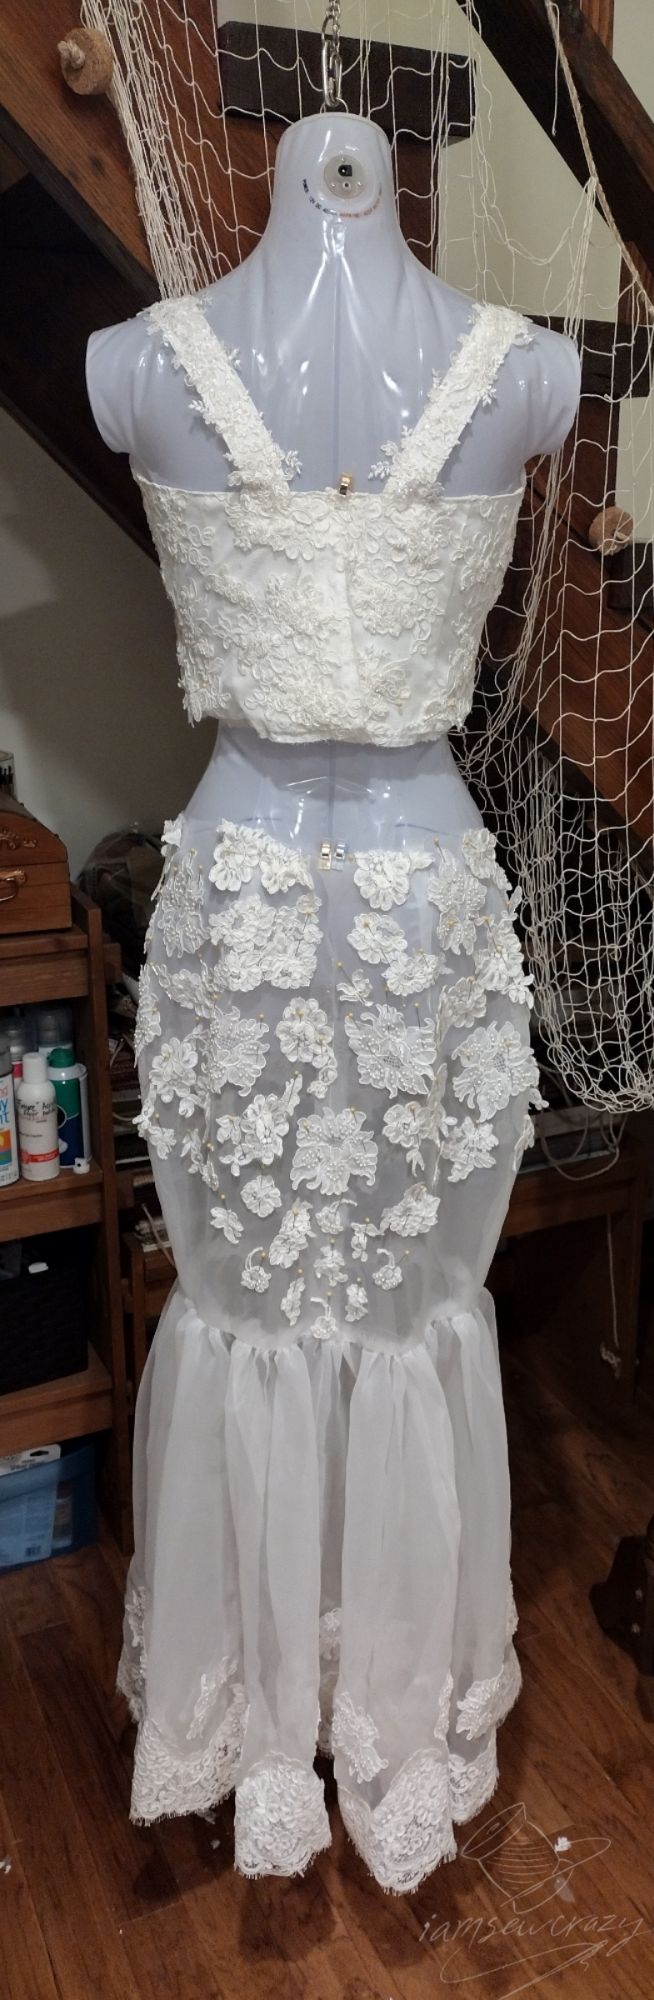
Here is how the dress looked when Michelle was finished. Having the fishtail done gave me a head-start with the skirt! Since Caroline was losing some weight before the wedding, I would still cut down the skirt to a more fitted silhouette, and re-gather the fishtail to fit the skirt.
Michelle saved all of the scraps from the train that I could use to make the straps, sleeves, and other pieces I needed. I’d like to thank her for the work she did, and I also want to thank Caroline for allowing me to use pictures from the fittings, to help show you all how to restyle a wedding dress!
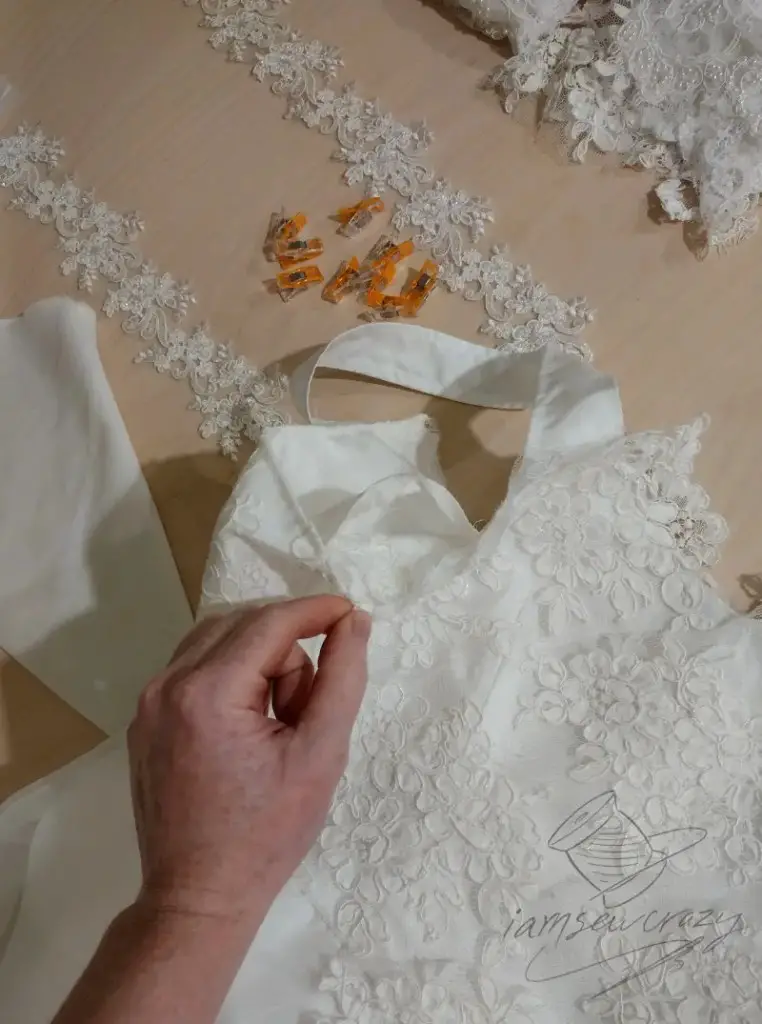
Drafting straps for the restyled wedding dress
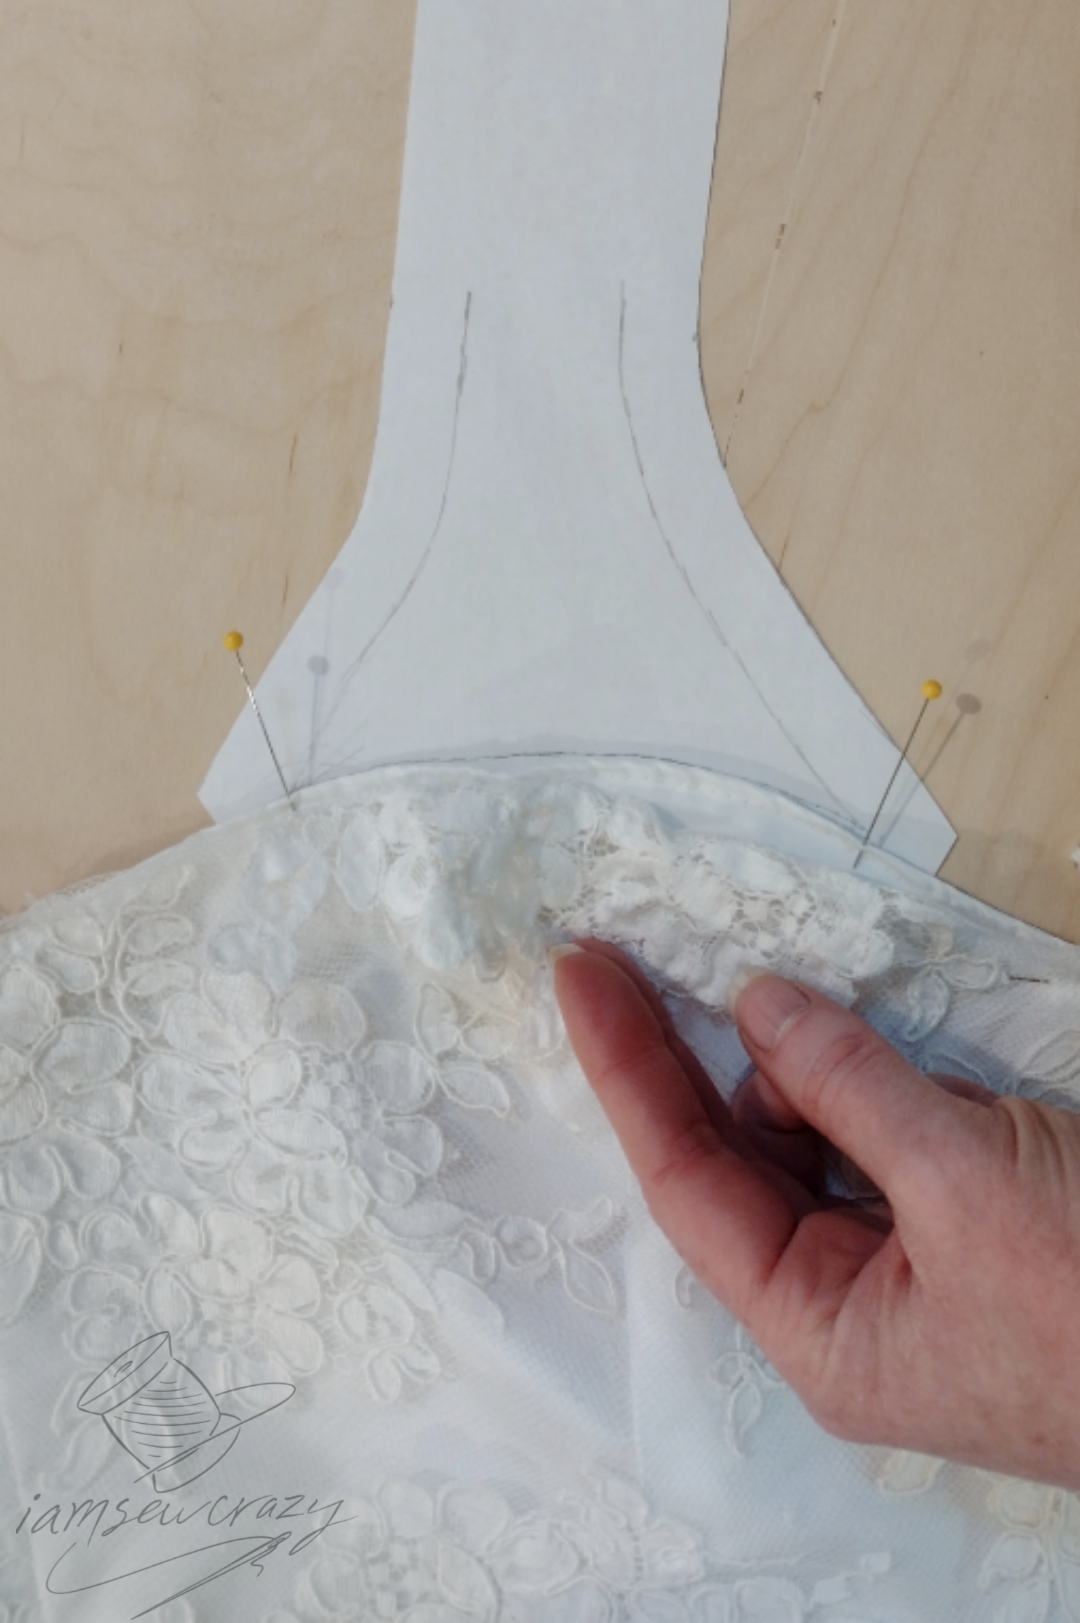
Since the original dress had netting going over the shoulders, I needed to make some sturdy straps out of the fabric from the train. The straps needed to hold up the weight of the dress, including the bulky fishtail and all of the beads and sequins we were adding. The straps were also going to have removable sleeves attached to them. And lace would be added on top, so I had to balance the width of the strap with the width of the lace the bride had chosen. I wanted the edges of the lace to peek over the sides of the straps, adding some interesting texture and details.
With all of that in mind, I traced the top edge of the bodice and drafted a strap pattern. I cut the straps slightly longer than needed, so that I had some extra length. I’d rather trim off a little bit later than freak out about having enough to work with.
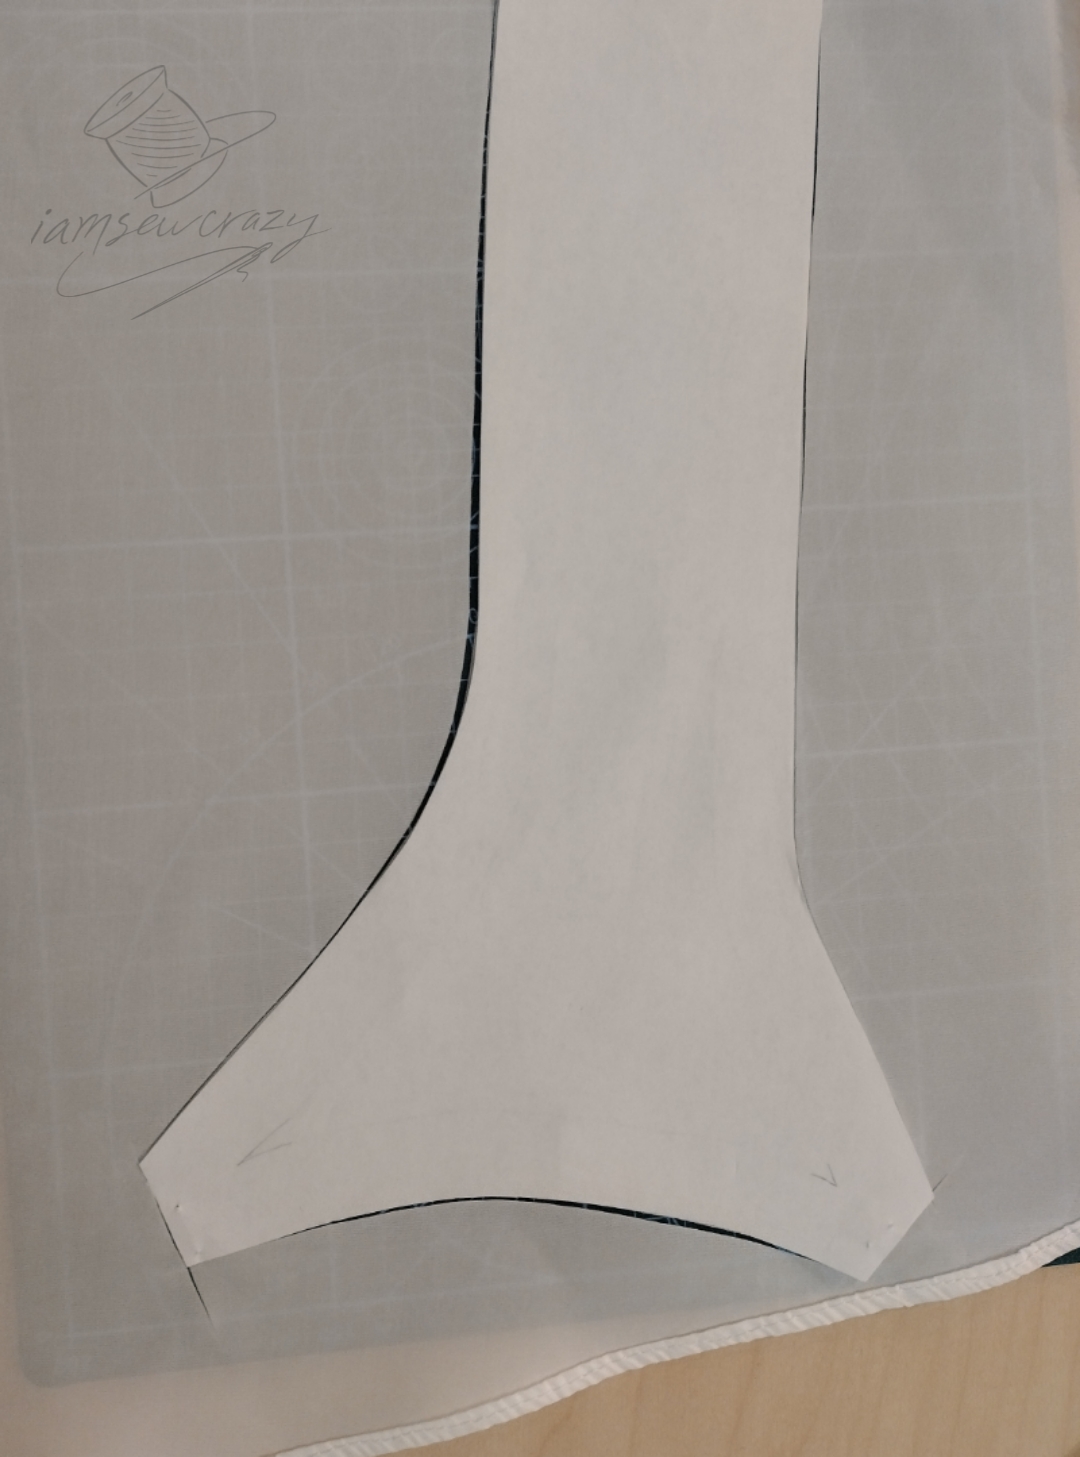
I cut the strap shape out of the fabric 4 times, paying careful attention to the grainline of the fabric. If the straps weren’t on-grain, they would twist and stretch awkwardly. In addition to looking odd, that would throw off the fit of the removable sleeves. And we can’t have that!


Then, I sewed 2 pieces together to make each strap. I turned them rightside-out using a safety pin, and pinned them to the dress for a fitting. I would press and topstitch them after checking how they looked on the bride.
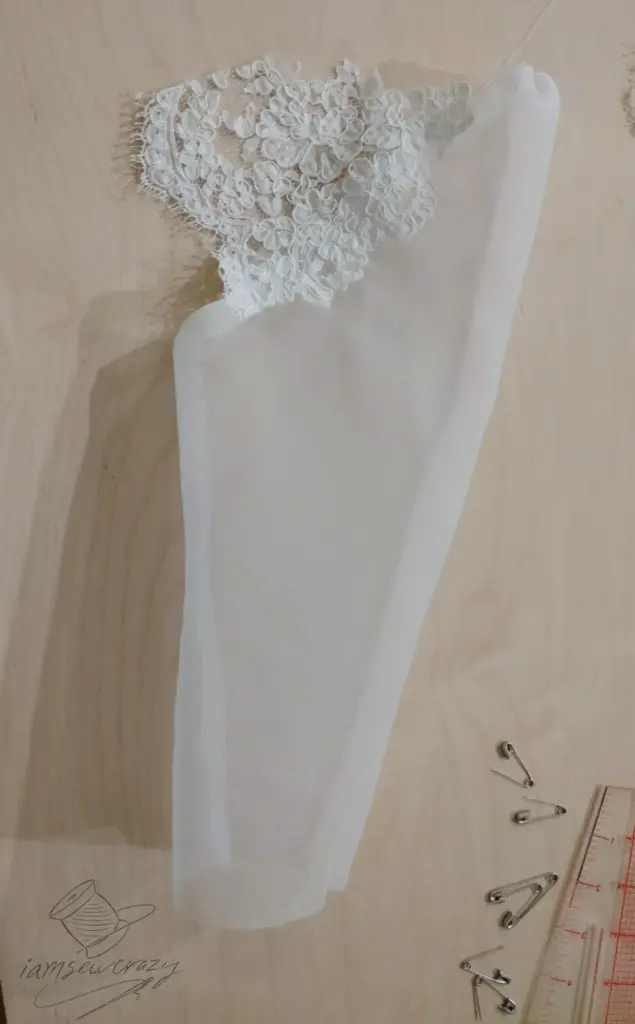
Drafting the removable bell sleeves
There are so many style options available with bell sleeves! The bell can be more full, or longer, or asymmetrical. So in order to decide on a silhouette, I needed to make an example for Caroline to try on.
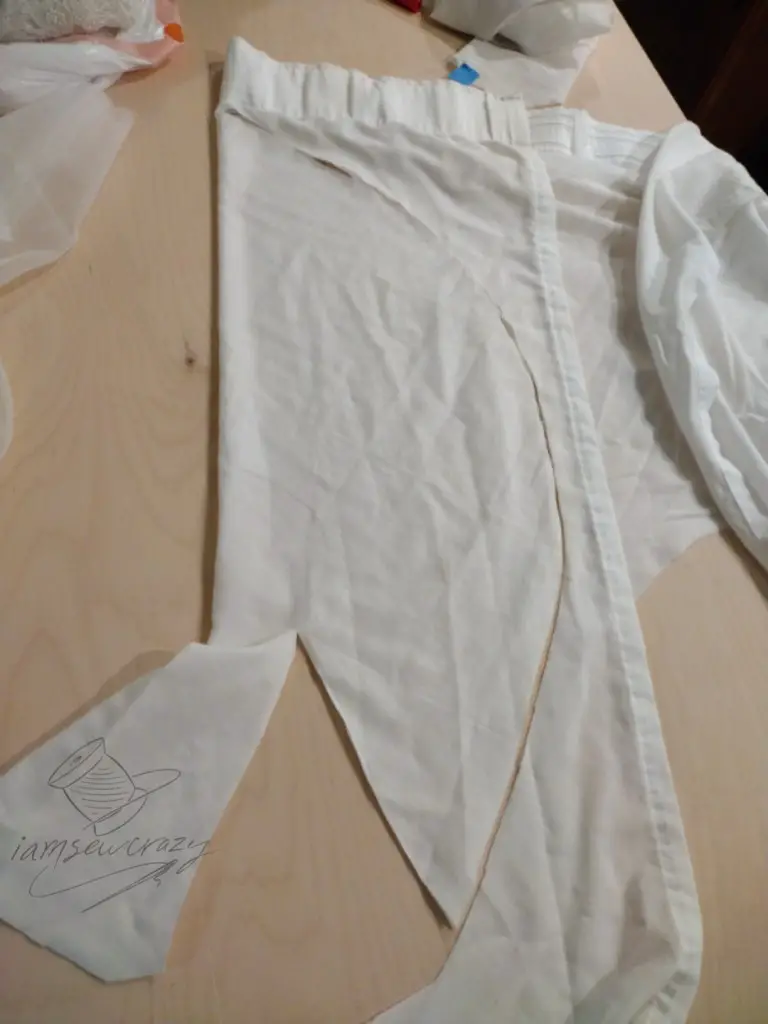
I cut a basic sleeve shape out of some white fabric I had on hand. Then, I freehanded a bell shape out of the same fabric to use as a template. I had to make sure that the bell shapes were small enough to fit on this scrap of the original dress train, because that was all of the sheer dress fabric I had left to use! Fortunately, they fit just right.
I gathered the bell at the top edge and sewed it to the sleeve shape. Then I clipped it to the dress.
Since the sleeves were going to be attached to straps and not a normal armhole, I was concerned that the shape of the sleeve was going to look a little bit awkward in the back of the dress. Caroline suggested adding lace triangles to the sleeves to fill in the area between the sleeve and the strap on the back of the dress. I thought that was a great idea! I would measure at the next fitting to see exactly how big I needed the triangles to be.
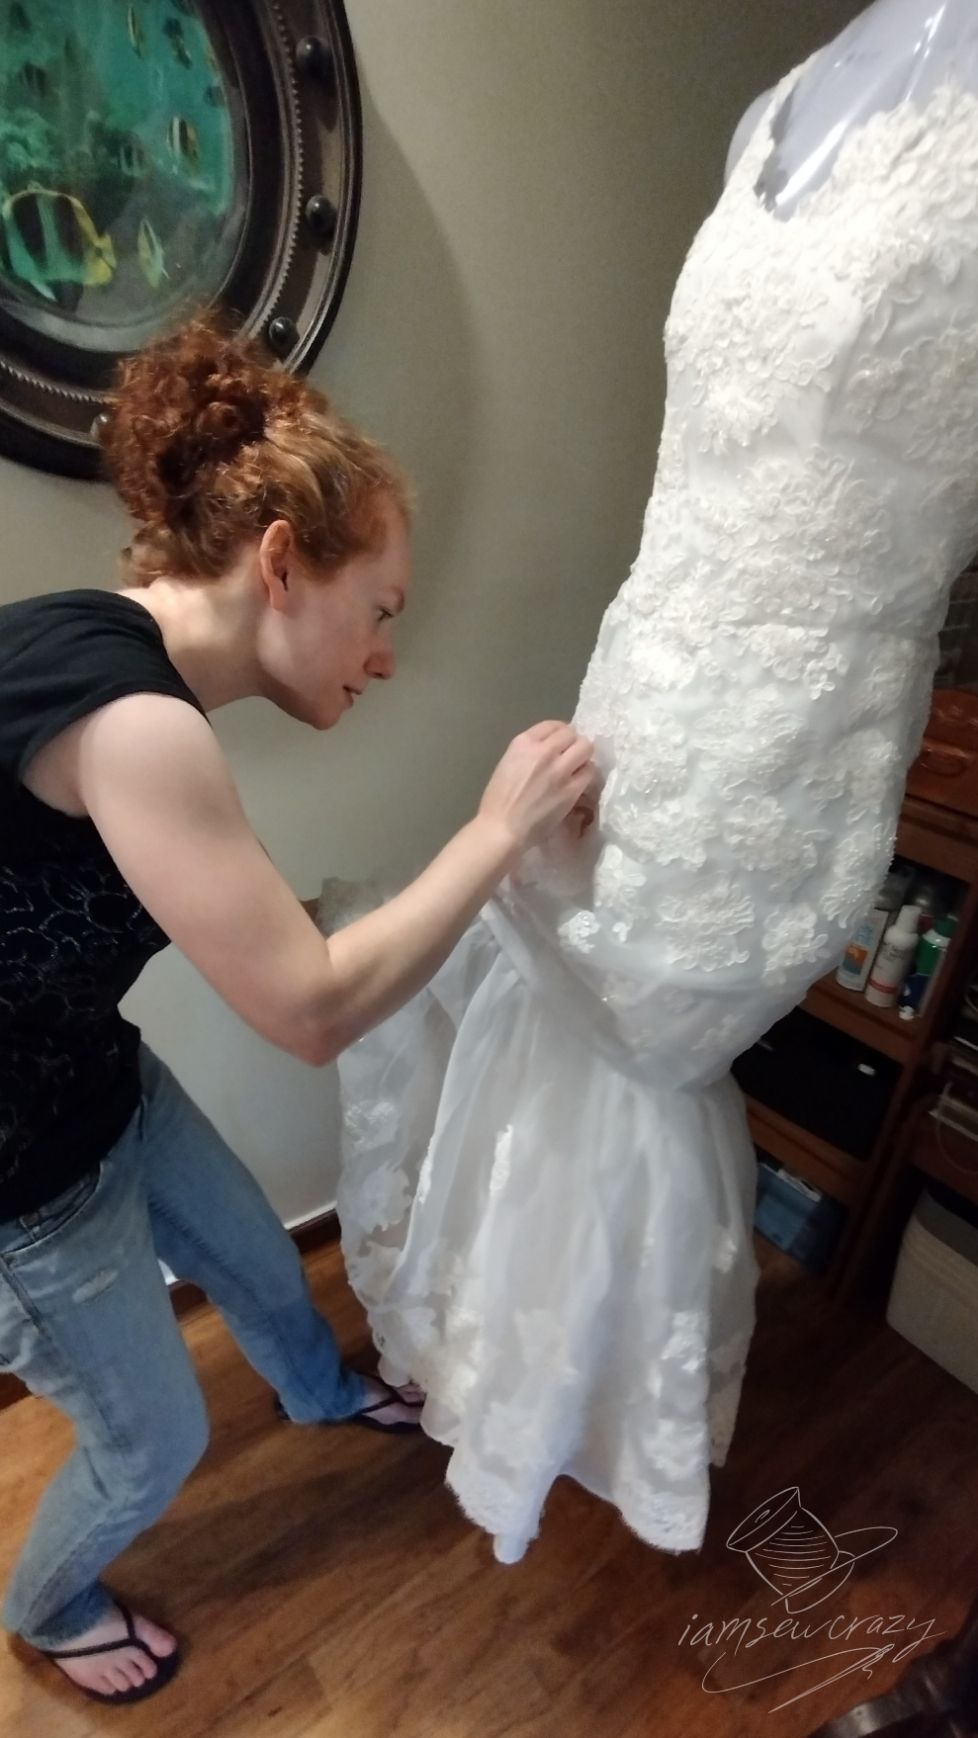
Reshaping and fitting the dress to the bride
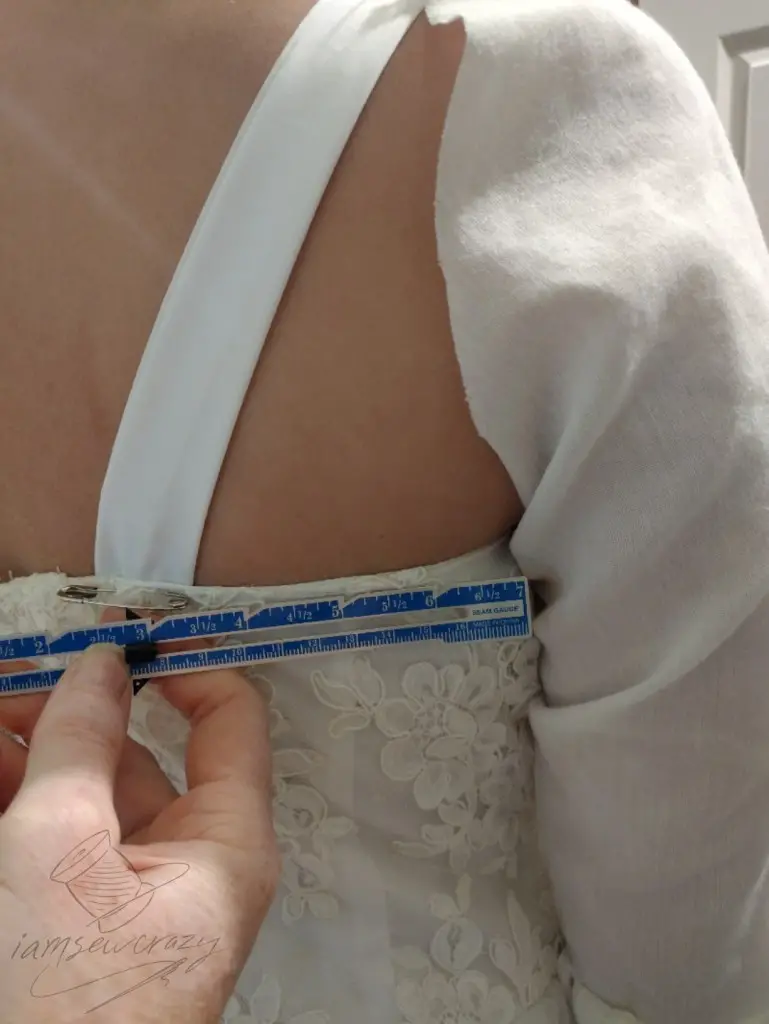
This part was difficult because Caroline lived a couple of hours away, and she was also trying to lose some weight for the wedding. I held off the final fitting as long as I could, but I still needed her in my studio, in the dress, to check everything… and still have time to get the rest of the sewing done before the wedding. And with a closely-fitted dress like this, I didn’t have much allowance for the bride losing or gaining any weight. Remember, when you restlye a wedding dress, the fit must come before the embellishments!
Fitting the bodice to the bride
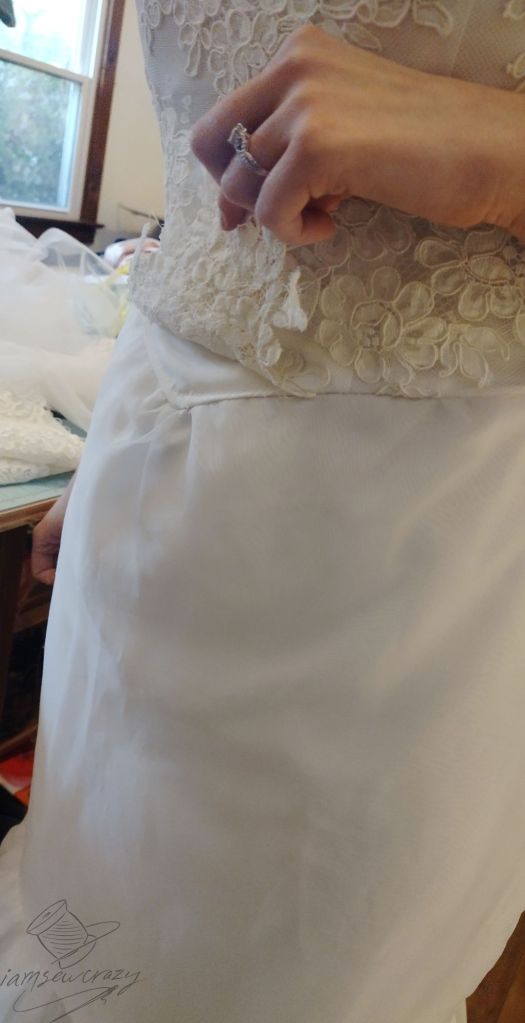
The fit of the bodice started out too tight, and we thought we would need to add a lace-up panel in the back instead of the buttons. But Caroline shrank so much that I ended up taking in the bodice at the side seams, right underneath the arms. (And putting the buttons back on!)

Taking in the side seams meant that I would have to take off and then reattach the featherboning that was sewn to the side seams. I didn’t want to take the whole lined bodice apart, so I did those alterations through the top edge of the bodice. I cut off the stitches that held the featherboning in place. Then I carefully held the other layers of fabric out of the way as I re-sewed the side seams on the lining and outer fabric. Next, I reattached the featherboning over the new side seam. It looked great!
As it turned out, Caroline was noticeably smaller at the time of the wedding than she was at the final fitting. (But I forgive her because Jesus says I have to.) However, this made me extra happy that we had decided to use traditional straps to hold the dress up. Relying on straps to hold the weight of the dress meant that the bodice could be a little bit looser without causing a wardrobe malfunction.
Fitting the removable bell sleeves
Caroline asked me to make the bells a little bit less full, but the length was perfect. The fit of a sleeve is something that has a right and wrong way to do it, but style details like how large the bell is or how high up the arm the flare starts are purely the bride’s decision.
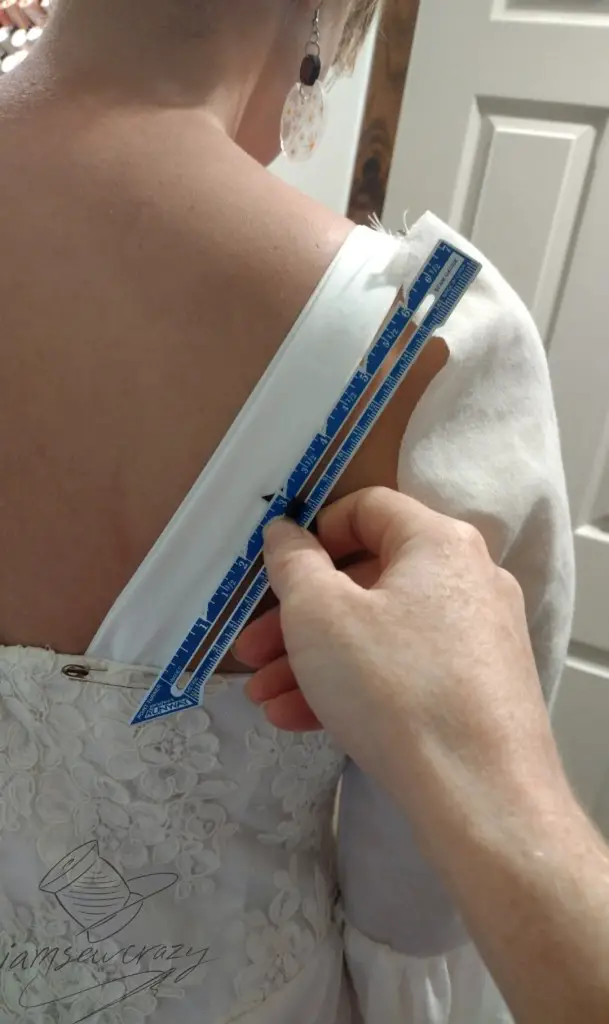
I took this opportunity to measure for the lace triangles at the back of the sleeves. I already had the perfect scraps of lace in mind to use for the triangles. They were left over from the train of her mother’s dress, and they would look amazing!
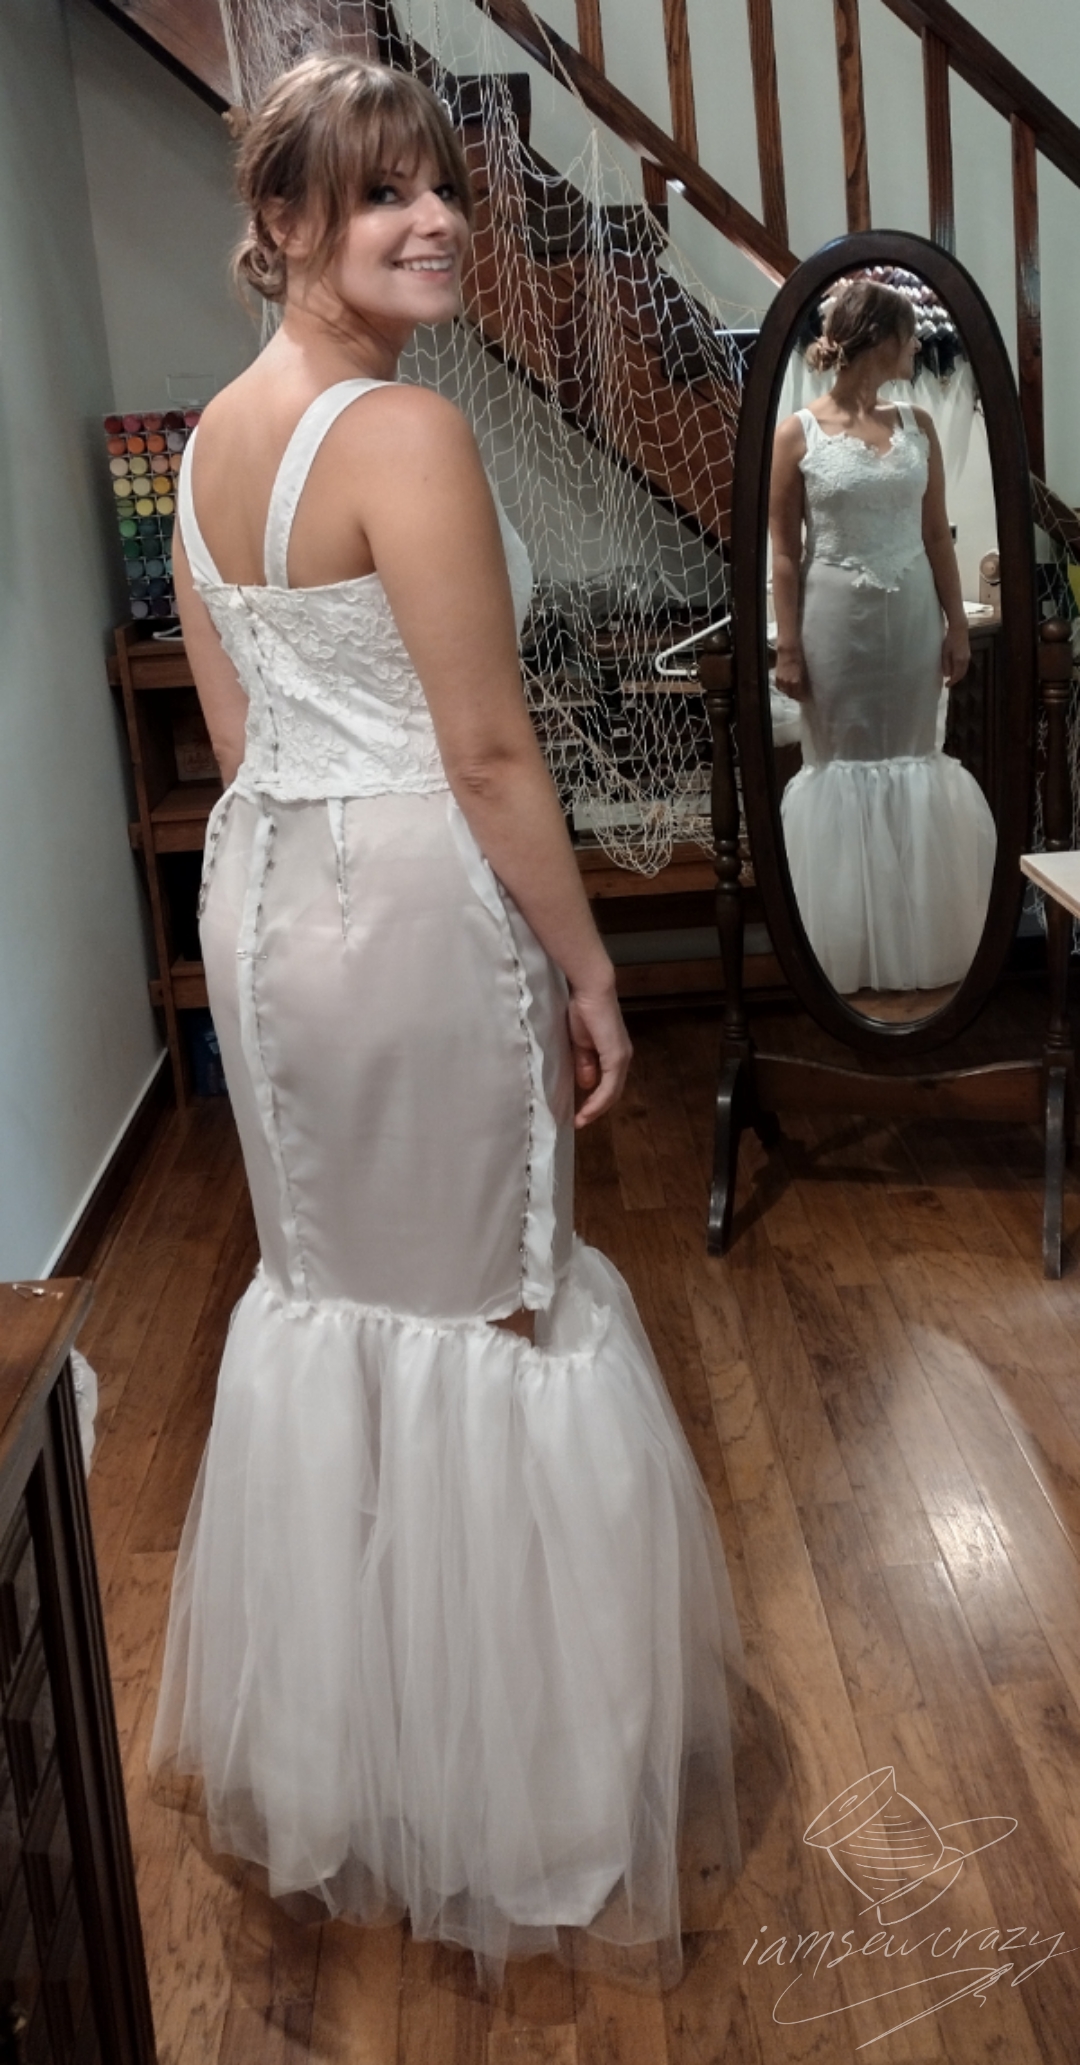
Fitting the skirt to the bride
I cut down the skirt of the dress quite a lot. When the other seamstress, Michelle, made the fishtail, she sent the skirt to me with a roughed-out shape. As the wedding date got to be about a month away, I pinned darts into the skirt lining, took in the center back a little bit, and curved the sides so that it would fit Caroline exactly. Then I asked her to come in for a final fitting.
I ended up letting out the sides a bit so that she had a little more ease to sit down and walk around. And I made the darts just a smidgen longer.
When the fit was perfect, I made the satin layer to the same dimensions, but 1/2″ larger. And then I made the outer sheer fabric to the same dimensions as the satin… but 1/2″ larger. So now we had lining, satin, and then a sheer layer, each one just a little bit bigger than the layer below. In sewing, that’s called leaving room for “turn of cloth”.
Every layer needs to be slightly larger than the one below it so that the fabric lays smoothly. You know how if you put two paper bags of the same size, one inside the other, the inner bag will buckle and wrinkle? Another way to think of it is how the inside lane of a racetrack needs to be shorter than the outside lane in order to fit inside the larger oval. So the outside lane is like our outer skirt fabric, and the inside lane is like our skirt lining. When they are slightly different sizes, they fit smoothly into one another.
Sewing the skirt pieces together
I sewed the side seams and the darts on each skirt piece separately. The center back seams were only sewn below the zipper opening.
When I sewed the darts on the sheer layer, I used my favorite method to avoid a backtack at the point of the dart. I used only the bobbin thread! Here’s a video of the process:
Another way of threading your machine for this method is to thread the needle backwards with the bobbin thread. Then, tie the bobbin thread to the needle thread. Pull on the needle thread to draw the bobbin thread through the rest of the threading path. Cut off the knot where the needle thread was attached to the bobbin thread, and you’re ready to go!
Now that the fitted skirt pieces were cut down to size, I needed to gather all of the fishtail pieces to match the bottom edge of the fitted skirt, where it stopped at the bride’s knees. There was a layer of lining fabric with many layers of tulle attached to it, to make the fishtail poof out. That was made out of all new material that Michelle had added. There was also one satin layer and one sheer layer that were made from the train of Cherie’s dress, with the original lace trim around the bottom edge of the sheer layer. These pieces would all be gathered separately, and stitched to their respective skirt pieces.
Fitting the fishtail to the skirt
I used a ruffler foot to gather the fishtail layers. But first, in order to check my ruffler foot’s settings, I made a quarter-sized sample of each fabric. (I didn’t have enough fabric for a full-sized sample, but working with a scrap 1/4 the size is plenty.)
I measured the circumference of the bottom of the skirt pieces. Then I measured the circumference of the fishtail pieces. I divided those two measurements by 4. Then, I made two reference marks on a scrap of satin that were the same distance apart as 1/4 of the fishtail measurement.
I used my ruffler foot to gather the sample scrap in between the two reference marks, and then measured how far apart the marks were. I was aiming for the two marks on the scrap to end up 1/4 of the skirt measurement apart. If the measurement was a little off, I adjusted the ruffler foot, yanked out the gathering stitches, and stitched again.
Here’s an example of the math:
Let’s say that the bottom of the skirt was 35 inches around. And the fishtail was 94 inches around. That meant I needed to make marks 23.5″ apart on my reference scrap (94 / 4). Then I needed to adjust the gathering foot so that the marks on the fabric, after being gathered, measured 8.75″ (35 / 4) apart.
Check out the video above if you would like some tips about using a ruffler foot, or if the math for the stitch test is confusing. It may be easier to follow if you can watch the process in action.
I needed to repeat this test on the sheer fabric as well. Good thing I saved my scraps!
Then I sewed each gathered fishtail piece to the corresponding skirt piece.
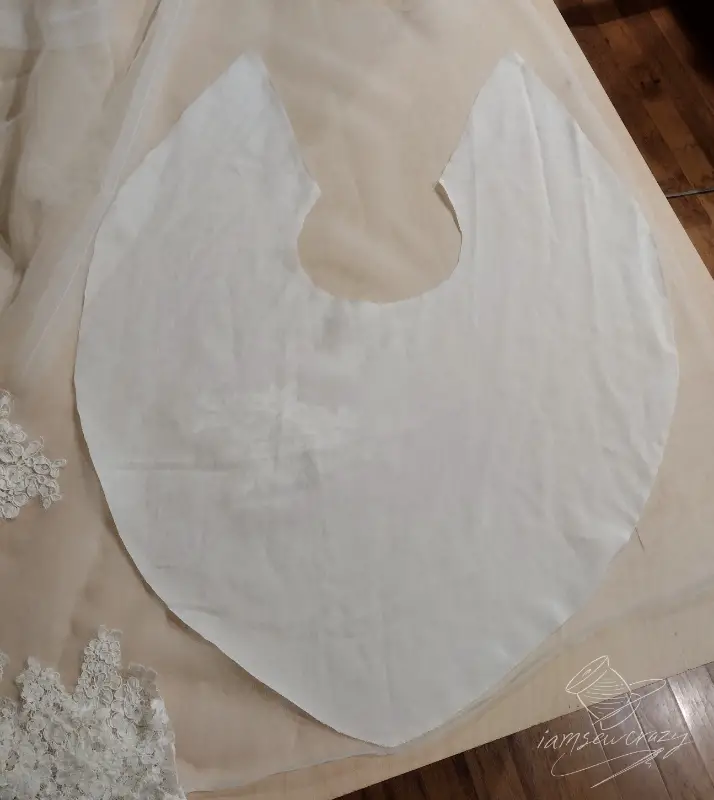
Restyling the wedding dress sleeves and train into bell sleeves
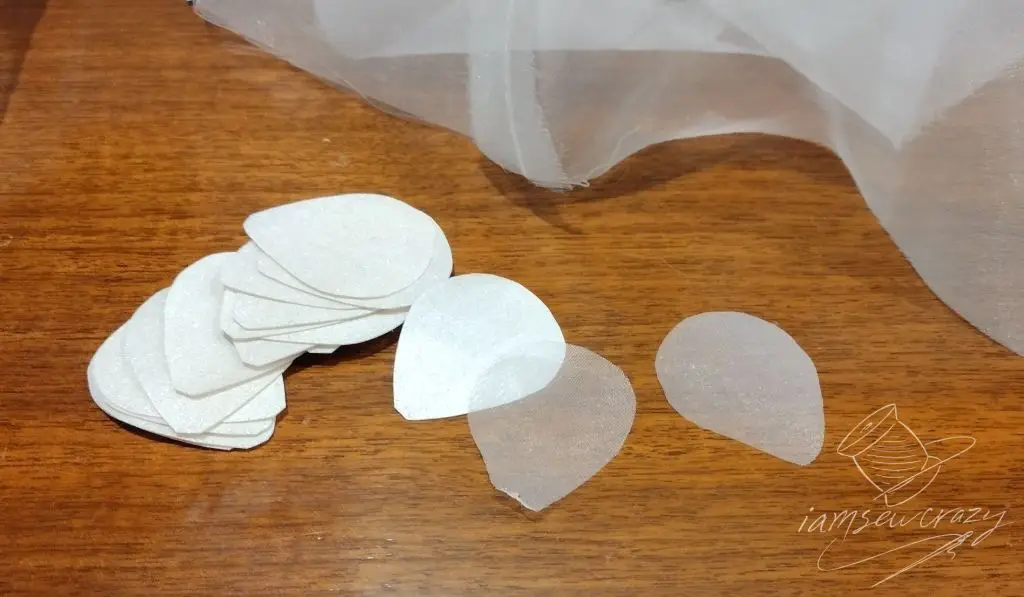
I was able to trim down the original sleeves and turn them into the fitted part of the sleeves, above the bell. Then I used the bell template we had decided on to cut the bell shapes out of the leftover fabric from the dress train.
Next, I made the lace triangles that Caroline wanted to fill in the area between the sleeve and the strap in the back. I designed the triangles to go on top of the sleeve, but under the strap. The bottom of the lace triangles didn’t attach to the dress at all; I cut them with a scalloped eyelash edge on the bottom and I made them to hang free.
The lace motifs were carefully cut around where they would be laying on top of the sheer sleeve fabric. The other side would later be cut off in a straight line. It will lie underneath the strap, following the same angle.
Since the fabric for the sleeves was very sheer, the seam allowances needed special attention. There’s no way around the seam allowances being visible, so I had to make them neat and tidy.
Attaching the removable bell sleeves with snaps
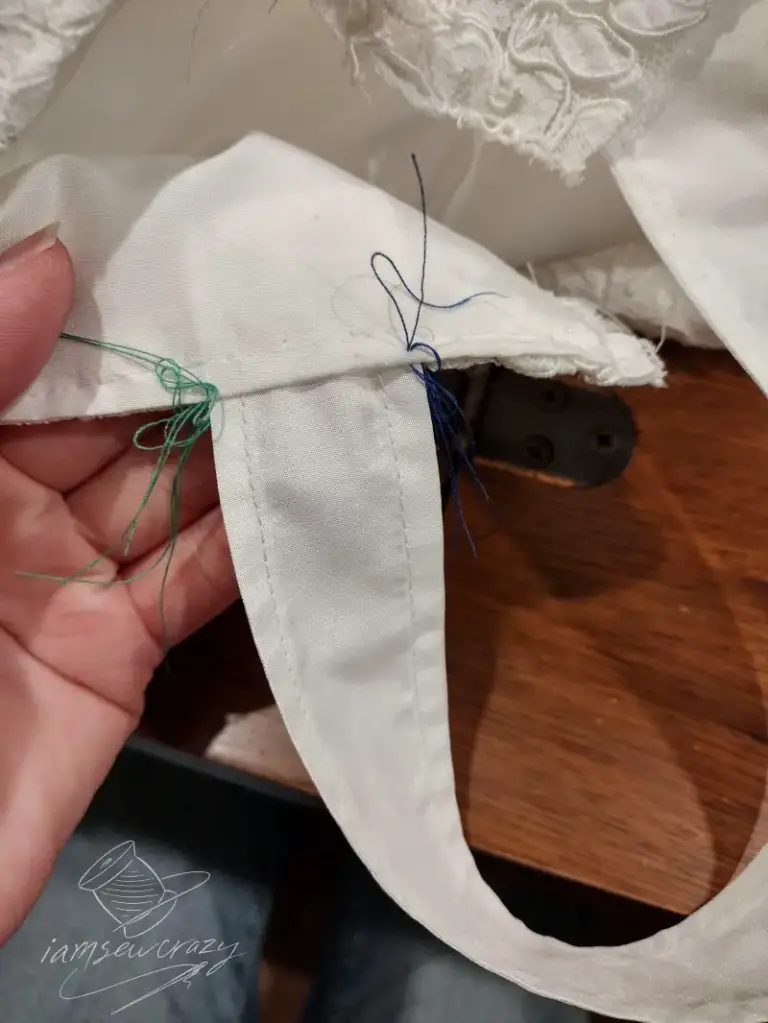
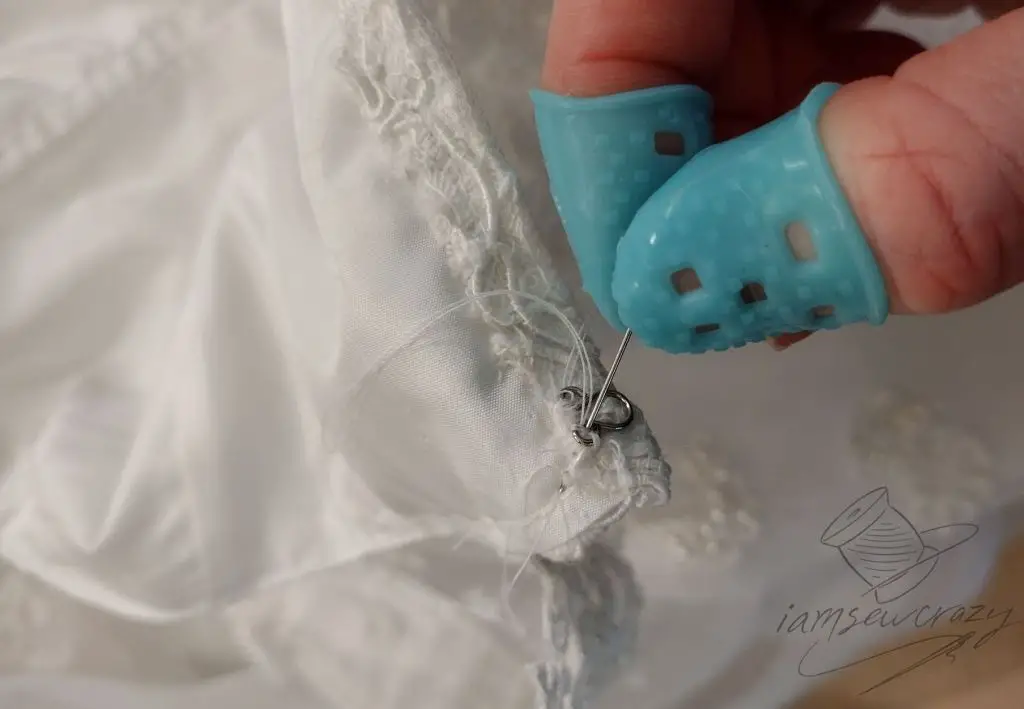
I needed to mark exactly where the sleeves should join to the straps, so that I could add the snaps to each piece. I used tailor’s tacks to make the reference marks. (No marking pens were allowed near this special dress!) Stress points were given more than one snap, while the snaps were spaced a little farther apart in some places.
Then, I hand-sewed the snap studs to the right side of the sleeves, and the snap sockets to the wrong side of the dress. This was because the sockets are much more comfortable facing your skin than the studs are.
Embellishing the restyled wedding dress (mostly by hand!)
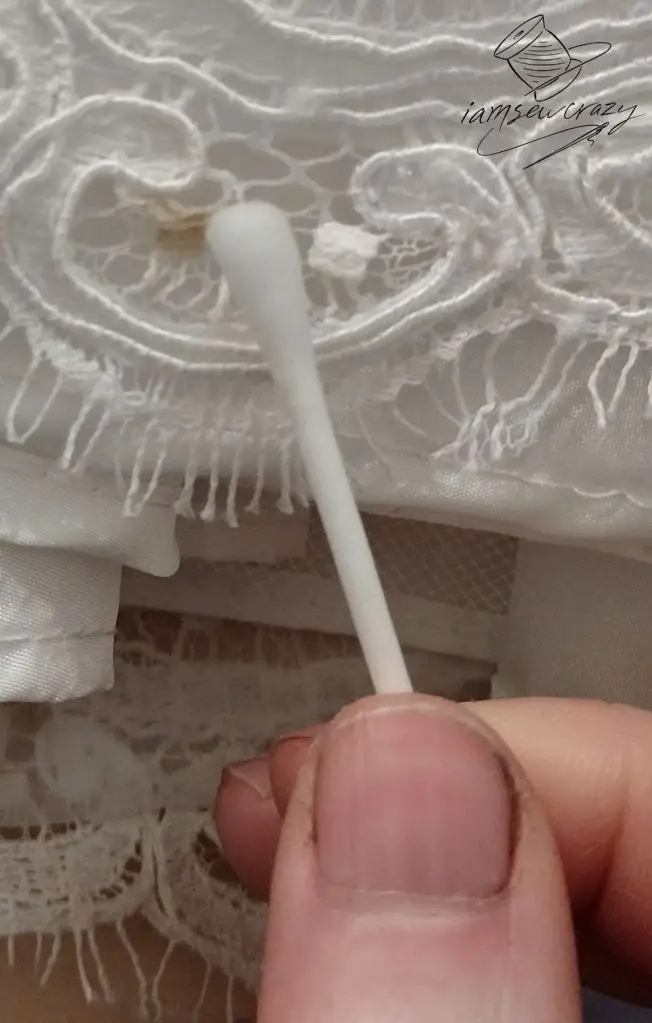
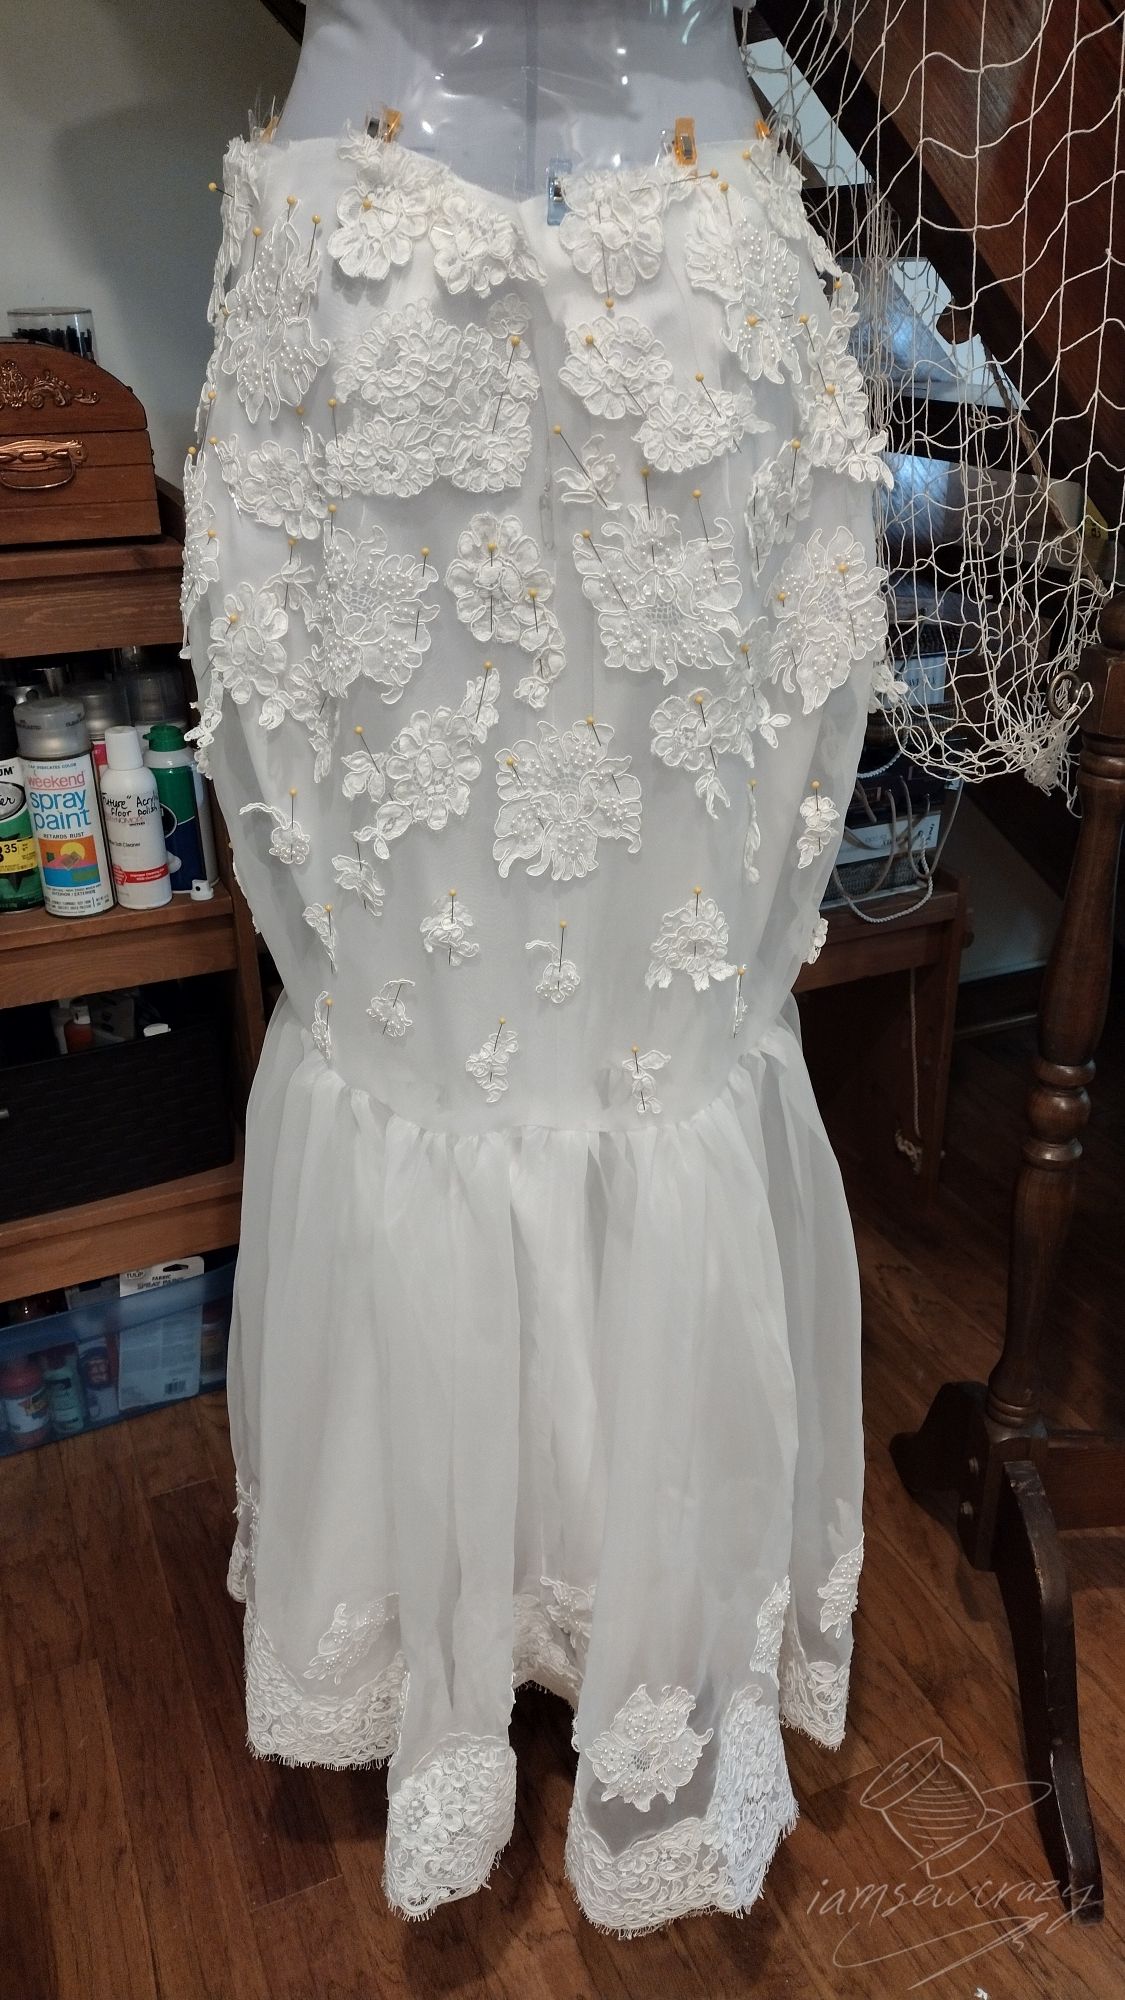
Most of the lace was added as a style decision, because it looked good. But I also used some lace appliques to cover up damaged areas of the dress. When you are working with vintage clothing, you should expect a few surprises like this. Fortunately everything covered up nicely, but there were a few holes in the netting and a small stain or two.
Embellishing this wedding dress involved a LOT of hand-sewing. When you’re working with lace, sheer fabric, and heirloom-quality garments, every stitch is important. The time it will take to hand-sew embellishments is something to consider when you’re looking into how to restyle a wedding dress.
Adding lace to the straps
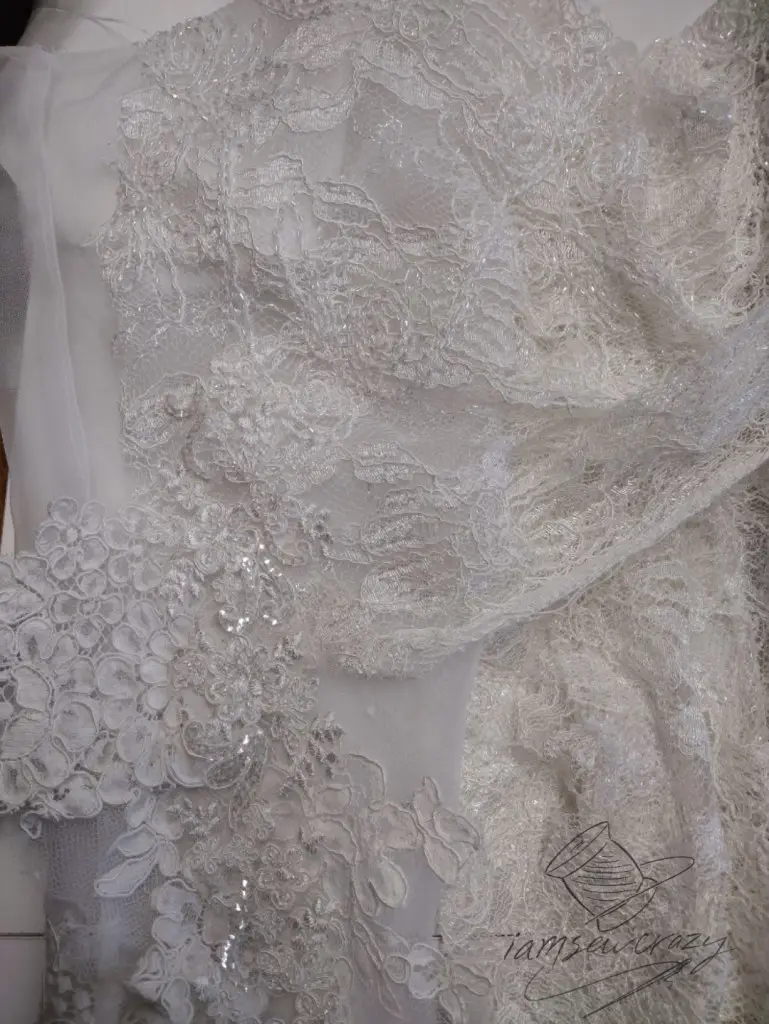
The lace for the straps was actually ordered online! Caroline had it sent to me and fortunately it blended perfectly with the rest of the materials. It had beads and sequins to catch the light, and the corded edges helped it blend with the original lace.
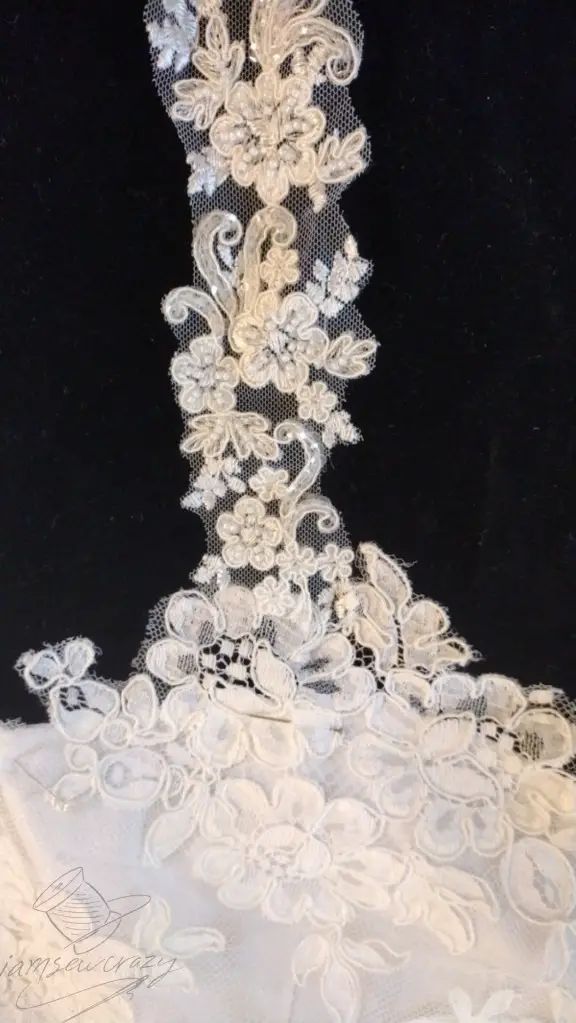
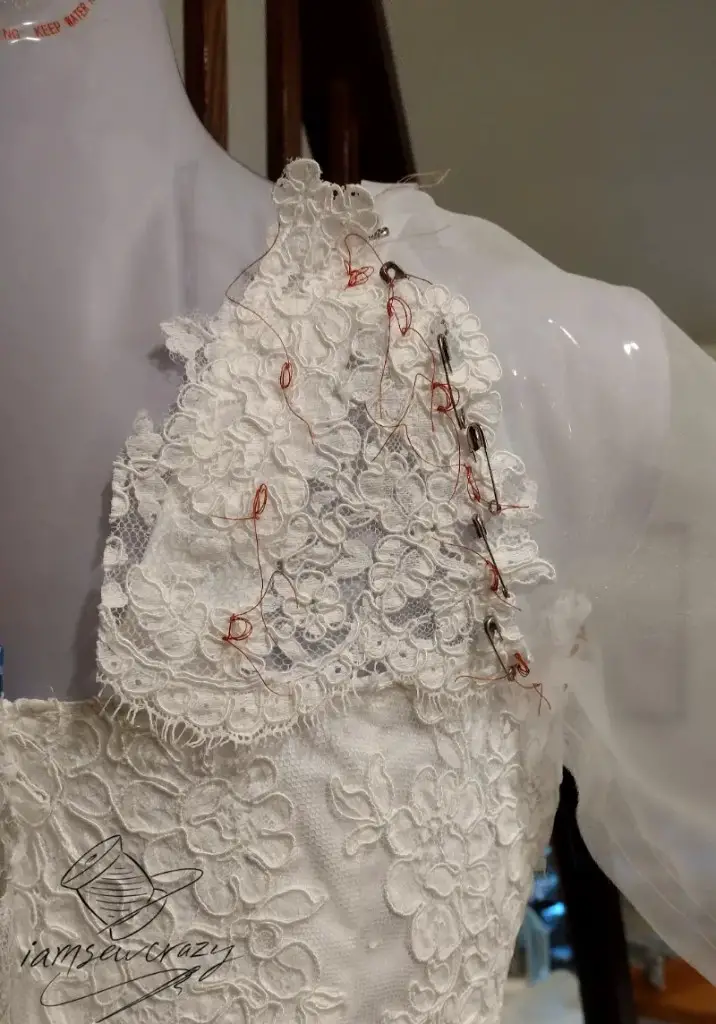
I had made the straps just narrow enough for little pieces of the lace to peek off the edge of the straps. This creates some interesting texture, and shows off the delicate design of the lace. There was enough lace left over to layer onto the bodice, which helped me to cover up a few damaged areas.
Embellishing the bodice
The lace I added to the straps was also appliqued onto the bodice. This was to add some sparkle, and to make a smoother transition from straps to bodice. Sprinkling the strap lace down the dress made for a more cohesive design all around. The original lace didn’t have any beads or sequins on it, and we had to get some glimmer in between the straps and the skirt!
I didn’t even ask Caroline about how much I was adding where, since I knew I couldn’t leave the damaged areas of netting showing. It was pretty obvious to me where and how the sparkly lace needed to be added, so I just went for it.

Mostly the sparkly lace was used in the center of the original lace motifs. This really added some glamour, and it helped me to define the neckline a little bit more too.

I saved some of the lace from the straps to layer onto the skirt. I also had to leave a few appliques for the last minute, since they couldn’t easily be added before I installed the buttons and button loops. And a few motifs had to wait until I sewed the skirt to the bodice.
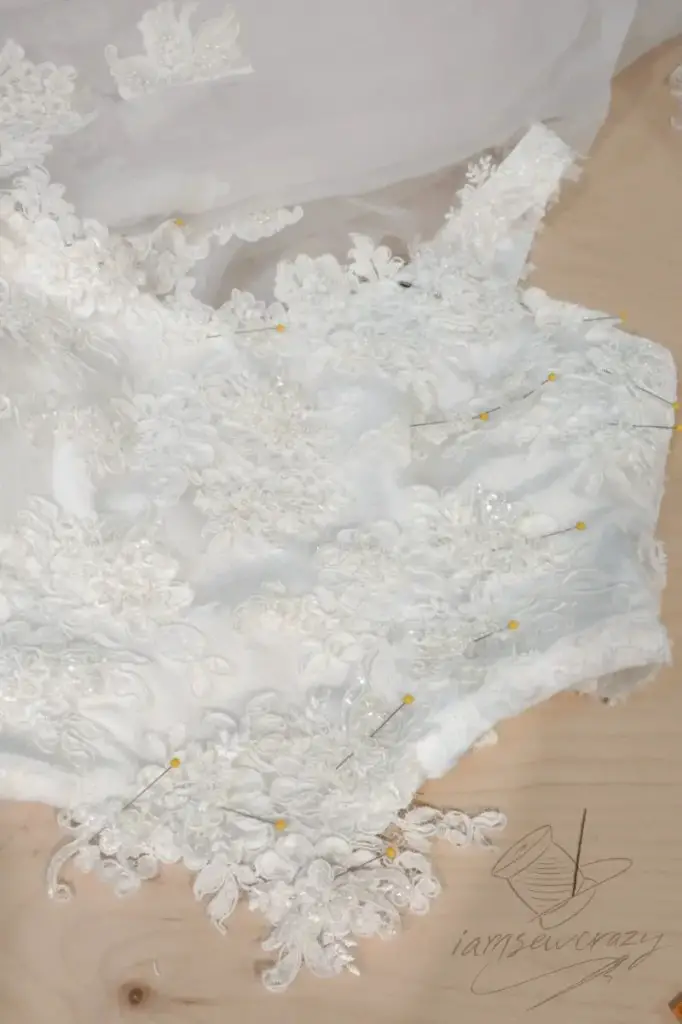
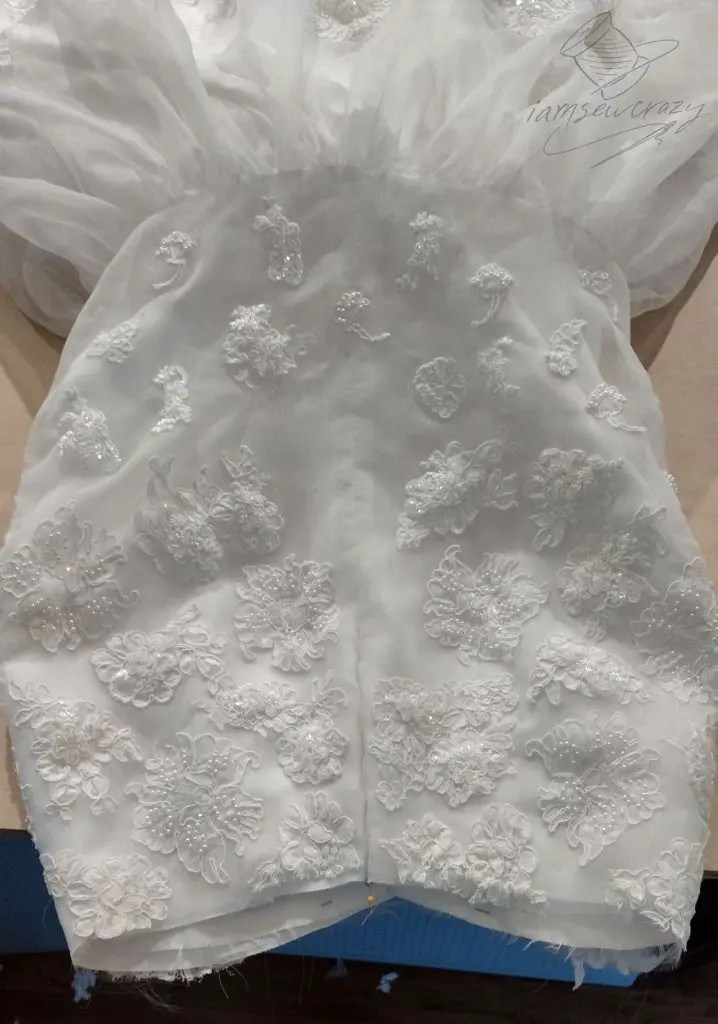
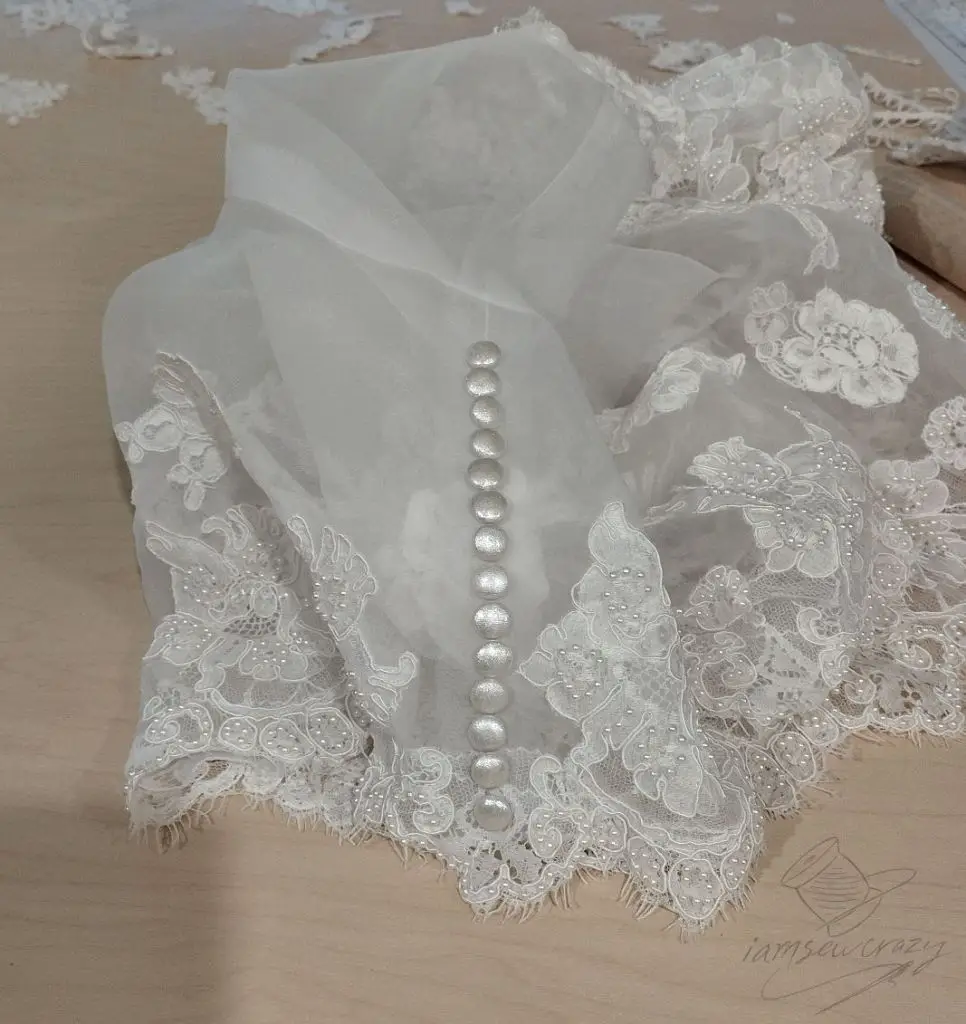
Embellishing the skirt
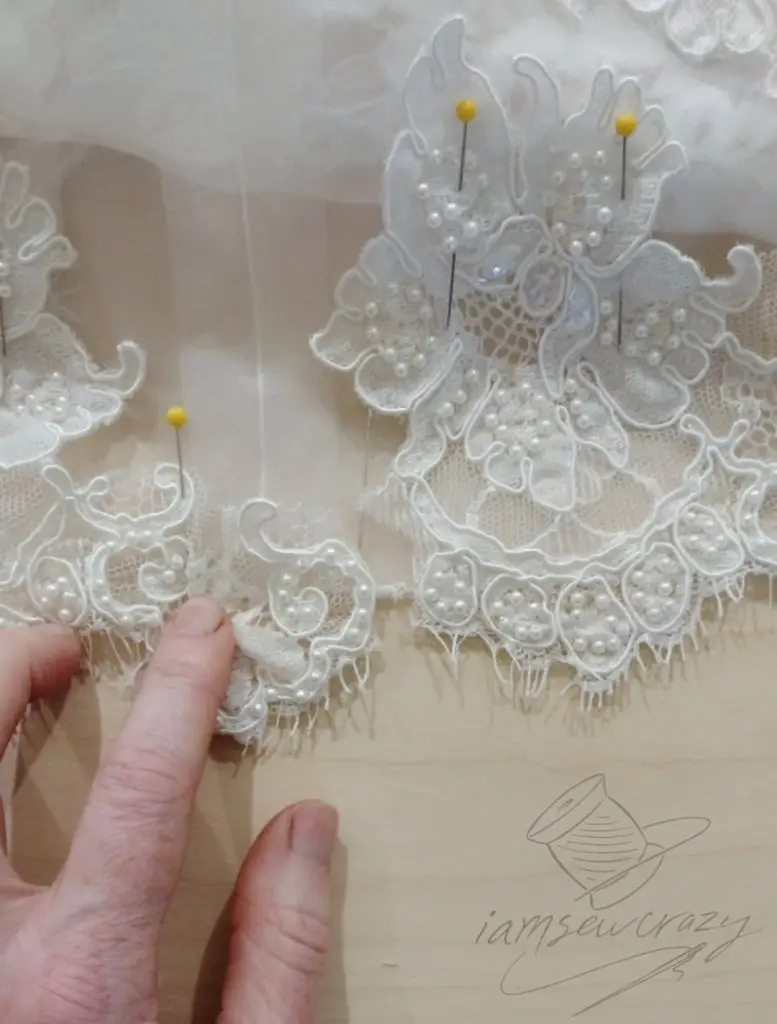
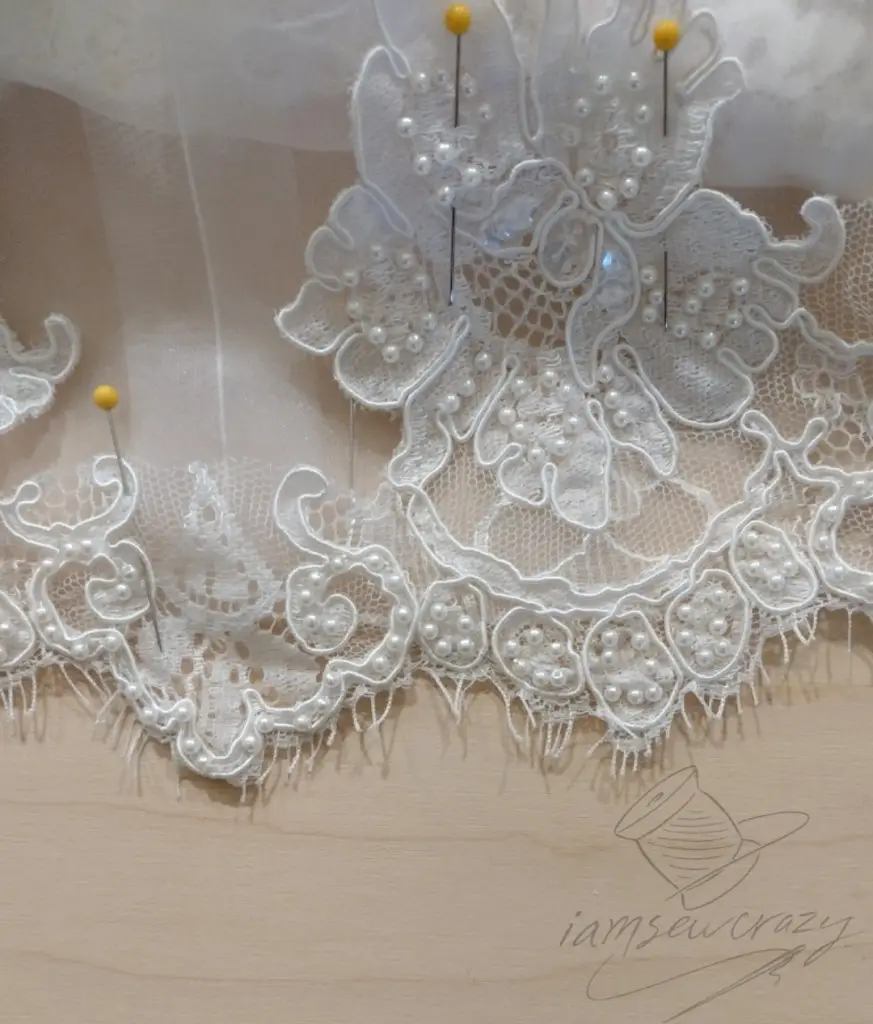
We had such a hard time finding the perfect lace to embellish the skirt. Finally I ended up at LK Couture Designs (a lovely local fabric store) and bam, there it was. I texted the bride pictures of the laces I had found there. Internally, I was thinking that I would CRY if she didn’t pick the one with the tiny pearls on it! But no worries, that was her favorite lace too. It was a French lace, with double scalloped eyelash edges, sequins, and hand-applied faux pearls. Two yards would be enough for the eyelash edge to go around the bells of the sleeves.
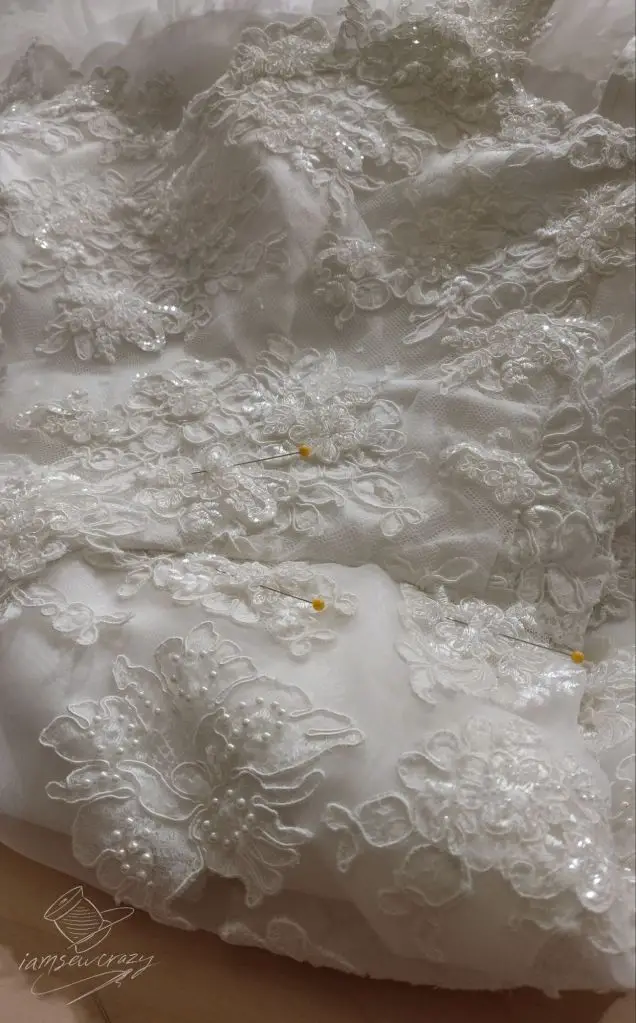
I went to work cutting into the pearl lace and pinning it to the skirt, along with some of the original lace and pieces of the strap lace.
I sent Caroline a few pictures so that she could approve of how I was scattering the lace down the skirt. We landed on the second design, with the larger lace motifs concentrated at the top of the skirt, and the smaller ones spilling down towards the fishtail. The idea was to use the appliques to create a subtle angled line, and give the skirt even more of an hourglass shape. I think it’s very flattering!
I was hand-sewing through only the sheer layer of the skirt, so my work had to be tidy and there was no place for an awkward thread tail to hide.
Could we just take a minute to admire the finish on that dart point? That’s how amazing it looks when you sew a dart with only the bobbin thread!
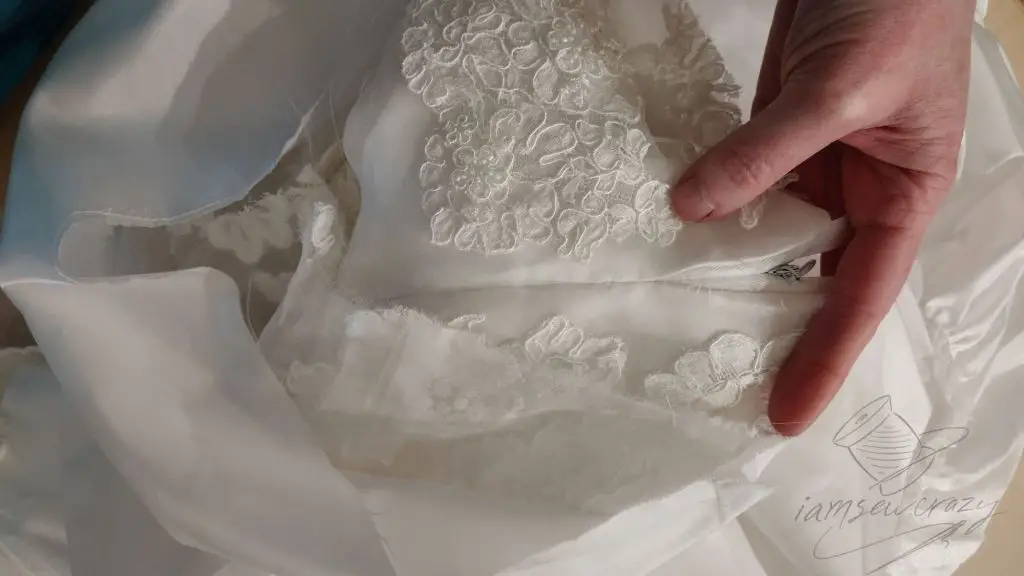
A few of the center back-ish lace motifs needed to wait until after I had installed the zipper.
Embellishing the sleeves
I embellished the sleeves, using a combination of lace from the original dress and the pearl lace. You won’t believe how perfectly the lace design matched up along the edge!
Check out where the pattern repeat ends! When Caroline asked me to make the bells smaller, nobody measured the scalloped lace edge. She just said “about this big” and I pinned it to cut later. So when the pattern repeat on the scalloped edge matched up so well, I was dying of happiness! That kind of thing just doesn’t happen often in real life.
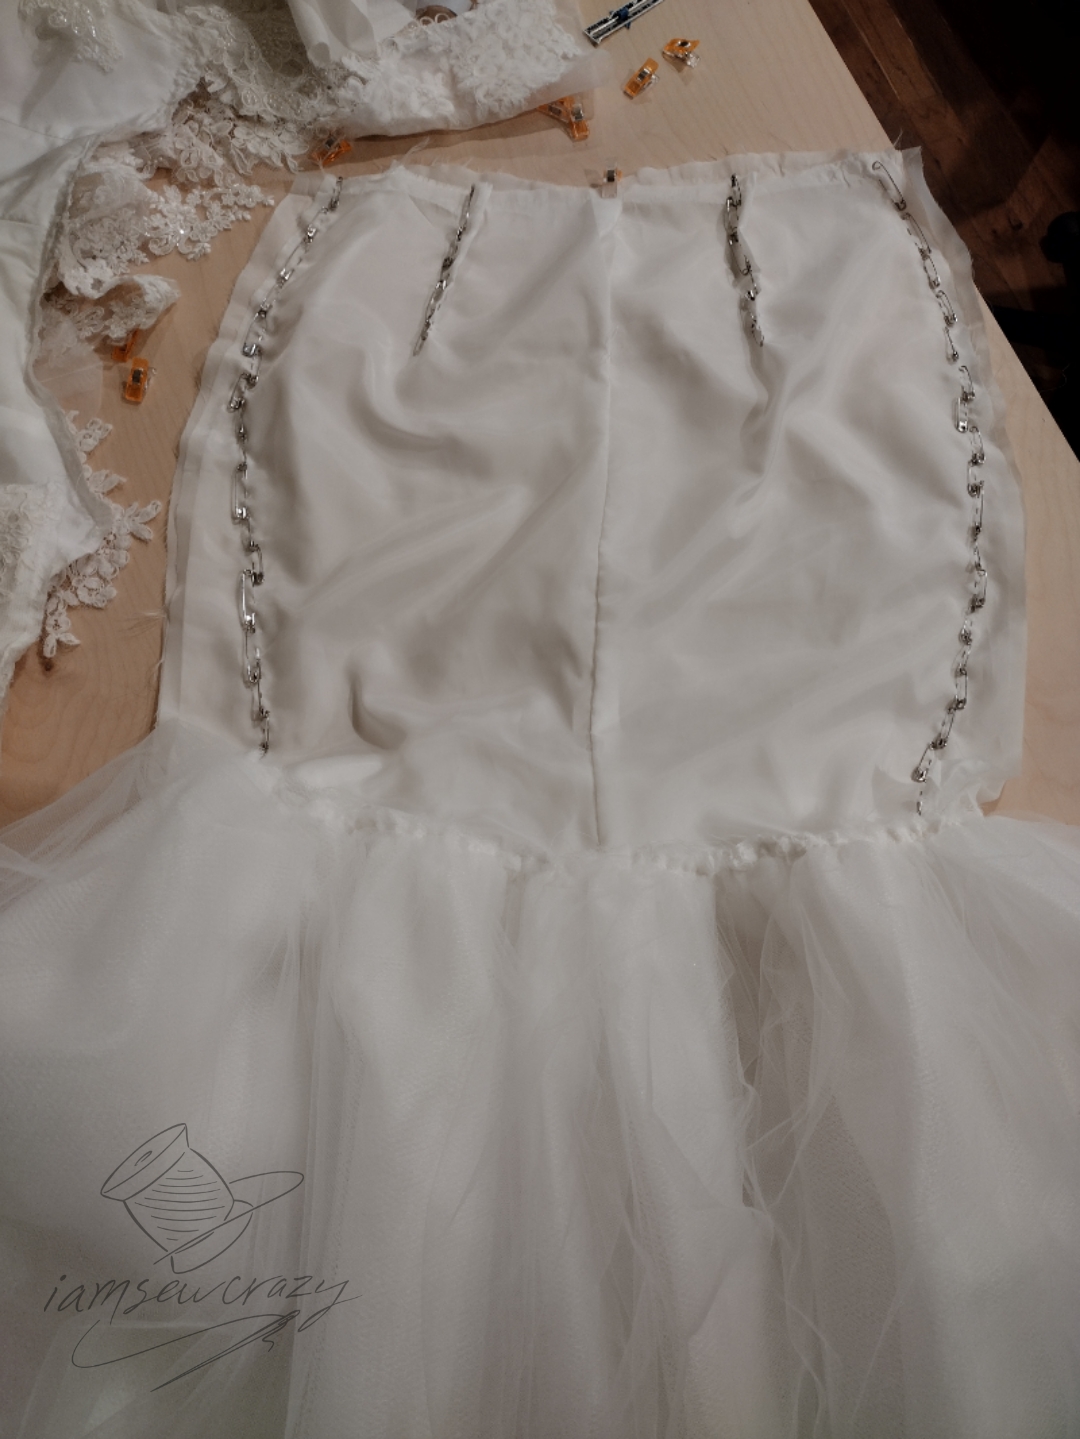
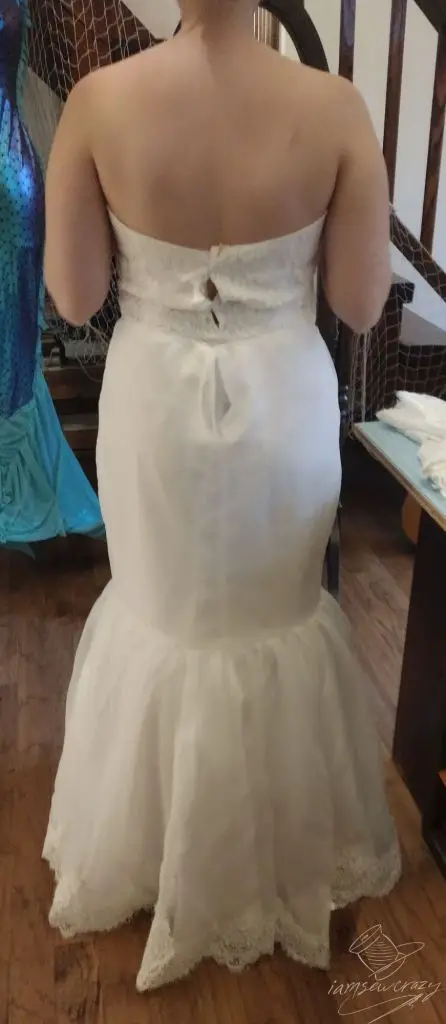
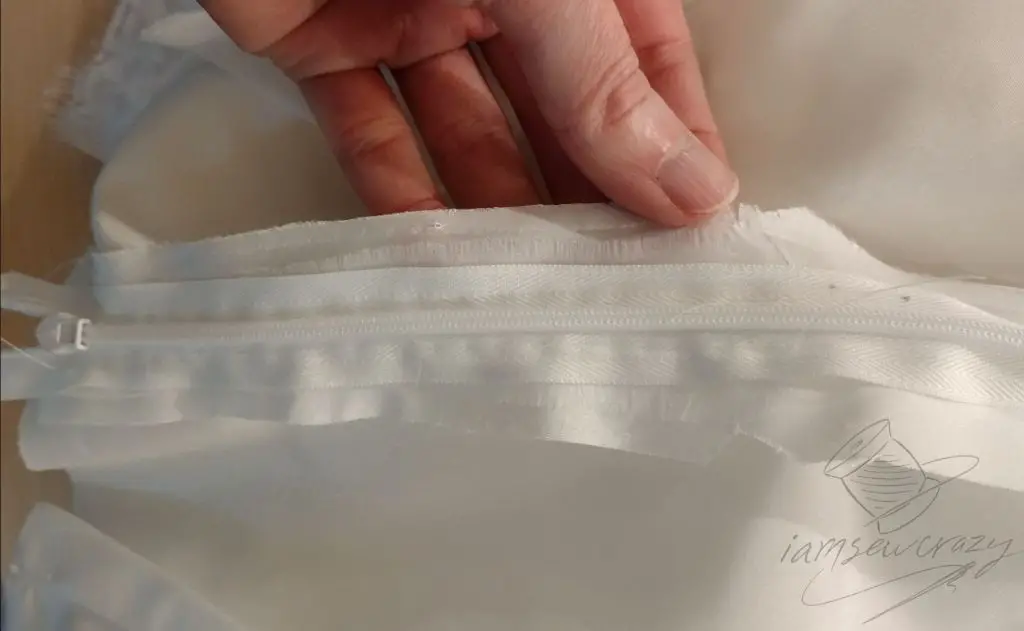
Adding a new invisible zipper
The original wedding dress had a lapped zipper, which was okay for the flowy style. But I’d die before I put a lapped zipper in a fitted dress like the new, restyled wedding dress! So of course I bought an invisible zipper and sewed it in. The zipper went from the bottom of the bodice at the bride’s waistline, down to just past the widest part of her hips. (The zipper was obviously necessary so that the bride could get inside of the dress.)
How to install an invisible zipper in a wedding dress with 3 layers
I was putting the zipper into 3 layers of dress fabric (lining, satin, and sheer). So I treated the satin and sheer as though they were one layer, and the lining as a separate layer. Putting an invisible zipper into 3 layers of fabric is really no more difficult than 2 layers if you do it this way. The seam allowances all ended up hidden between the satin and the lining. And the sheer fabric hangs free from the satin below the zipper, so the seam allowances are only connected at the zipper itself.
Take a few minutes to figure out how many layers you need to attach the zipper to, and think about any special challenges your wedding dress might have. Since each wedding dress is different, you might need to use a different method to install your zipper. And that’s okay! Some dresses have two linings, some have gathered material on the skirt, etc. It would be a good idea to practice a few times on scrap materials to test your method if you’re not sure. Here is how I installed the zipper on this wedding dress:
Select a zipper
Choose an invisible zipper that is longer than you need. This will make it much easier to install, because you can move the slider out of your way while you’re sewing. You can also test your iron settings on the bottom of the zipper that will be cut off later.
Using the synthetic setting on your iron, press the zipper teeth away from the tape so that they lay flat.
Prepare your seams
Working with each layer of the dress separately, sew each seam below the zipper area. For this dress, that meant sewing the lining, the satin, and the sheer, one at a time. (For a dress with a different configuration of layers, you can baste the zipper opening and sew the lower part of the seam at the same time. But since this dress had a sheer outer layer that I wanted to hang free below the zipper, I did it this way.)
Slash the seam allowance of the sheer fabric right at the base of the zipper area. Cut from the edge of the fabric straight towards the beginning of your line of stitches. Do not cut into the stitches.
Baste the zipper opening closed

With the satin and the sheer skirt layers inside out, place the sheer inside the satin. Nest the satin and sheer layers together by pulling the sheer fabric’s unsewn seam allowances in between the satin fabric’s seam allowances. The sheer fabric’s sewn seam allowances (below the zipper area) should lie between the two layers of fabric, just hanging free.
Pin the nested seam allowances in place.
Using a long straight stitch, machine-baste the seam closed. Sew through both layers at the same time, exactly where the zipper will go.
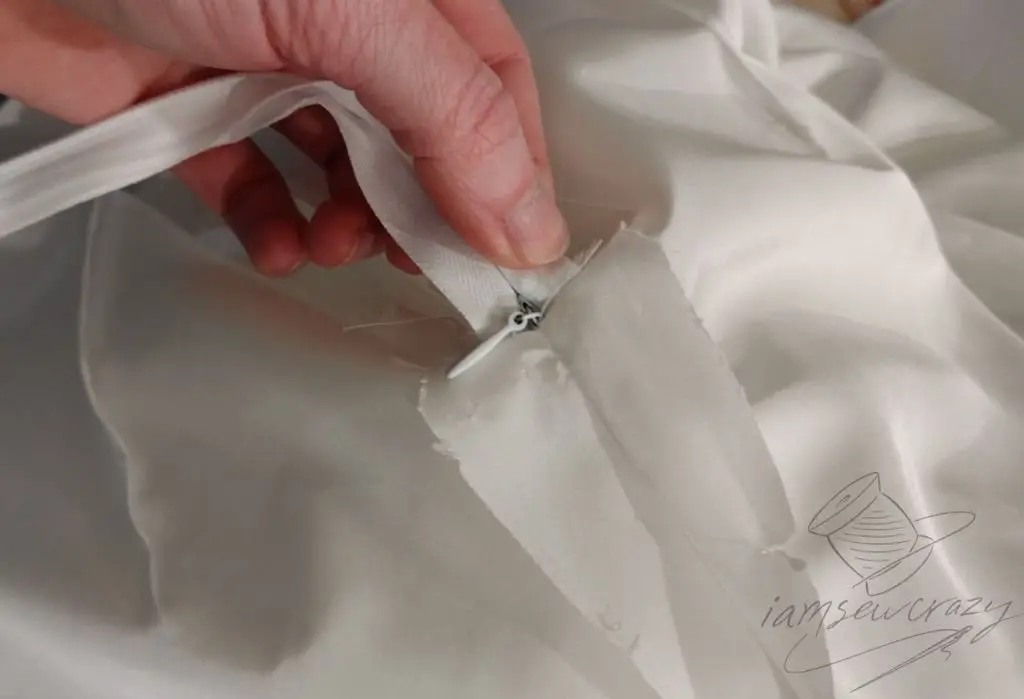
Baste in the zipper
Place the zipper so that the top of the zipper is at the top of your opening. The right side of the zipper should be laying against the seam allowances of the sheer fabric. Line up the zipper along the basted seam, with the center of the zipper teeth exactly along the seam.
Hand-baste the zipper tape to the satin and sheer fabric’s seam allowances. Baste through both layers at a time, treating the two fabrics as one. You do not need to baste very close to the zipper teeth; right in the middle of the zipper tape will be fine. Make sure that you only catch the seam allowances and the zipper tape in your hand-basting stitches.
Prepare to sew in the zipper
Remove your machine-basted stitches that are holding the zipper opening shut.
Open the zipper slider all the way. Carefully pull the zipper slider through the tiny opening where the zipper teeth meet the machine-sewn seam. You may need to reach in from the bottom of the zipper, and use a pair of hemostats or tweezers to grab the slider.
Install an invisible zipper foot on your sewing machine. If you don’t have one, it’s very possible to use a regular zipper foot. But for a special garment like this, where do-overs can be tricky, I’d recommend getting an invisible zipper foot.
Sew in the invisible zipper
Set your stitch length for a normal seam now (you’re through with basting). Adjust your presser foot and needle position so that you will be sewing right next to the zipper teeth.
With the zipper teeth in the groove on the bottom of the presser foot, sew one side of the zipper. Sew down from the top of the zipper to the end of the skirt’s zipper opening, where you should meet your previous machine-sewn seam. Make sure that you are sewing through both layers of seam allowances and the zipper tape only.
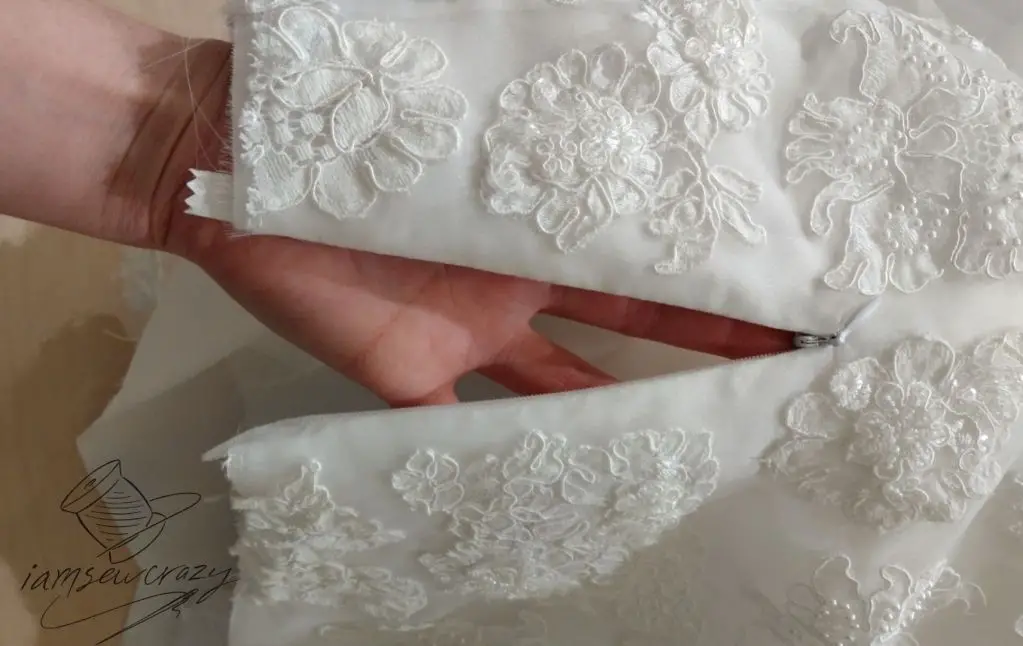
Repeat on the other side of the zipper tape. Turn the skirt to the right side and zip up the zipper slider to check your work before you add the lining. If you’re happy with the way the zipper looks, pull the zipper slider back down to the bottom of the zipper tape, and then proceed to add the lining.
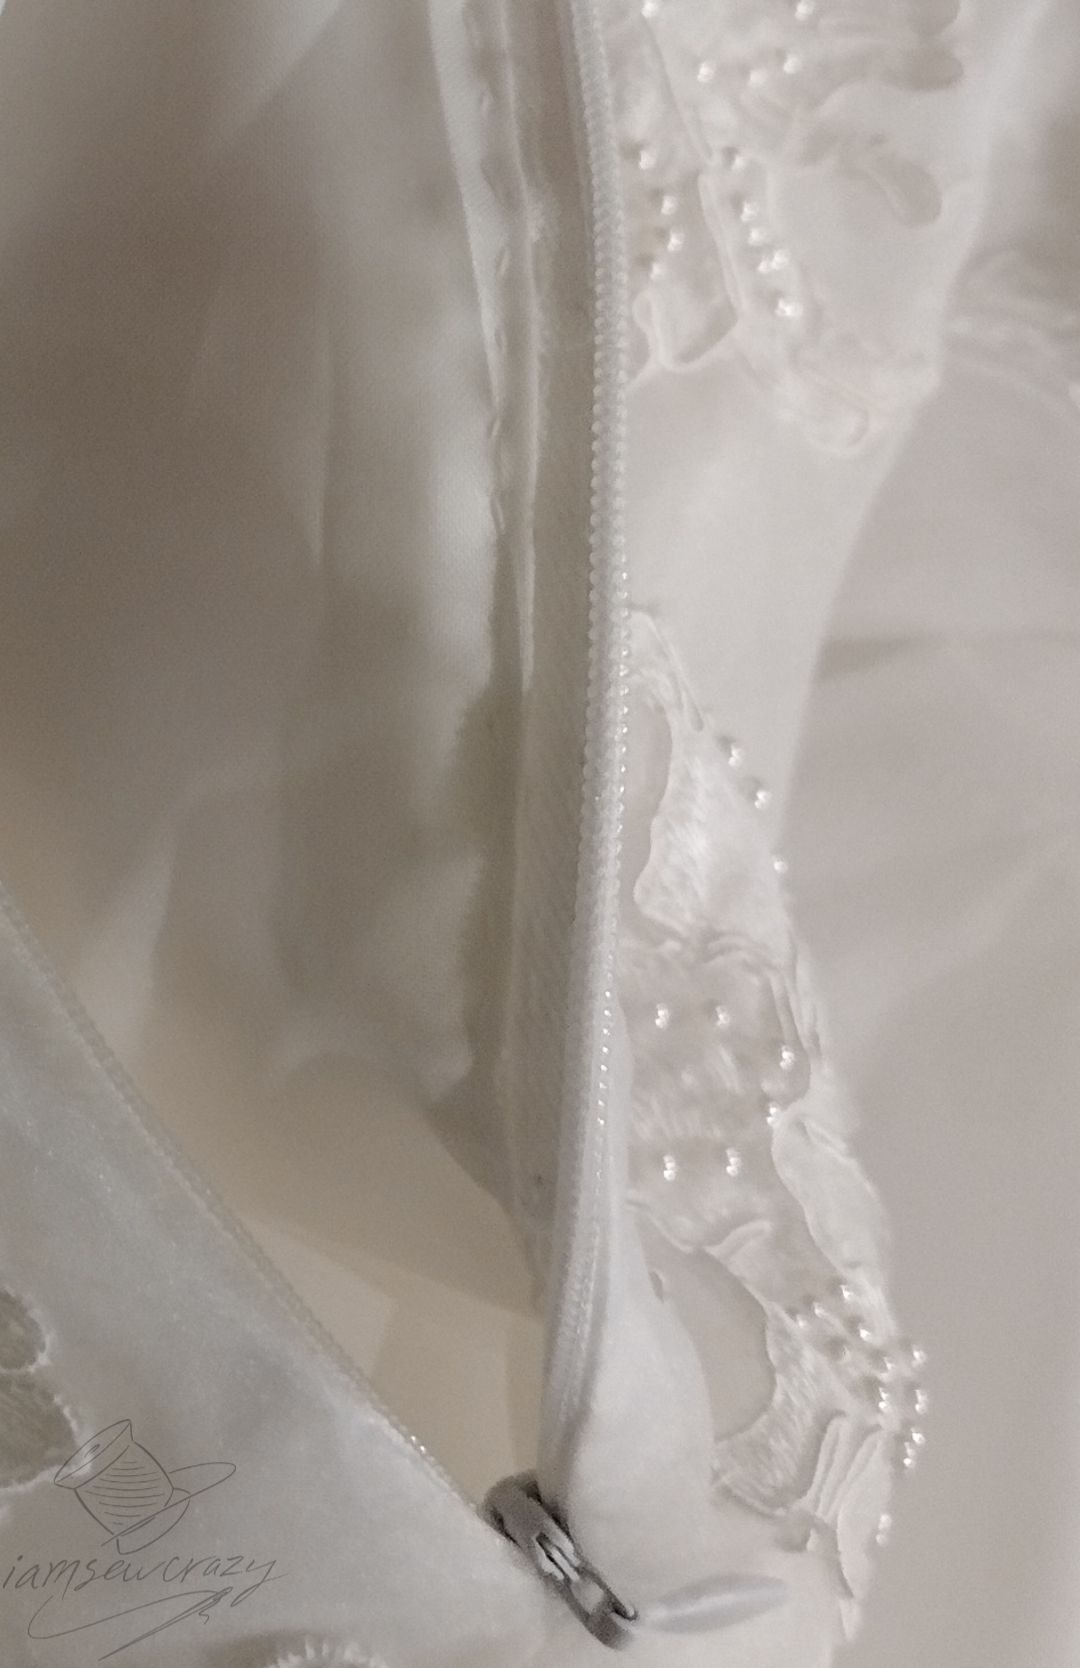
Sew the lining to the zipper
Place the skirt inside the lining. Line up the seam allowances of the skirt and lining in the zipper area. Sew in the middle of the zipper tape (not as close to the zipper teeth this time), through the seam allowances and zipper tape ONLY. Make sure you are not catching a folded piece of the skirt fabric in your stitching!

Now flip the lining to the inside of the skirt. Zip the zipper slider all of the way up.
Since this was a fairly short zipper, I might have hand-sewn the lining seam allowances to the zipper tape. I’m sorry, I don’t remember for sure how I did the lining this time around, and somehow I forgot to take a picture! But if the construction of your particular dress makes machine-sewing the lining to the zipper difficult, or just if you’re more comfortable with hand-sewing, you can always fold in the lining seam allowances and hand-stitch the lining to the zipper tape.
It’s a good idea to come back through and quickly hand-tack the lining to the zipper tape on the inside. You can see my tacking stitches in the photo above. The tacking stitches are optional, but recommended so that the lining can’t get caught in the zipper slider. If you’ve ever had a dress with a lining that constantly found its way into the zipper slider, you definitely understand!
Finish off the zipper
Make sure that the zipper slider is zipped up. Sew a bar tack (a line of dense, narrow zigzag stitches) across the zipper tape only, below the zipper opening of the skirt. This is to make sure that the zipper slider can’t come off of the bottom of the zipper tape after you trim off the excess zipper tape.
Trim the zipper tape to just below the bar tack.
I never remove my hand-basting stitches that hold the zipper tape to the seam allowances. You can if you want to, but I see no reason to bother.
Using the iron settings that you tested on scrap material, carefully press the newly-installed zipper to give it a crisp finish.
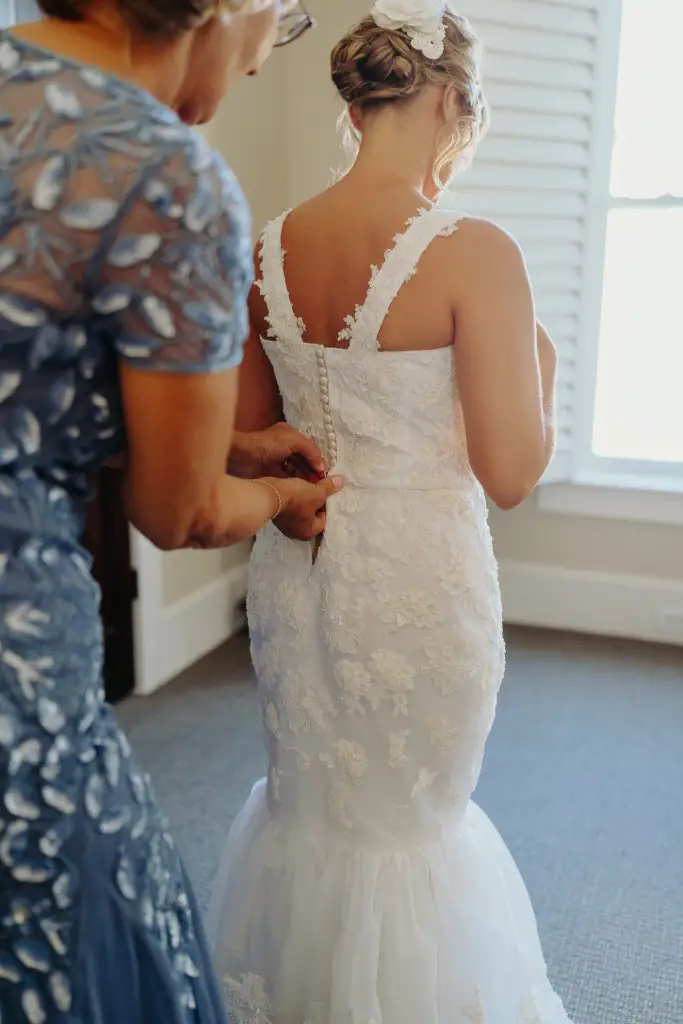
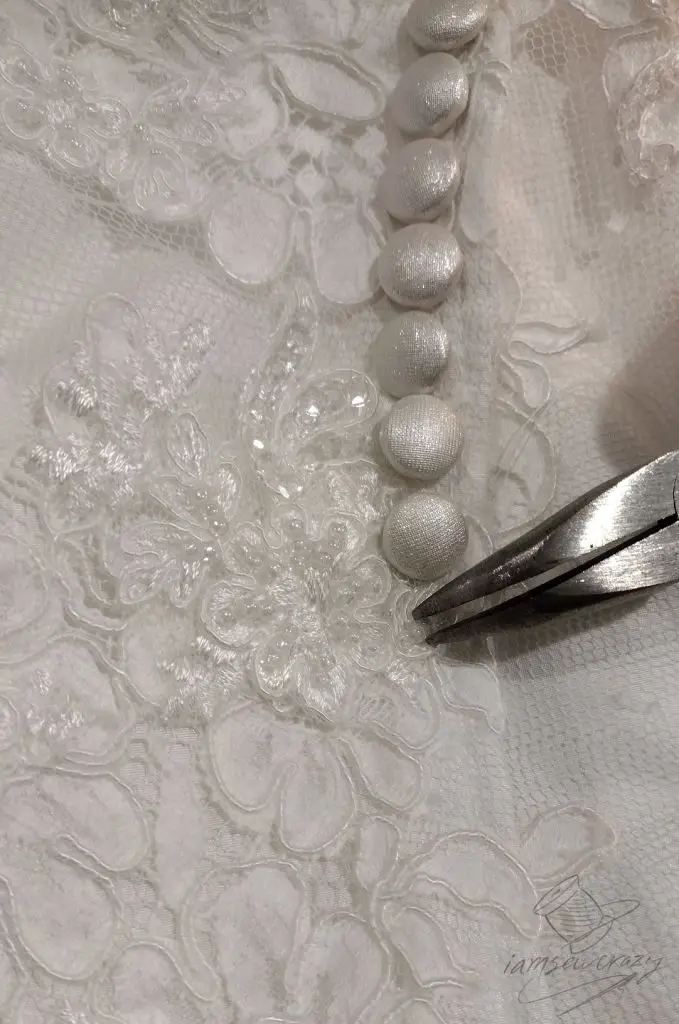
Pearlizing and reinstalling the original wedding dress buttons
The original buttons were one detail that Caroline wanted to keep. So I gave them a pearlized finish and sewed them back onto the bodice and the sleeves.
The pearlized finish is the same thing I put on the flower petals when I was making the fascinator. I’m going to add more info about that process in my future post about how to restyle a wedding veil into a fascinator.
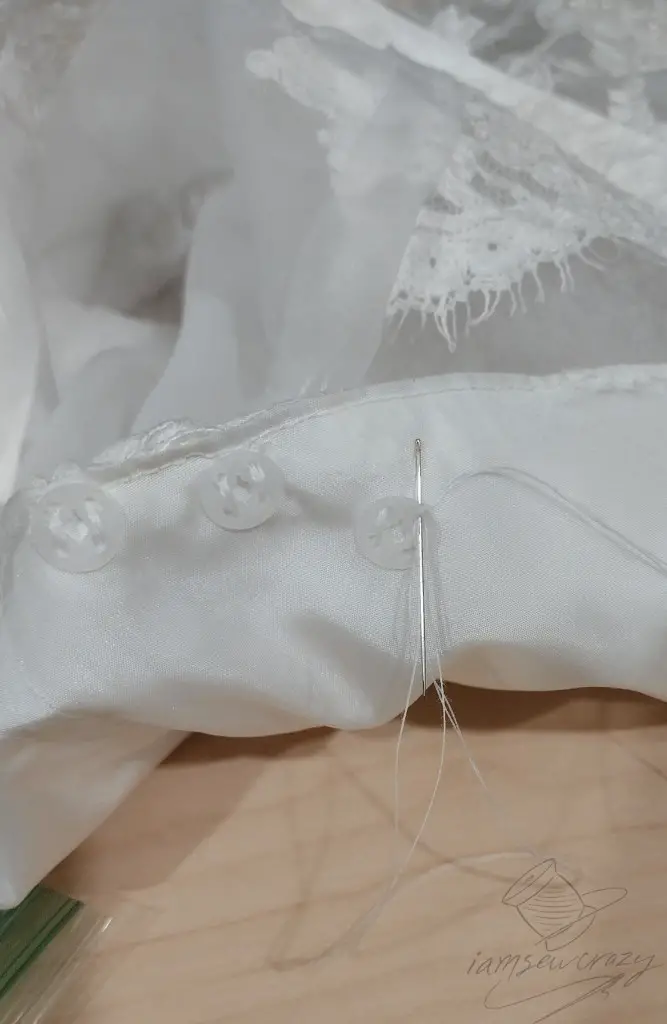
The new style of the wedding dress no longer required buttons all the way up to the neck. This meant that I could add more buttons to each sleeve. I was also able to throw out any buttons that were damaged, and still have enough.
The button loops were the same ones from the original dress. They went right back on, just as before, but trimmed shorter.
When I was sewing the buttons onto the back of the dress, I needed to snap some of the glass beads from the beaded lace I had used to embellish the bodice. I didn’t want to cut the threads, because that might loosen the beads I wanted to keep.
I also found one single silver bead that was driving me crazy. So I crushed that one too, and threw it out.
I added a rustproof hook-and-eye to the very top of the bodice. I did not trust those buttons, even though I put each of them through a strength test. (Remember that the satin buttons from the original dress all had to be thrown out because they were coming apart!)
The hook-and-eye was placed so that it would take the greatest amount of strain. With the stress taken off of the top button, the rest of the buttons could just hang out and do their thing.
Sewing the skirt to the bodice
This was a fairly obvious and uneventful process. But since it was one of the last things I did, it was nice to finally have the dress in one piece! After I attached the skirt to the bodice, I was able to hand-sew the last of the lace appliques down. (Including the one at the bottom center front of the bodice that had been hanging free all this time.)
On some wedding dresses, you may be able to keep the bodice lining and skirt lining together as one piece. And that’s great if that’s what makes sense for your dress! A lot of times this is the best way to do it. But for Caroline’s dress, it made a lot more sense to have the lining pieces separated at the waist.
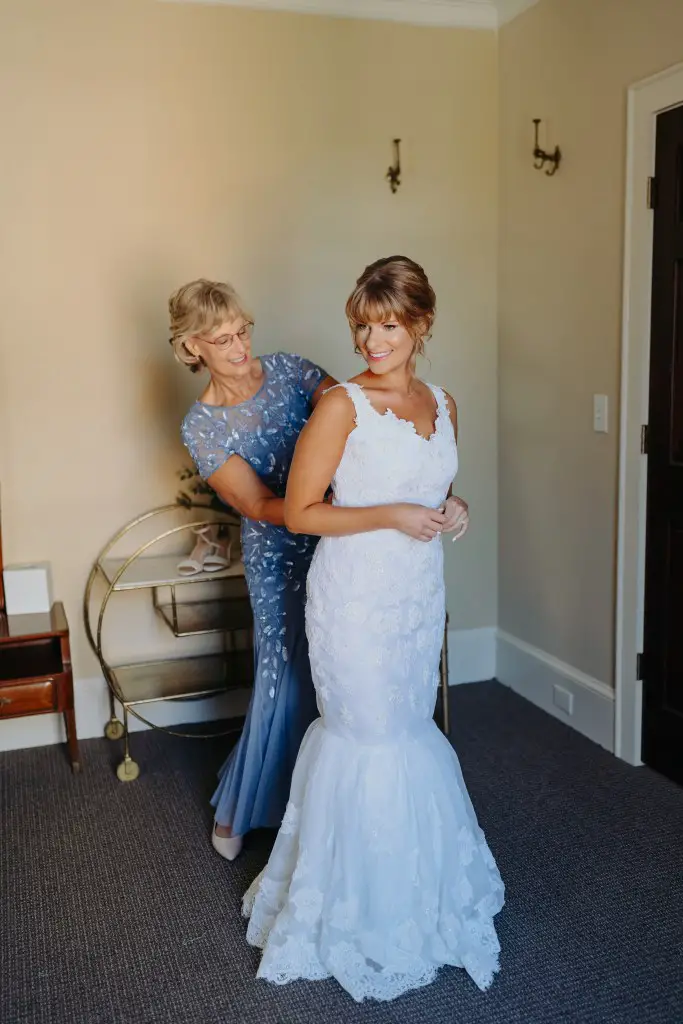
Final result after months of work restyling the wedding dress!
A few days before the wedding, Caroline and her mother Cherie came to pick up the dress. I hadn’t sent them any pictures of the finished dress yet, so it was a big moment when they saw everything in person! And I was really hoping that Cherie would like what we had done to her original dress, even though Caroline and I had her full permission to alter it.
Cherie said she was in shock and couldn’t believe that it was the same dress. I got shivers when I saw Caroline wearing it! I knew my work was done when Caroline said that she wouldn’t change a single thing about it. And guess what? Neither would I!


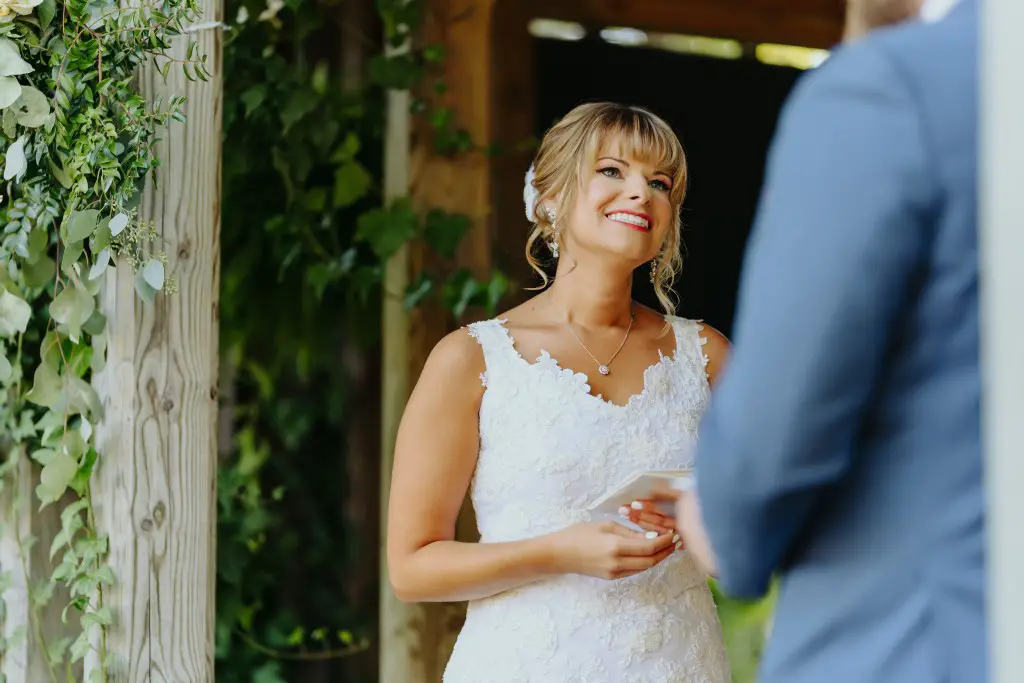


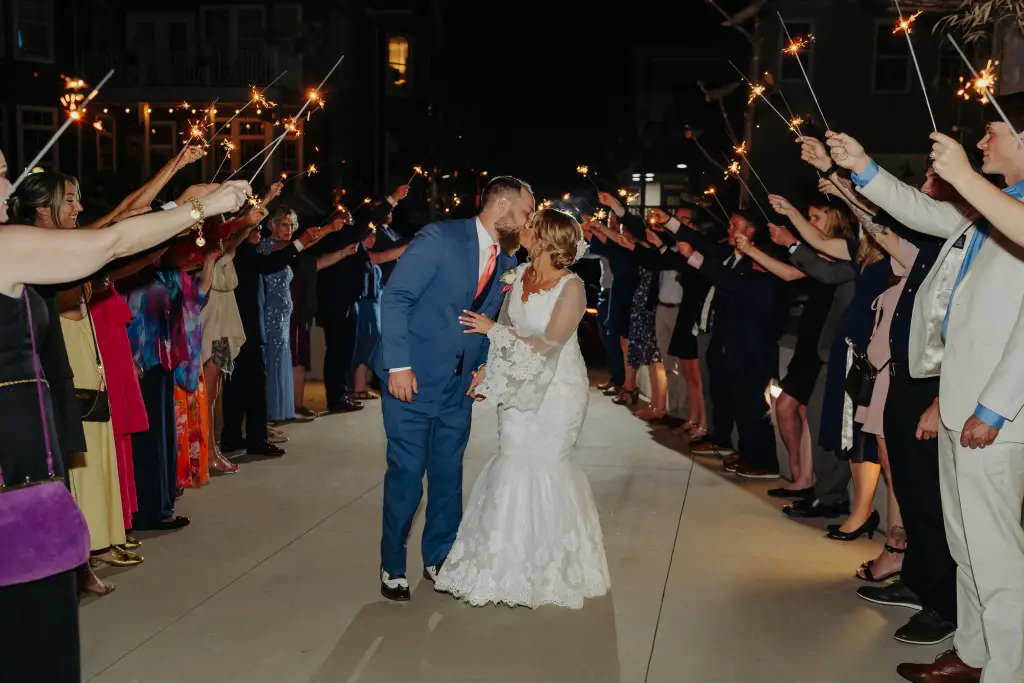
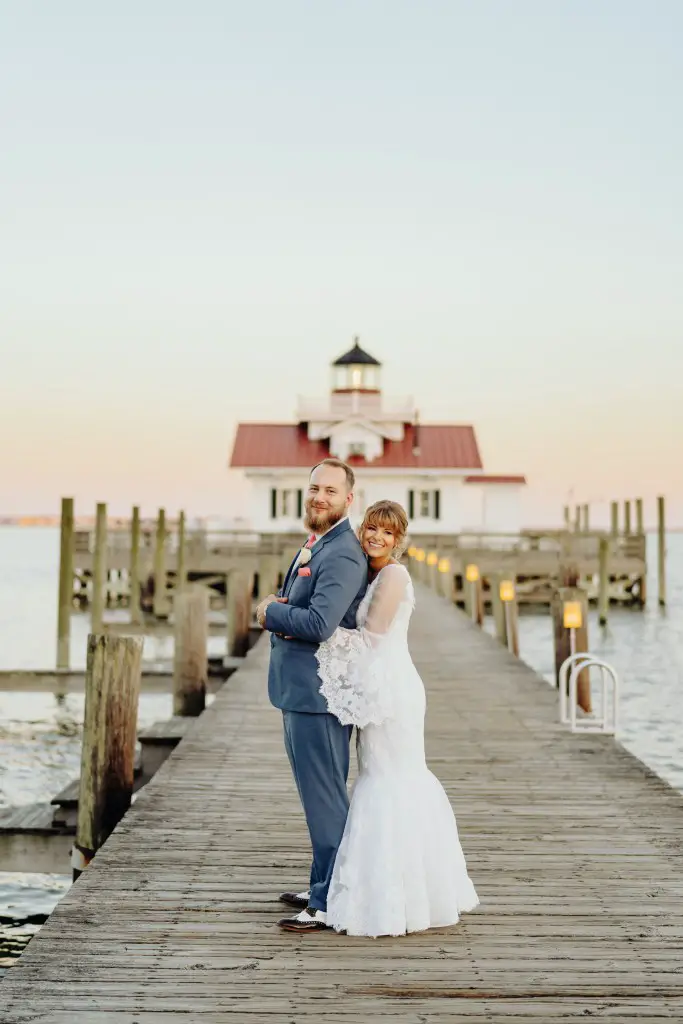
All of the wedding day photos are courtesy of Maria Kandalova Photography. The pictures turned out great, and I’d like to thank Maria for allowing me to use her photos. If you’re looking for a photographer in the Outer Banks area, check out Maria’s website or instagram.
I dumped my heart and soul into restyling this wedding dress. I also broke two hand-sewing needles on this project, which I think was a first for me. And it was so very worth it! I’m extremely happy for Caroline and Ryan, and I hope they have an amazing life together!
If you’re here because you want to find out how to restyle a wedding dress, I’m glad you stopped by! I hope you have some guidance and a few more ideas after reading about Cherie and Caroline’s dress. And stay tuned for the tutorial about how to restyle a wedding veil into a fascinator! It’s a great way to dip your toes into the world of refashioning vintage wedding clothes and accessories. Have fun, my crafty friends!