


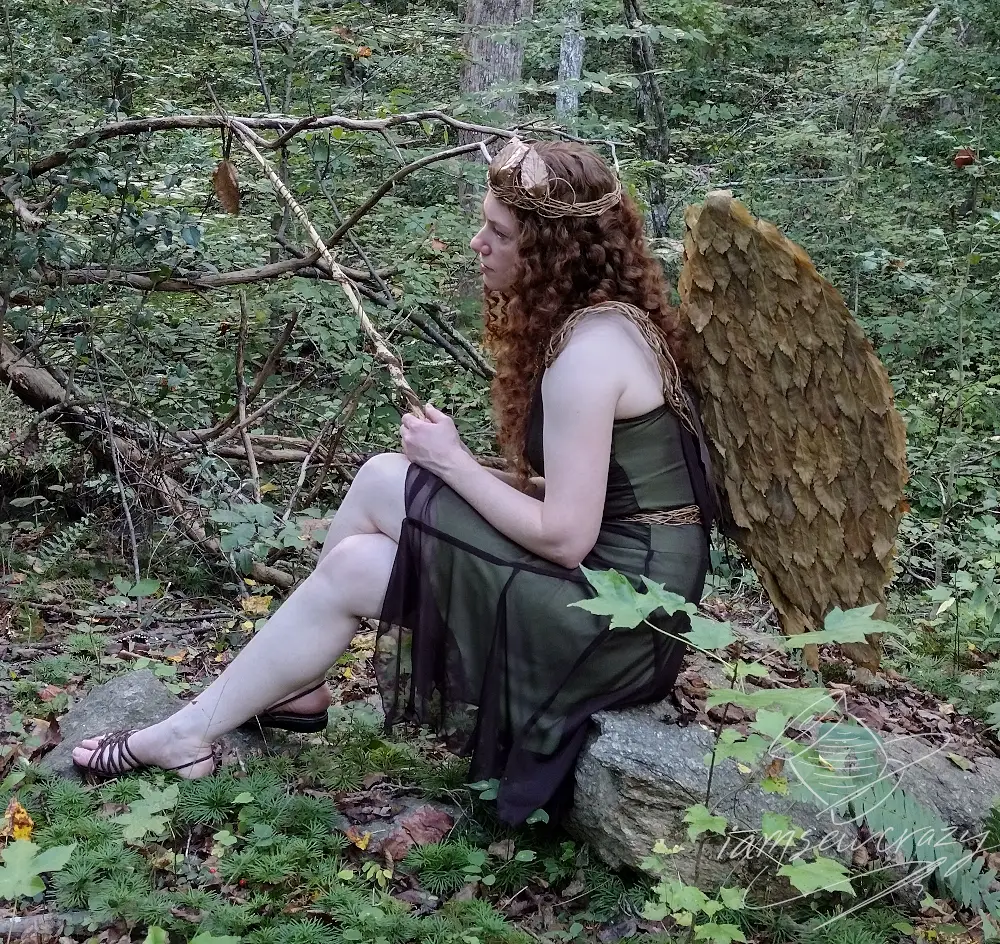
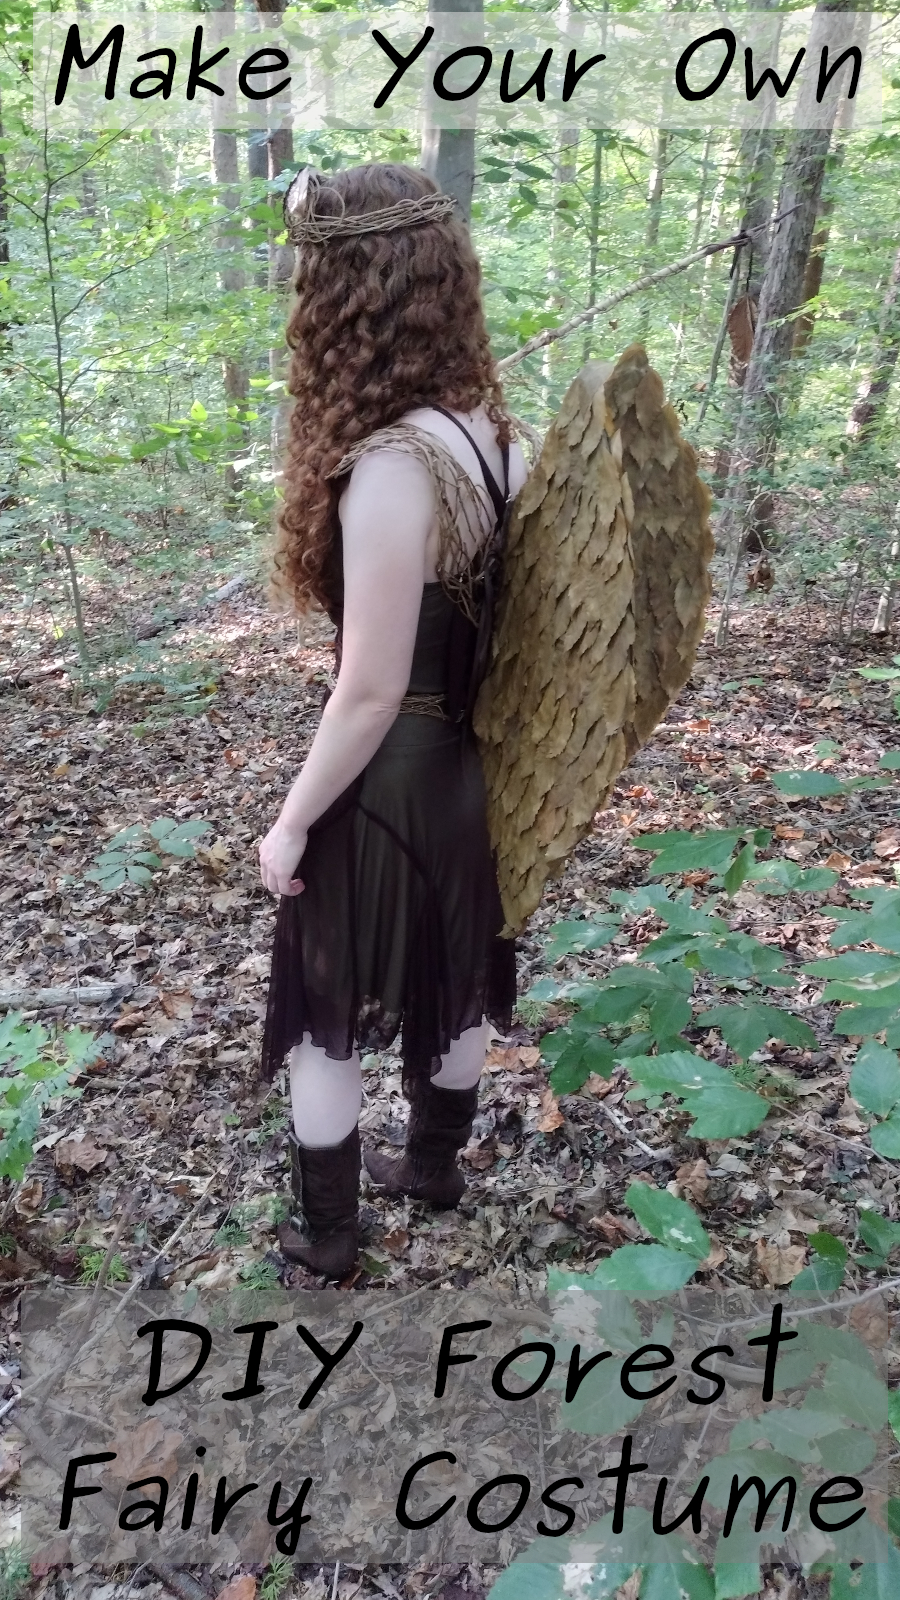
Let me show you how to make a Forest Fairy costume! It definitely attracts attention everywhere it goes. The DIY fairy wings are covered with layers of real leaves that are overlapped to resemble feathers, and the shoulder harness for the wings is made out of natural vines that I shaped and dried. The tiara, arm cuff, and magic wand are made out of vines, leaves, and sticks as well. Read on, and I’ll show you how to make a forest fairy costume of your own!


The way I preserved the leaves in glycerine would be a really nice technique to make a DIY Poison Ivy costume for a cosplay event! You can also spruce up a storebought cosplay costume by adding a few leaves to a barrette, gloves, or masquerade mask to create a fun accessory.

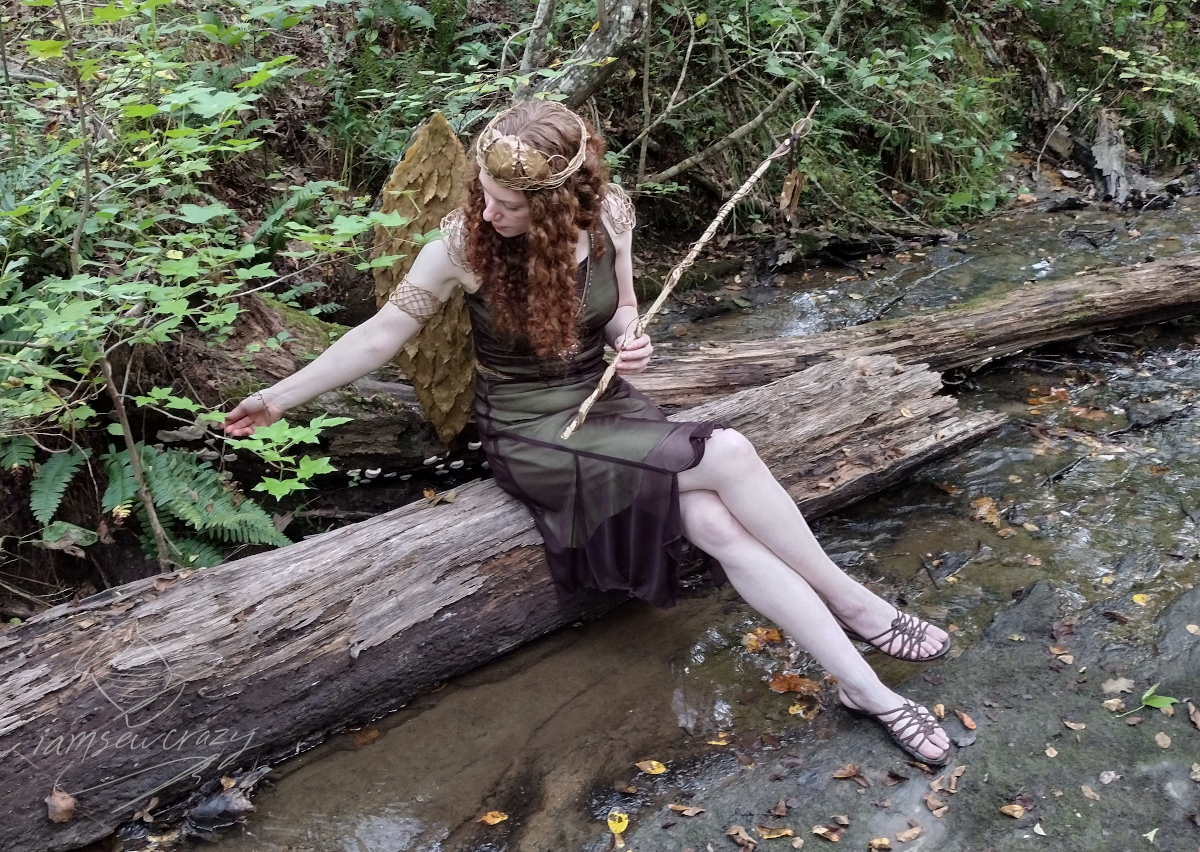
I’ve taken the forest fairy costume to several fashion show runways, and it always looks great on every model. The DIY fairy wings are very lightweight and comfortable, and it would be easy to wear it all night to a costume party or trick-or-treating this Halloween. I’ll show you the methods and materials I used so that you can make your own fairy wings and accessories, or you can pick and choose some of my ideas to design a fairy costume of your own.
The Leaves
The fairy wings are covered with layers of leaves that are arranged and overlapped in rows to look like feathers. You can absolutely use fake leaves like these if you want to, and it will save you a considerable amount of time. Artificial ivy or rose leaves would be great choices! If the faux leaves you choose come attached to branches or vines, you can just snip them off and toss out the branches.

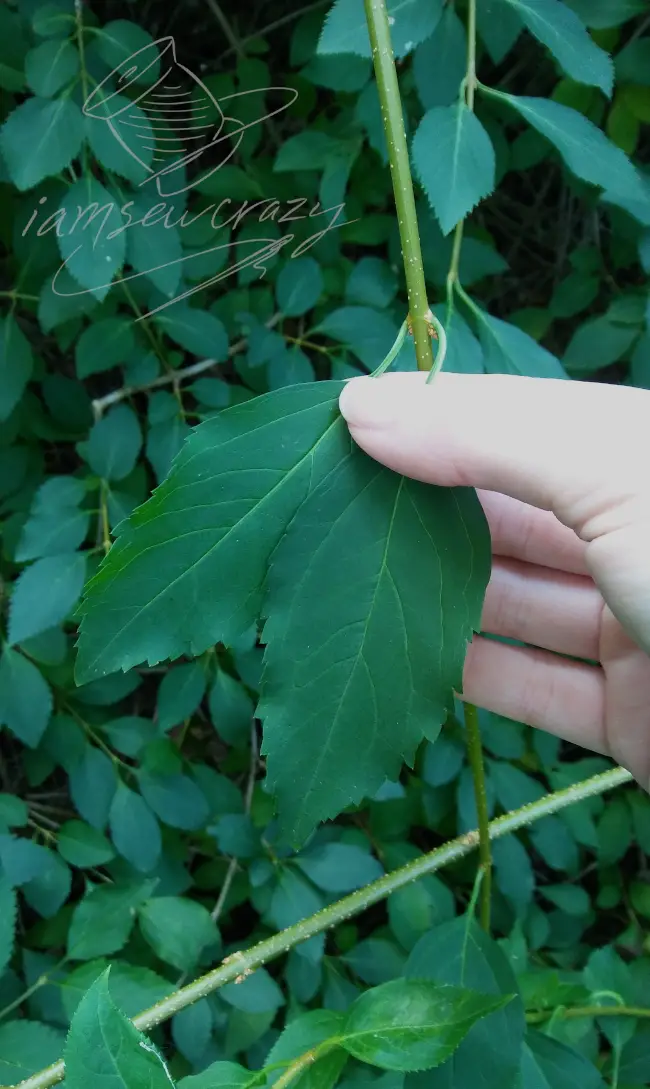
If you use natural leaves, make sure that the leaves you are picking aren’t dangerous (like poison ivy leaves, for example). I ended up using forsythia, and the fairy wings took about 350 leaves in total, but you may need more or fewer than I did. (Since my leaves were natural, they varied in size quite a bit.) The faux rose leaves in the link come with 480 individual leaves, so that’s a good amount to start with. You can always get two packs if you make enormous wings, or if you want to add leaves to the skirt or bodice of the dress as well. When you make your own fairy costume, you get to make it 100% YOU!
I preserved the forsythia leaves by submerging them in a mixture of vegetable glycerine and water. Treating them with glycerine will keep them soft and supple, instead of having the leaves become dry and crumbly over time. If you want your DIY fairy wings to hold up without the leaves curling, shrinking, or crumbling into oblivion, then you need to either use artificial leaves, or preserve them in glycerine.

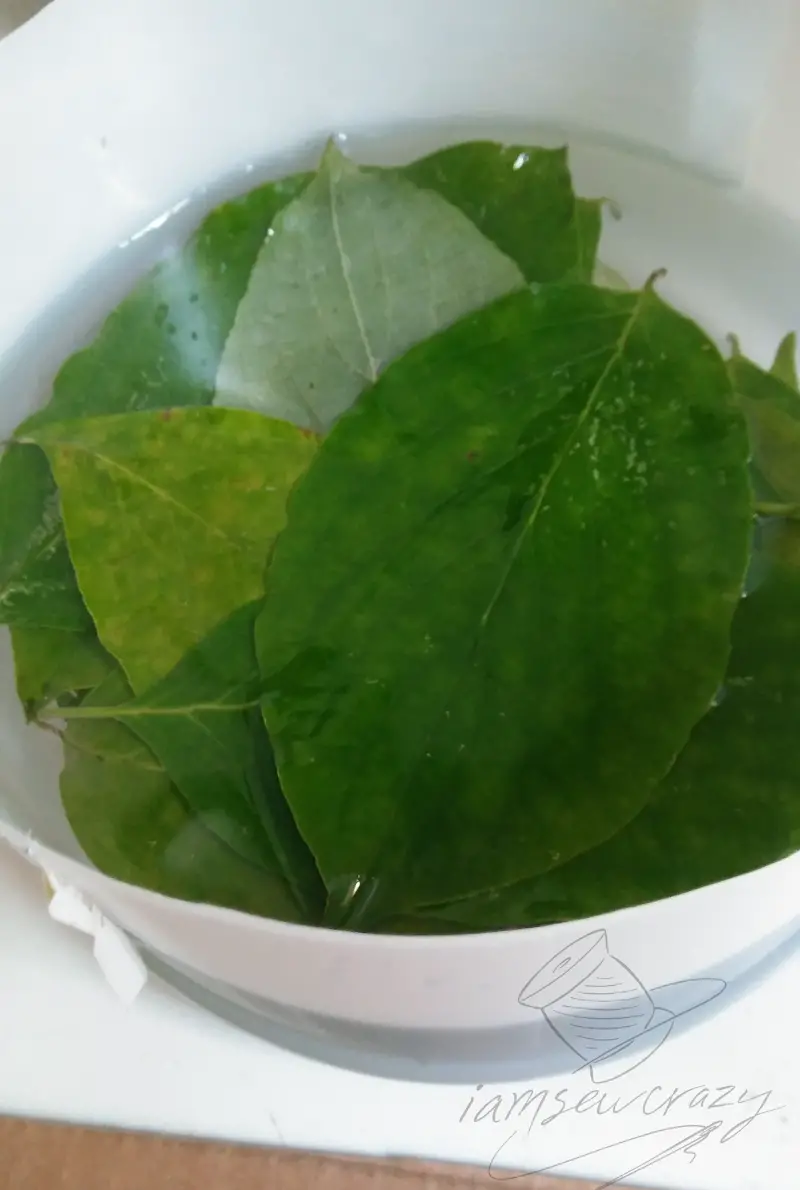
A liter of glycerine mixed with 2 liters of water is a good amount, because you need to fully submerge the leaves, and 3 liters of mixture allows you to fit a bunch of leaves in at once. Add your freshly-picked leaves to the glycerine mixture, and cover them with a plate or other flat item that will keep them submerged. It takes about 3 days for the leaves to become preserved, but it may vary depending on the type of leaves you are using.
If you need to preserve more than one batch of leaves, it’s okay to re-use the glycerine. It will change color after the first batch of leaves, but it will still work fine.

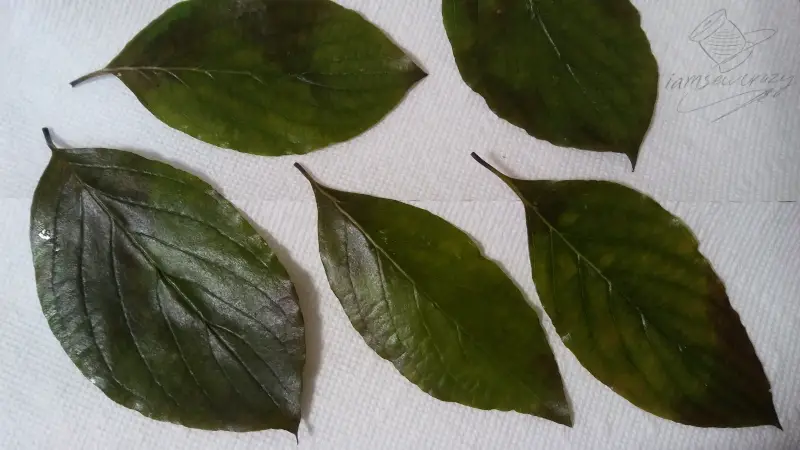
You will be able to tell if the leaves are ready or not, because they will change color slightly as they absorb the glycerine mixture. See how my leaves started out looking very bright green, and then turned more of an olive color? If the color change is still patchy and incomplete, the leaves need more time.

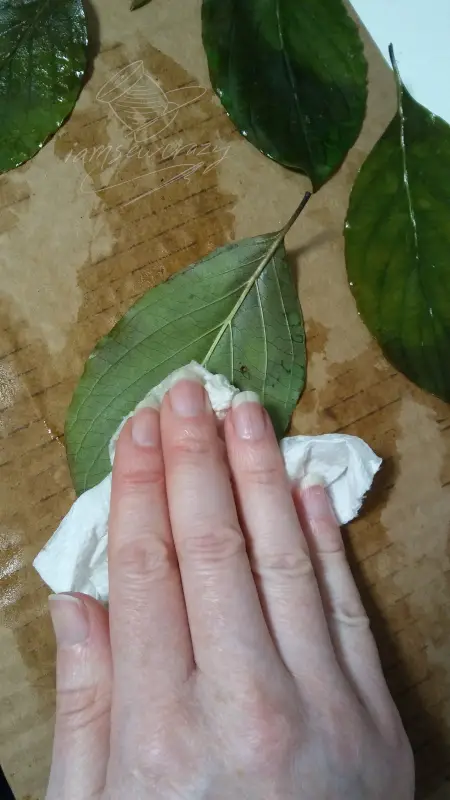
When my leaves were ready, I took them out of the glycerine mixture and blotted them dry. I spread them out in a single layer on paper towels, to dry out further.

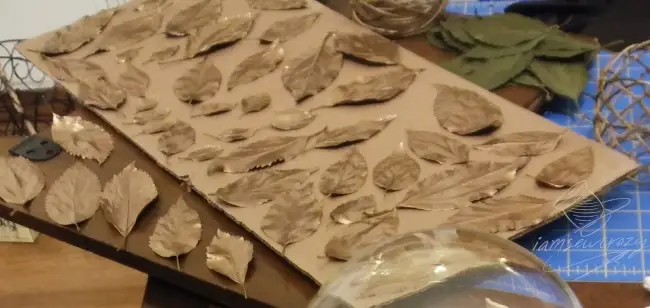
I chose some nicely-shaped leaves of different sizes that had no bug bites, and painted them with Krylon copper foil spray paint to use as accents on the tiara and the magic wand.
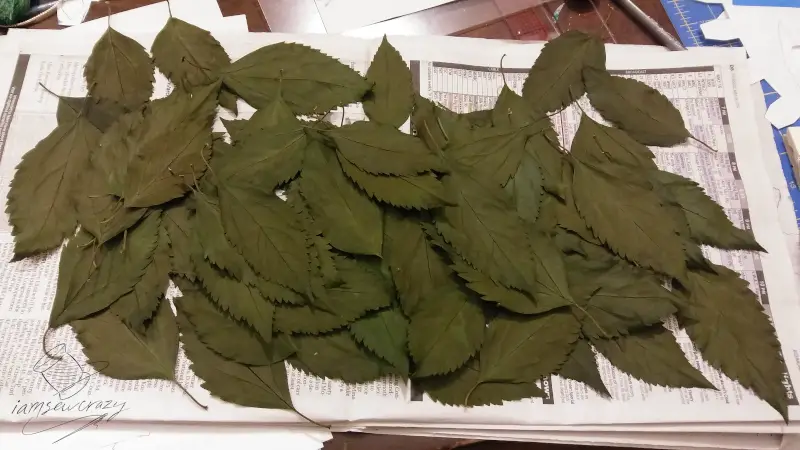
Then I snipped off any remaining stems from the rest of the green leaves, since I didn’t want stems on the leaves that I was going to layer on the wings. Since the leaves will be overlapped, the stems will be covered up anyway, and the stems would just create an uneven surface for the next leaf to adhere to.
The Fairy Dress

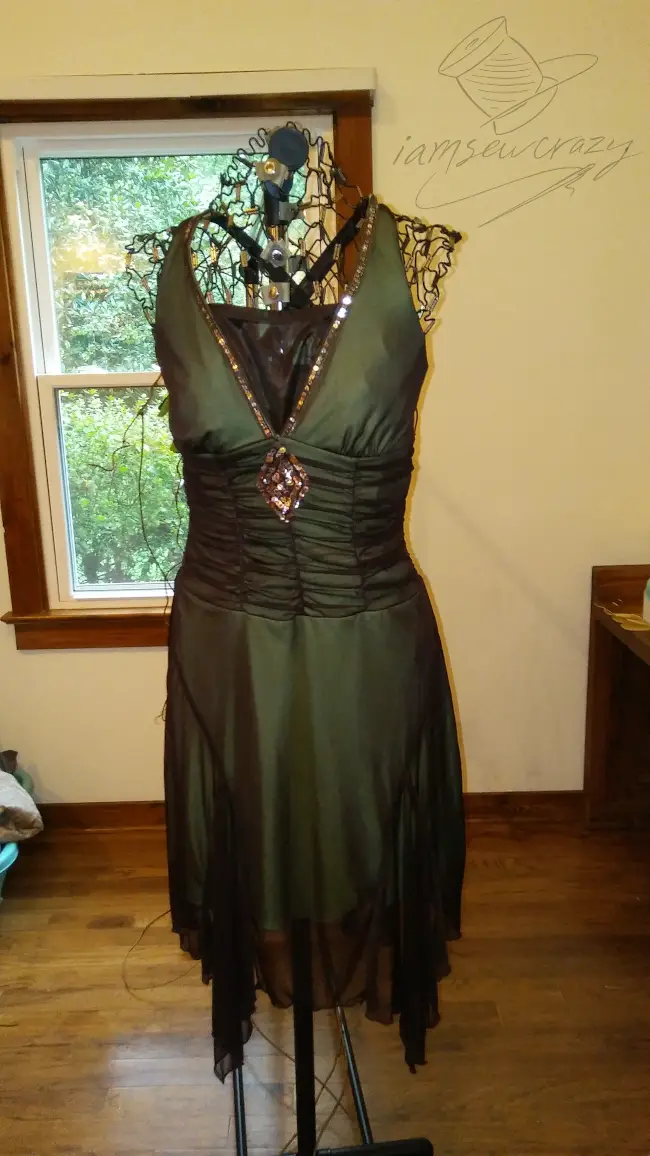
The fairy dress started as a thrift store find, and I added a few finishing touches to it. Look for something in a color that doesn’t clash with any of your natural materials. An irregular or handkerchief hem on the skirt is very fairy-like, or you can add fabric to your dress to make it more whimsical. Try adding a sheer layer that floats over the skirt, or sew overlapping triangles of fabric at the waist with their points hanging down, to create a raggedy-elegant Tinkerbell look. Add some sequins around the neck, or some gems that mimic your other accent colors. Or cut the straps off, and instead use some crisscrossing ribbons or braided bands. Anything that looks boho-glam and earth toned will probably blend in just fine!
The Vines
Natural vines are a wonderful craft material, but weaving shapes and designs out of them does take a little practice. I’ve been doing this for a long time, so I’ll give you as many tips as I can. But the truth is that natural vines can be tricky to work with because they vary so much. You’re going to have to just get in there and figure out exactly how to make them do what you want them to do!
The vines I used are a species called akebia quinata (also known as Chocolate Vine) that’s native to Japan. Lots of different kinds of vines will work, but I’m going to stress again the importance of making sure you’re not picking poison ivy vines. Watch out for anything that will be harmful to you, other people, or your pets.

Natural vines will bend and flex best if they are partially dry. If they are too fresh or too dry, they will crack and split. For my akebia, that meant pulling the leaves off and then leaving them alone for about 2 days before I started weaving them.
Start by defining the borders of your design element, and then fill in the center by weaving new vines over and under the existing vines in your design in order to lock everything together. Wrap some vines around the outside edges of your accessories. As you work, think about the way vines twirl around things as they grow and climb. If there is a natural bend in the vine, don’t fight it or try to straighten it out. Either figure out a way to work the bend into your design, or choose another vine. And don’t leave a long length of vine that’s not supported or locked in by another vine. It will become a weak point later on.
The end of the vine that was closer to the root will always be stiffer and sturdier, and the vine will get weaker, thinner, and more flexible as you go towards the tip. This can be a good thing and a bad thing: the thicker, sturdier root ends are great for the structural parts of the costume, such as the belt, shoulder harness, and the frame of the tiara. But take a look at the arm cuff, and you’ll notice that it’s made out of one single vine. As I got closer to the tip, the vine was so soft that weaving it in and out made it want to kink like a garden hose. So you have to know when to give up on a floppy vine tip that just won’t behave.
Once you’re happy with your design, leave it to dry without messing with it! It will keep its shape wonderfully once it’s fully dry, but don’t try to use it before that. You can speed up the drying process by putting it near an air vent or fan.
Making the Shoulder Harness for the Fairy Wings
Now that you have some tips for how to work with vines, we can move on to the shoulder harness! The harness is shaped like a V, with the two points bent down to curve over the top of the wearer’s shoulders. It does not actually bear all of the weight of the wings, but it keeps the side-to-side motion in check. The wings will hang from the center back, so without the wide shoulder harness stabilizing them, they would pivot and move left to right a little bit.
I made use of a vintage wire dress form to shape the vines for the shoulder harness and belt. If you don’t have a dress form like that, you can use a conventional soft dress form and hold the vines down with safety pins instead of twist ties like I’m using. If you don’t have a dress form at all, you can make a DIY duct tape dress form, but it’s a more limiting option and it takes a little bit of time to make.
I put the fairy dress on the dress form first, so I could see exactly where the straps of the dress hit, and how much of the shoulder I would be covering with the vines. I also needed to see the point where the straps cross in the back, because I will anchor the wings to that point later on.

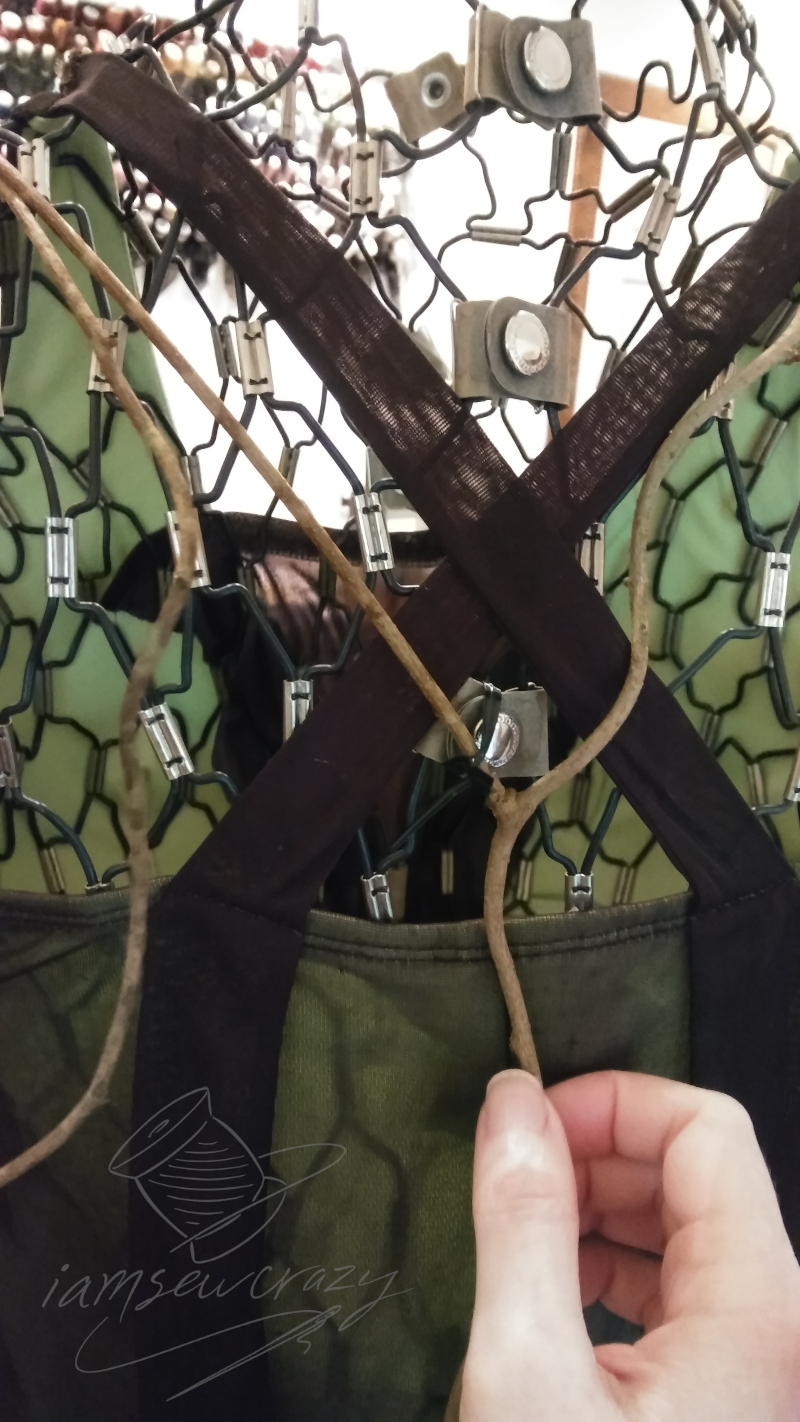
I chose a larger vine that branched off to become the center back of the harness. I tried to make everything lie in a natural way, thinking about the way vines twist and twirl as they grow. So the large branched vine would be the starting point for my V-shaped harness, with one of the two arms of the vine laying over each shoulder.

The arms of the first vine were then curved around into loops to make the borders of the shoulder harness, and the vines were twist tied to the dress form to hold them in place. Then, I wove more vines in and out of the ones that were twist-tied in place in order to fill in the middle of the harness. Make sure that you don’t weave vines through the dress form itself; the vines should only be attached to the outside of the form by the twist ties (or safety pins). Once the harness is done, leave everything in place until it’s dry. Then, you can remove the twist ties and lift the harness off of the dress form.


Here’s a couple of pictures of the finished harness, but I’m getting ahead of myself a little bit… I’ll show you how to make the fairy wings in a minute!
How to Make the Magic Wand

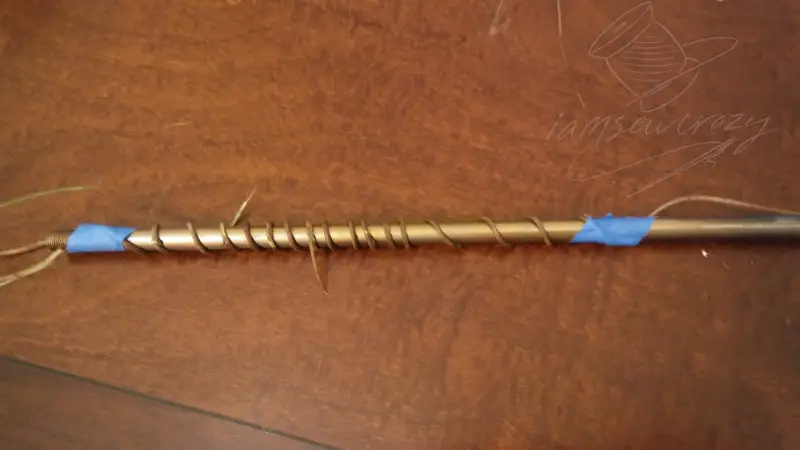
To make the magic wand, I took a short length of vine, and wrapped it around a metal rod. I held it in place with two pieces of painter’s tape so that it could dry. (Want more painter’s tape hacks? Check out my post that tells you 17 painter’s tape hacks to make your sewing and crafting easier!)

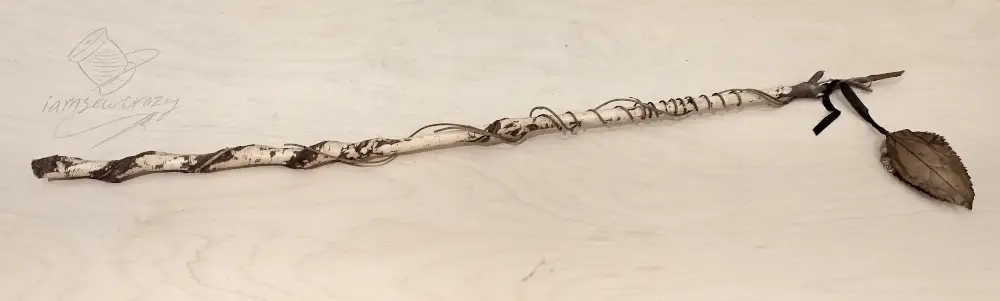
I took the vine I’d wrapped around the metal rod earlier, and twirled it around a stick to make the fairy’s magic wand. The wand is actually a beaver stick… the bark is partially missing because a beaver chewed the bark as a snack. But it looks really cool and magical, doesn’t it? Then, I added a cluster of the leaves I spray painted copper. I added Fabri-Tac glue to the stems of the leaves and then wrapped them with a strip of fabric. I tied the other end of the fabric strip to the stick.
I did test hot glue on the leaves, but it sort of cooked them. So when I glued leaves to the wand, tiara, and wings, I used Fabri-Tac and it worked super well.
Next I’ll show you how to make the fairy crown, belt, and arm cuff out of vines. The belt is functional because will help stabilize the wings at the base, but the fairy crown and arm cuff are just design details. After all, every forest fairy needs to be a little over the top!
How to Make the Arm Cuff

(Hey look, I painted my thumb copper, too!)
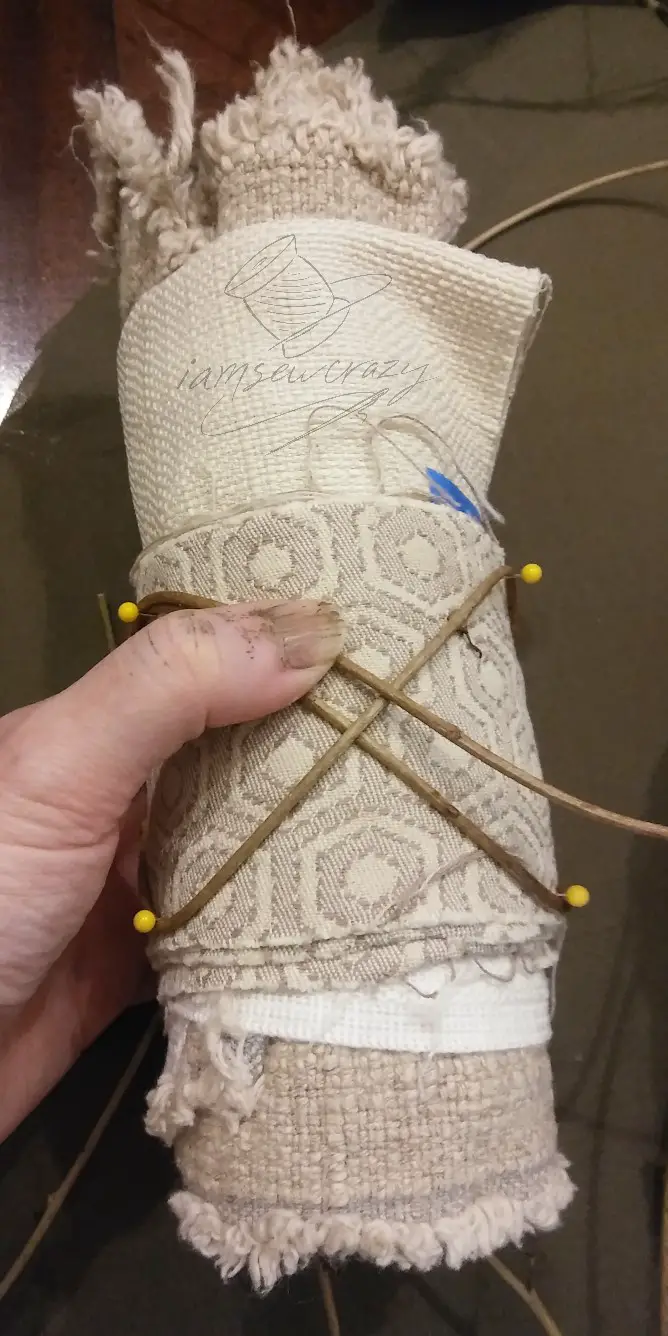
For the arm cuff, I used painter’s tape and fabric to make a form that is basically a fake arm. (Another one of my painter’s tape hacks!) It’s just a roll of upholstery fabric that I can stick pins into and shape the vines around. (Make sure that the fake arm is as large as the real arm of whomever is going to be wearing the fairy costume.)


I started by inserting a gridwork of pins into the form. Then I wrapped a really long vine around in an up-and-down wave pattern, anchoring it on the pins. When I got back to the beginning, I started weaving the vine in and out to lock everything together as I came to the vines I’d already wrapped. I kept going in an over-under-over-under pattern as I wrapped around the entire form in an up-and-down wave. I set the fake arm aside to let the vines dry out, and then I had a fabulous arm cuff that’s fit for a fairy!
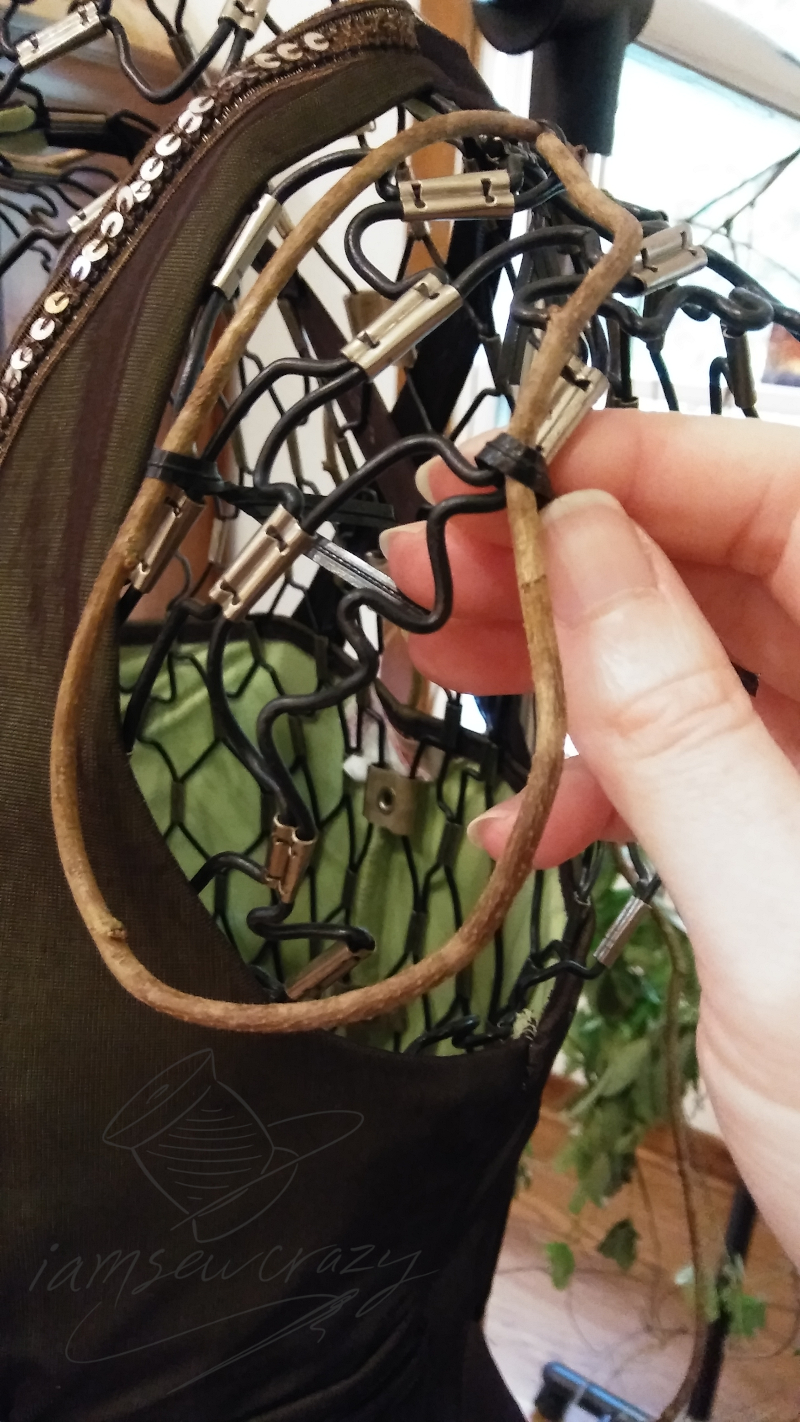
How to Make the Fairy Crown

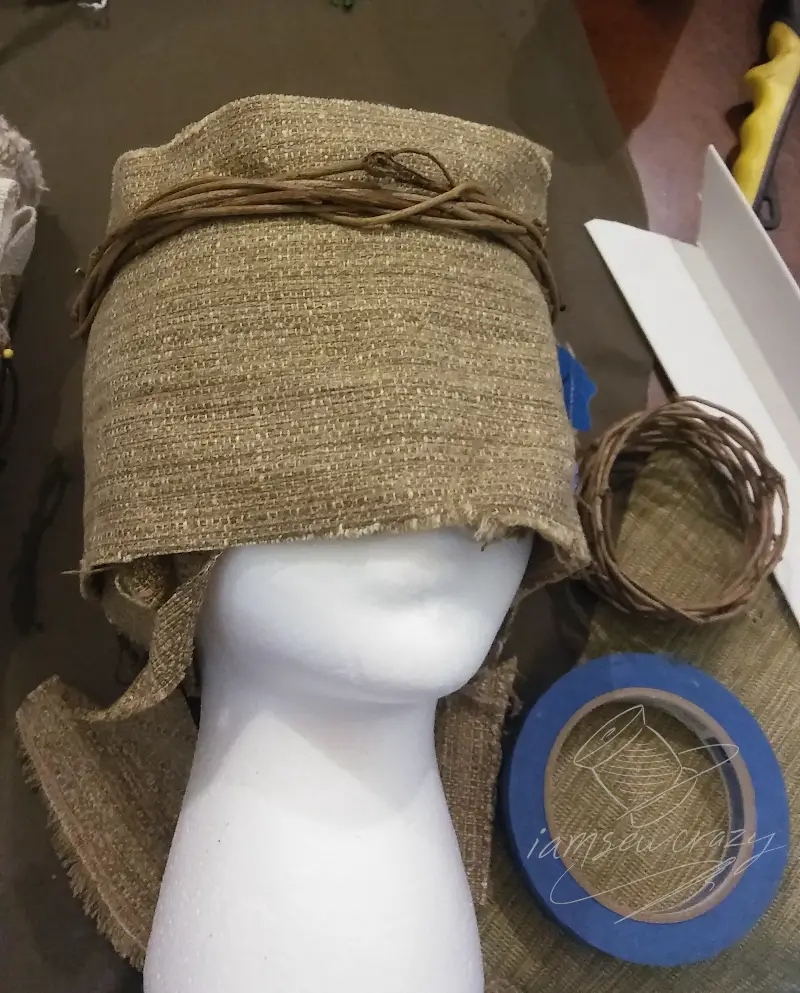
Here’s how to make the fairy crown: I used a fake head as a form and wrapped it with some scraps of upholstery fabric to create a more stable work surface that the vines could sink into. I started with a head-sized loop that formed the base of the crown, and then added some height as I wove more vines around, looping them and adding little swoops wherever they looked good, to fill in my design.


I let the vines dry, and then took the tiara off of the form. Remember the leaves I painted copper earlier? I glued a few of those onto the crown with Fabri-Tac, to create some metallic accents on the front.
How to Make the Belt
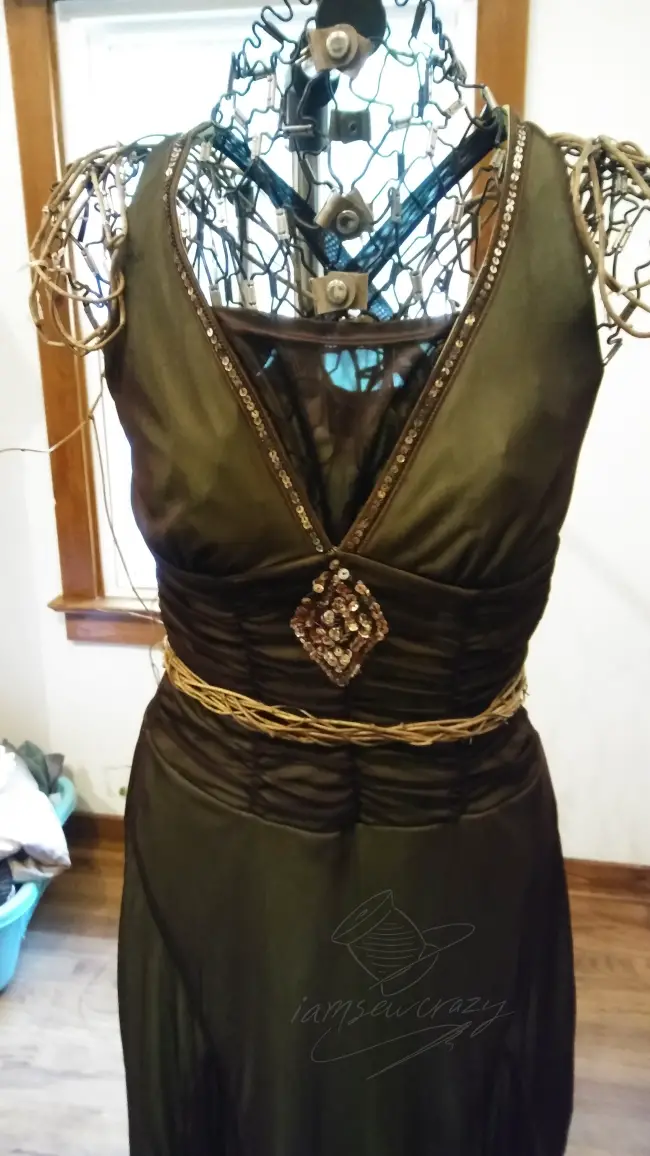
Now for the belt! This was the easiest piece in the whole ensemble, it’s just vines formed into a curved rope, with loops at the ends. You can start with a handful of vines, and just wrap them around each other like a messy rope/braid hybrid. When you make the two loops on the ends, weave the vines back around and into the belt so they don’t all end in the same place.

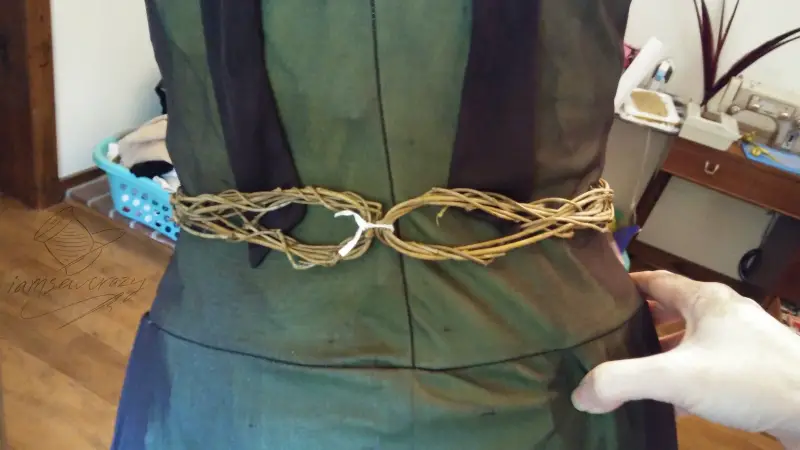
The wings will be attached to the belt by tying a ribbon through the loops in the back, to further stabilize the wings at the base. For now, I’m holding the belt in place with a twist tie until the vines have dried.

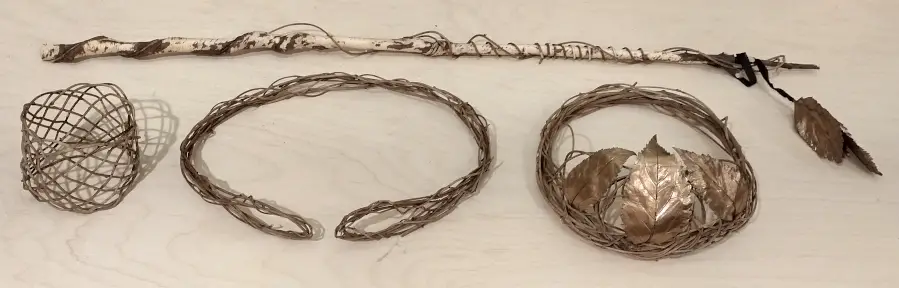
Here are the accessories, all ready and fit for a fairy!
How to Make the Fairy Wings
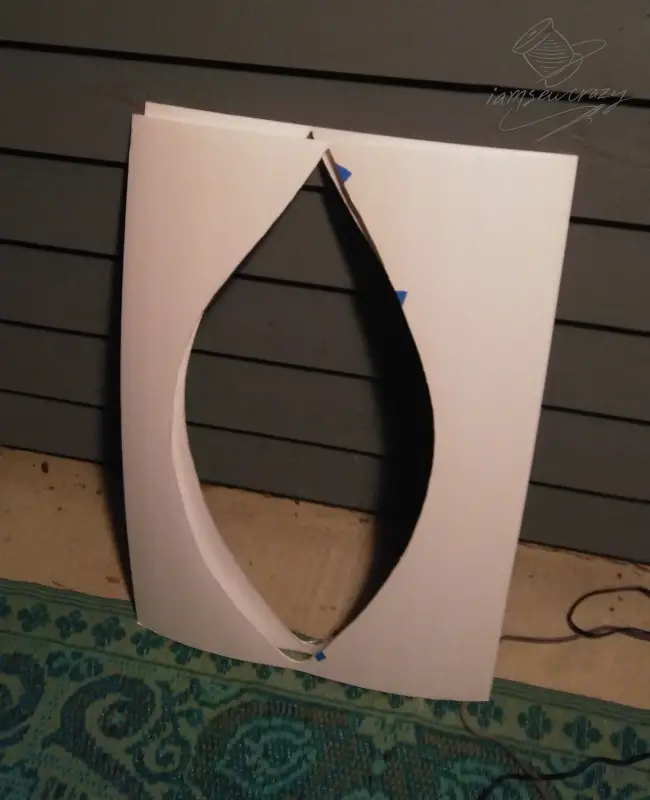
Now, to make the fairy wings! I used two pieces of 20″ by 30″ foam core board. Foam core is a thin sheet of sturdy foam that’s covered with paper on both sides, and it’s really cheap, lightweight, and easy to work with. I love it when you all support my site by using my affiliate links, but you can probably find the foam boards cheaper at your local dollar store. (That’s where I got mine!) So check there first to see if you can get a better price, and here’s a link to buy the foam core on Amazon if you can’t find them locally.
First, I peeled the paper off of one side of each sheet of foam core. Then, I drew a basic leaf shape on the side that still had the paper on it. I scored through the paper along the lines I drew, using an X-acto knife. I peeled just the leaf shape of paper off, so that I had a board with no paper on one side, and the outline of a leaf in paper on the other side. Then I took the leaf-shaped paper that I peeled off of the first board, and used it as a guide to score the same shape out of the paper on the other sheet. Then, I peeled the new leaf shape of paper off.
So, I ended up with two pieces of foam core, each with no paper on one side, and piece of paper on the other side that formed the outline of a huge leaf.

Then I took a hot soldering iron (outside, on my screened porch, with a fan going for extra ventilation because the fumes from melting foam are pretty rank) and ran it along the edge of the paper to easily cut two duplicate leaf shapes out of the foam.
The heat melts the edges of the foam as it cuts through, resulting in a stronger edge and a clean finish with no tiny pieces of foam flying around everywhere. The soldering iron won’t cut through the paper, so the edge of the paper worked as a guide to keep my cuts on track. If you don’t have a soldering iron, you can get a hot knife instead. They work great, and fumes are the only downside, so remember to take it outside and grab a strong fan to assist with ventilation.
I did this part at night, and I didn’t take pictures of every step, but hopefully I explained it well enough for you to follow along.

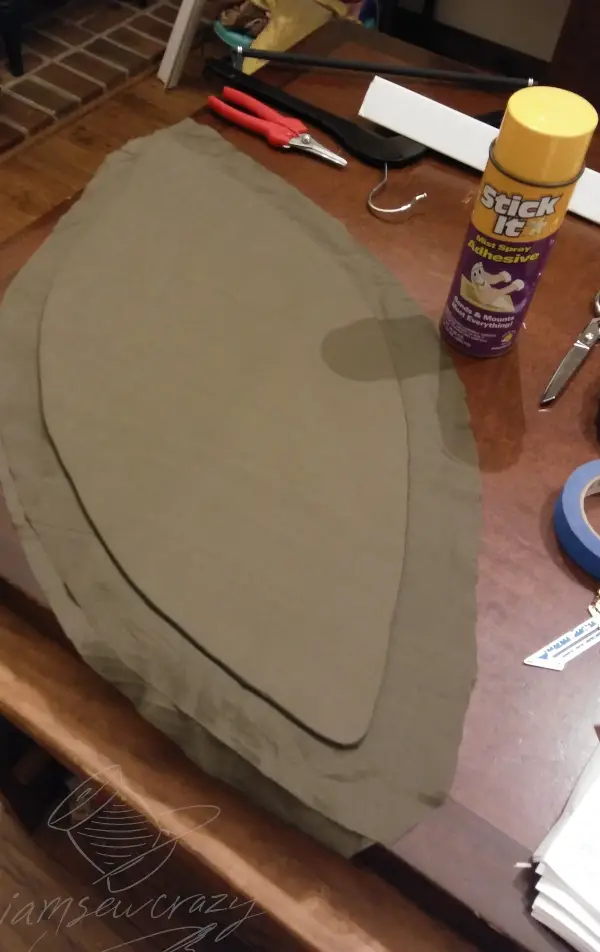
Next I wrapped the leaf-shaped foam wings in dark green fabric. The fabric serves two purposes: first, to give the leaves something to grab on to as I glue them. And second, to color the wings from stark white to green so that in case some of the background peeks through between leaves, it won’t be noticeable. I used a spray adhesive to attach the fabric, and it worked great. I wrapped one side at a time, folding a small amount to the other side so that the edges would be covered completely. You can cut slits in the excess fabric that you’re wrapping to the other side, so that it lies flat against the wings without wrinkling.


While I was covering the fairy wings in fabric, I did a dry-fit (just laying the leaves on top of the wings without any glue) to see if I needed to pick more leaves, and to decide how much I wanted to overlap them. I was really liking the design so far, but it did take a lot of leaves (about 350!) so I went out and picked more, submerging them in the glycerine to make sure I’d have enough to cover both sides of the two wings.

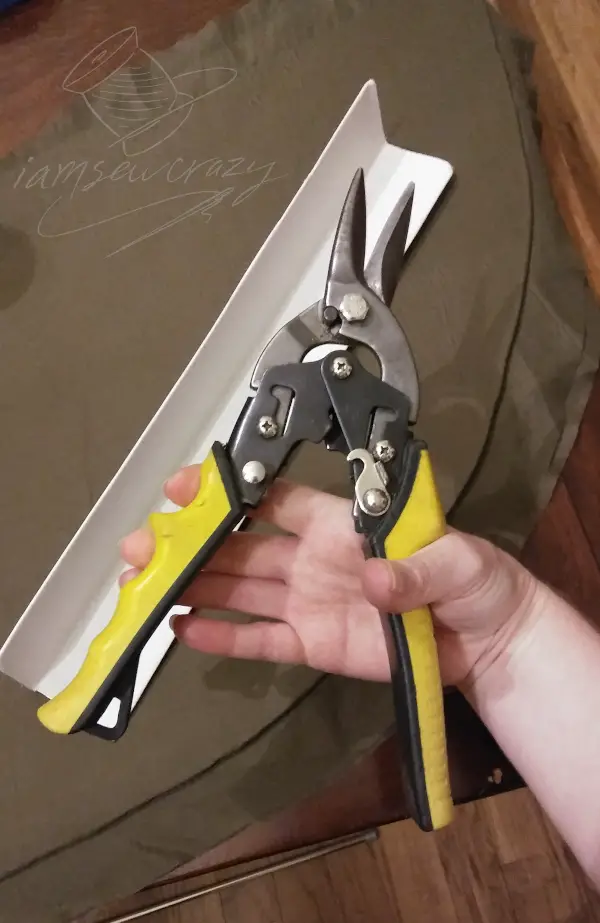
The two fairy wings were attached to each other by joining them to a piece of angled cardboard packing material. You know, the really thick stuff that reinforces the inside edges of heavy shipping boxes? I cut it to length by using a pair of aviation snips. They’re sturdy snips that are made for cutting metal, so they cut through the thick cardboard material with no problem.
I covered the cardboard right-angle with the same dark green fabric, to make it blend with the rest of the wings. Then, I used a generous amount of hot glue to attach the fabric-covered foam leaves to the fabric-covered cardboard.
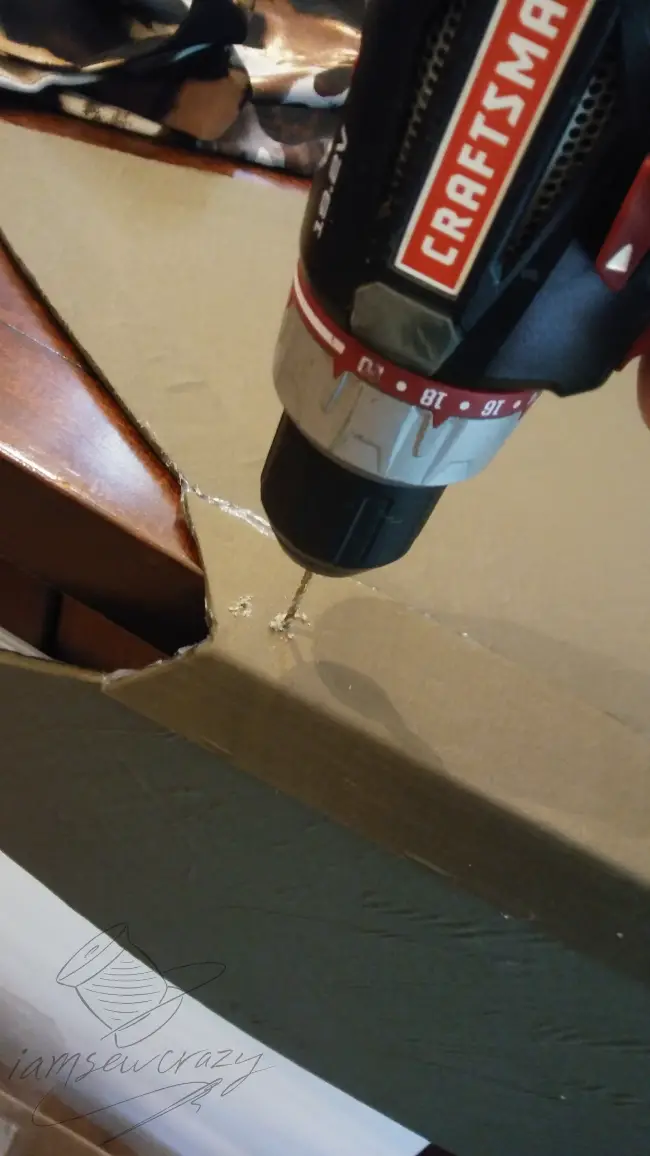
When the wings were attached together, I drilled holes through the cardboard piece in two rows. One row of nine holes on each side, with the holes on each side lining up with each other. These holes are going to have ribbon threaded through them so that I can attach the wing unit to the vine shoulder harness.
I added four more holes near the base of the wings. These holes will have another ribbon threaded through them, and the ends will be tied through the loops on the back of the vine belt. The belt carries some of the weight of the wings, and adds stability.
Then, I glued the leaves onto the fairy wings with Fabri-Tac, starting at the bottom and making rows straight across as I went up. I drew a line of glue on the center of the back of each leaf as I placed it, from the stem end to about halfway down the leaf. I didn’t want the entire back side of the leaf to be stuck down, because having the edges and tip of each leaf free created shadow lines that enhanced the individual leaf shapes, making them stand out and highlighting the feathered layers. The leaves are really light, so that was all the glue that was necessary to keep them in place.
How to Attach the Fairy Wings

I threaded short lengths of brown ribbon through the holes that I drilled, using a large-eyed tapestry needle to pull the ribbon through.
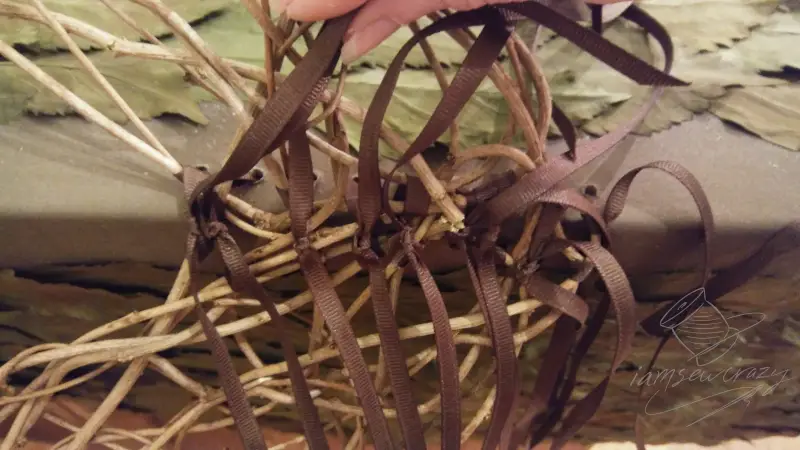
Then I pulled the ribbon ends through the center of the shoulder harness, working them through the spaces in between vines. Since the vines are irregular, I needed to find the best spots for the ribbons to lie across the vines. Then I tied the ribbons tight, to hold the wings securely onto the harness. The ends of the ribbons will trail down at the base of the wings, to add another design detail and some fluttery movement as the fairy walks.

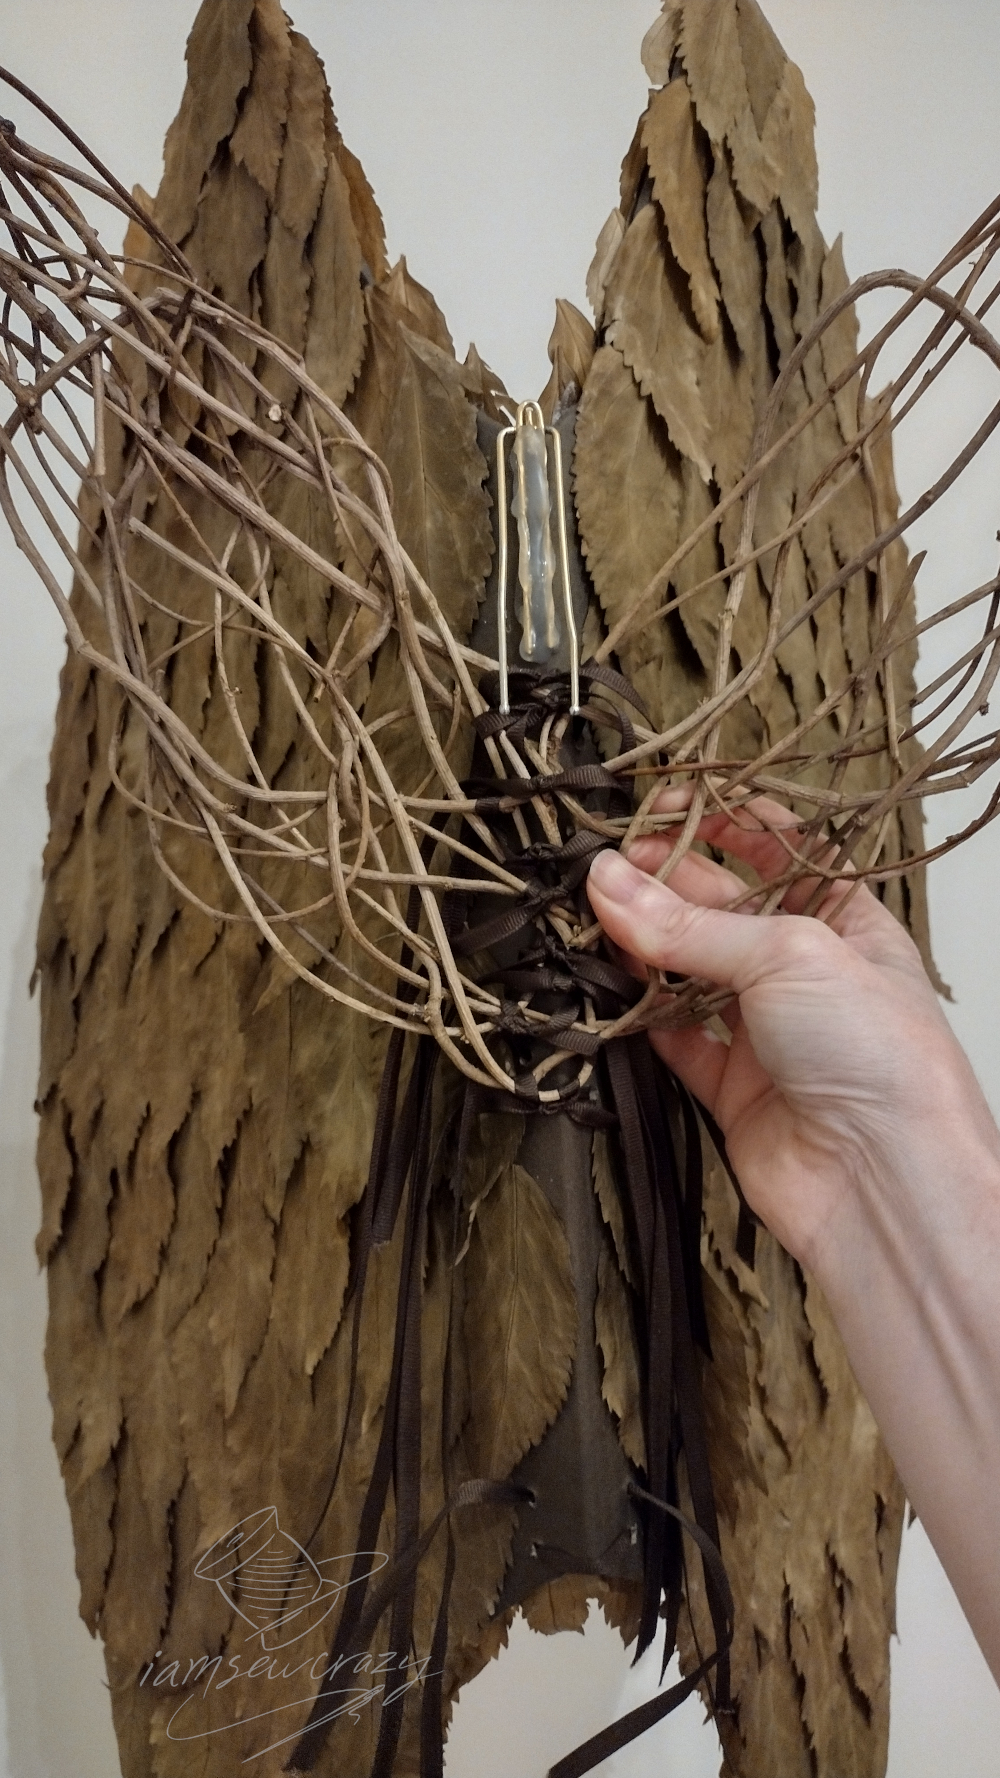
The last thing left was to hot glue a metal curtain hook on to the back of the wings, right at the top of the center piece of cardboard. I bent the ends of the curtain hook towards the wings a little bit, to make sure they wouldn’t poke whomever was wearing it.
When you put on the costume, the curtain hook slides down behind the straps of the dress, right where they crisscross in the back. Then, the short ribbon at the bottom of the wings gets knotted through the loops in the belt. There are two sets of holes for the short ribbon, so it will adjust a little bit to fairies of different heights.

That’s it! Now you can pick out some finishing touches that fit your style. I think the fairy costume looks good with boots, sandals, or even barefoot.

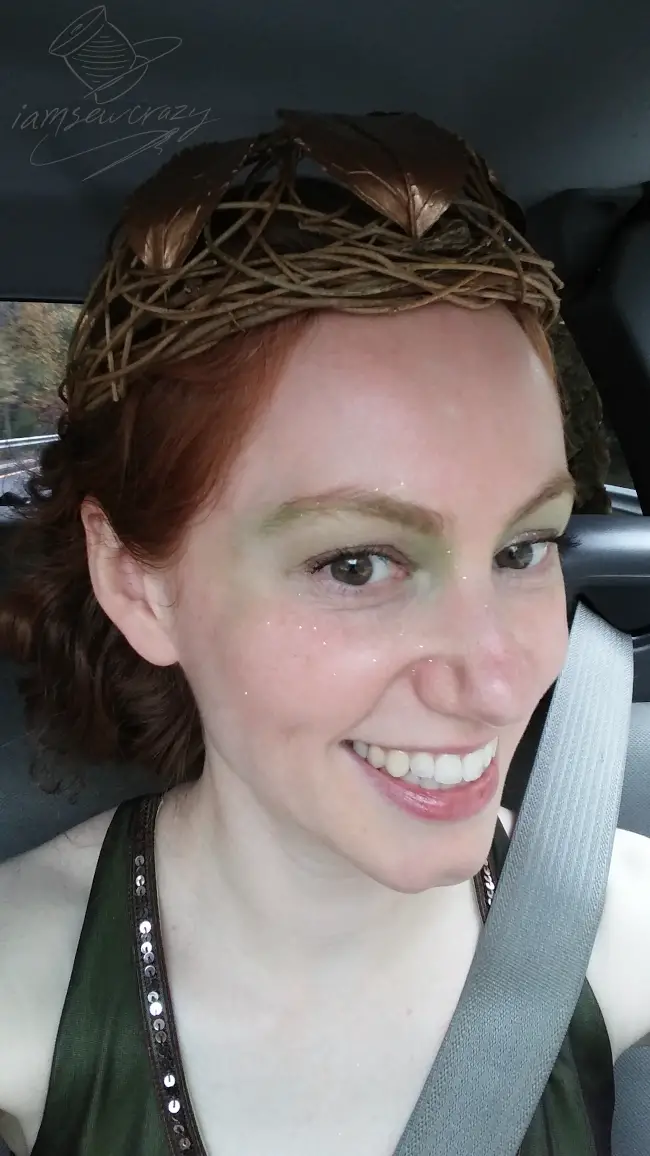
And it’s a great opportunity to get creative with your makeup! A dramatic green eyeshadow and sparkly blush go a long way towards completing the look. Here’s how I did my makeup for a Halloween event: the green eyeshadow extended out towards my hairline beside my eyes, for an overstated effect. I added cosmetic glitter, some lip gloss, and of course mascara. I was all set to turn someone into a frog!


Now you know how to make a forest fairy costume! I hope you use some of my methods to bring your own creation to life.


You are awesome and I knew you way back when. You so talented at a young age. I love your work.
Thank you so much! I love you guys, and I appreciate your support! 💕